Stop Guessing, Start Sealing: A Step-by-Step Framework for Durable, Physics-Based Flashing Installation on Roofs, Walls, and Openings
Water intrusion at building junctions silently compromises structural integrity, indoor air quality, and long-term value. This guide delivers a unified, science-grounded system for selecting, installing, and verifying flashing at every vulnerable interface—from valleys and chimneys to windows and deck ledgers. Move beyond fragmented tips to a cohesive strategy that respects water behavior, material science, and real-world constraints. Whether you’re a tradesperson refining technique, a homeowner evaluating repairs, or a design professional specifying details, this resource equips you to build confidence—not just barriers.
Introduction
Every building envelope contains intentional and unavoidable transitions: where roof meets wall, chimney pierces slope, window interrupts cladding, or deck attaches to structure. These junctions are not flaws—they are functional necessities. Yet without deliberate moisture management, they become pathways for water. Consequences unfold gradually: hidden rot in framing, mold within wall cavities, degraded insulation performance, and eventual structural compromise.
Flashing is not merely “metal over a seam.” It is a purposeful component of a layered defense system, engineered to work with physics—not against it. It acknowledges water’s relentless behavior: gravity-driven flow, capillary action, wind pressure, and thermal movement. Modern building science, reflected in standards like the International Residential Code (IRC), ASTM material specifications, and decades of forensic analysis, confirms that effective flashing integrates seamlessly with adjacent layers to create predictable drainage paths. This guide synthesizes those principles into an actionable framework. We begin not with tools or materials, but with a foundational mental model that transforms complexity into clarity.
The Three-Layer Defense Framework: Building Redundancy, Not Reliance
Before examining specific details, adopt this unifying lens. No single component is infallible. True resilience emerges from layered, interdependent defenses. This framework—widely endorsed in contemporary building envelope practice—ensures that if one layer is stressed, others maintain protection.
Layer 1: The Primary Barrier – Shedding the Bulk
This is the visible exterior surface: asphalt shingles, metal panels, siding, brick veneer, or stucco. Its role is to shed the majority of precipitation away from the structure. Crucially, it is water-shedding, not waterproof. Wind-driven rain, ice damming, or capillary rise can bypass it. Therefore, installation must follow gravity: overlapping courses downward (like shingles), drip edges at terminations, and attention to directional flow.
Why it matters: A poorly installed primary barrier overloads underlying layers. For instance, siding lapped upward at a corner creates a direct channel for moisture behind the cladding.
Common pitfall: Assuming cladding alone prevents leaks. It cannot. Its effectiveness is amplified only when integrated with Layers 2 and 3.
Practical insight: During installation, periodically step back and visualize water flow. Does each overlap guide moisture downward and outward? If not, adjust before proceeding.
Layer 2: The Secondary Barrier – Intercepting the Inevitable
This is the dedicated flashing system: step flashing at chimneys, pan flashing under windows, valley liners, kick-out details. Positioned beneath the primary barrier, it catches moisture that penetrates Layer 1 and redirects it outward. The non-negotiable rule: lap shingle-style. Upper components must overlap lower ones to harness gravity. Water moves down; your flashing must guide it down and out—never inward or upward.
Why it matters: This layer handles the moisture that will bypass Layer 1 during severe weather, freeze-thaw cycles, or debris accumulation. It is the workhorse of leak prevention.
Critical nuance: “One-size-fits-all” fails here. A low-slope roof in a high-wind coastal zone demands different detailing than a steep roof in an arid climate. Context dictates design.
Material note: Flashing must accommodate movement. Rigid, continuous pieces at dynamic junctions (like roof-wall transitions) often fail where segmented, overlapping pieces succeed.
Layer 3: The Drainage Plane & Air Gap – Enabling Drying
Beneath flashing lies the drainage plane—typically a weather-resistant barrier (WRB) like housewrap or fluid-applied membrane—paired with an intentional air gap (via furring strips, drainage mats, or cavity design). This layer provides an escape route for residual moisture and promotes drying. Ventilation within the gap accelerates evaporation, reducing the risk of prolonged dampness.
Why it matters: Even perfect flashing experiences minor moisture intrusion from condensation or installation tolerances. Layer 3 ensures this moisture doesn’t linger. Field observations consistently show assemblies with functional drainage planes resist deterioration significantly longer than sealed cavities.
Common error: Blocking the drainage path. Sealing the bottom edge of WRB to the foundation, or omitting weep holes in sill pans, traps moisture. Always preserve an exit route.
Systemic link: Layer 3 connects to broader building science principles: interior vapor control, attic ventilation, and cladding choice. A holistic approach prevents unintended consequences.
The Fundamental Principle: Flashing does not stop water; it manages water. Its purpose is to provide a predictable, gravity-driven path for moisture to exit the assembly—never to trap it inside.
This framework applies universally. Every detail explored next—valleys, chimneys, windows—must be evaluated through these three layers. Now, let’s translate theory into practice at the most critical junctions.
Roof Valleys: Channeling High-Volume Flow
Valleys concentrate runoff, debris, and weather stress. A flawed detail doesn’t merely leak; it funnels water directly toward vulnerable sheathing. Three primary approaches exist, each with distinct applications.
Assessing Your Valley Context First
Before selecting a method, consider:
– Roof pitch: Steep slopes (>6:12) handle runoff more efficiently than low slopes (<4:12).
– Climate: Heavy snow, ice damming risk, wind-driven rain frequency, or debris load (e.g., pine needles).
– Roofing material: Compatibility with valley flashing (e.g., slate requires custom copper; architectural shingles pair well with preformed metal).
– Valley width: Narrow valleys (<12″) increase water velocity; wider valleys (>18″) collect more debris.
Decision guide:
– Low slope + high debris/snow? → Prioritize metal-lined valley with robust underlayment.
– Steep slope + minimal debris + aesthetic preference? → Woven valley may be acceptable (with caveats below).
– Historic structure with material authenticity requirements? → Consult preservation guidelines; custom metal often required.
Method 1: Woven Valley (Use with Caution)
Shingle courses from opposing roof planes are interlaced across the valley center.
Installation essentials:
1. Apply a minimum 36-inch-wide strip of self-adhering ice and water shield underlayment centered over the valley board, extending 18 inches up each slope. In cold climates, verify membrane flexibility at expected installation temperatures.
2. Begin shingling the side least exposed to prevailing winds. Extend the first course ~12 inches into the valley.
3. Weave subsequent courses from the opposite side over the previous course. Maintain consistent exposure (typically 5–6 inches at the valley edge).
4. Use a straightedge and chalk line to trim excess shingle material cleanly 1.5–2 inches from the valley center.
When it might suffice: Very steep pitches (≥8:12) in dry climates with minimal debris.
Significant limitations:
– Creates thick asphalt buildup that traps heat, accelerating shingle aging.
– Debris accumulates in the weave, holding moisture against shingles.
– Difficult to repair; replacing one shingle disrupts multiple courses.
– Not recommended for slopes under 6:12, high-wind zones, or regions with frequent heavy rain. Most building codes require metal valleys for slopes under 4:12.
Adaptive tip: If used, install a perforated valley guard over underlayment to reduce debris—but recognize this is a compromise, not a solution.
Method 2: Closed-Cut Valley
Shingles from one roof plane extend across the valley; the opposing plane’s shingles are cut back to form a straight line.
Installation essentials:
1. Install ice and water shield underlayment identically to woven valley method.
2. Complete shingling on one side of the valley, extending courses ~12 inches across the centerline.
3. Snap a precise chalk line 1.5–2 inches from the valley center on the shingled side. Trim shingles cleanly along this line.
4. Shingle the opposite side, aligning courses precisely against the cut edge. Apply minimal roofing cement under cut edges only for wind resistance—avoid creating a dam.
Potential advantage: Cleaner visual line; preferred in some architectural styles.
Critical vulnerabilities:
– Cut shingle edges are prone to lifting in high winds.
– Wind-driven rain can infiltrate behind the cut edge, especially if alignment is imperfect.
– Still susceptible to debris accumulation. Generally not recommended for low slopes, high-wind areas, or high-rainfall regions.
Temporary fix: For failing closed-cut valleys, a retrofit metal strip can be installed over existing shingles as an interim measure—but full replacement is the durable solution.
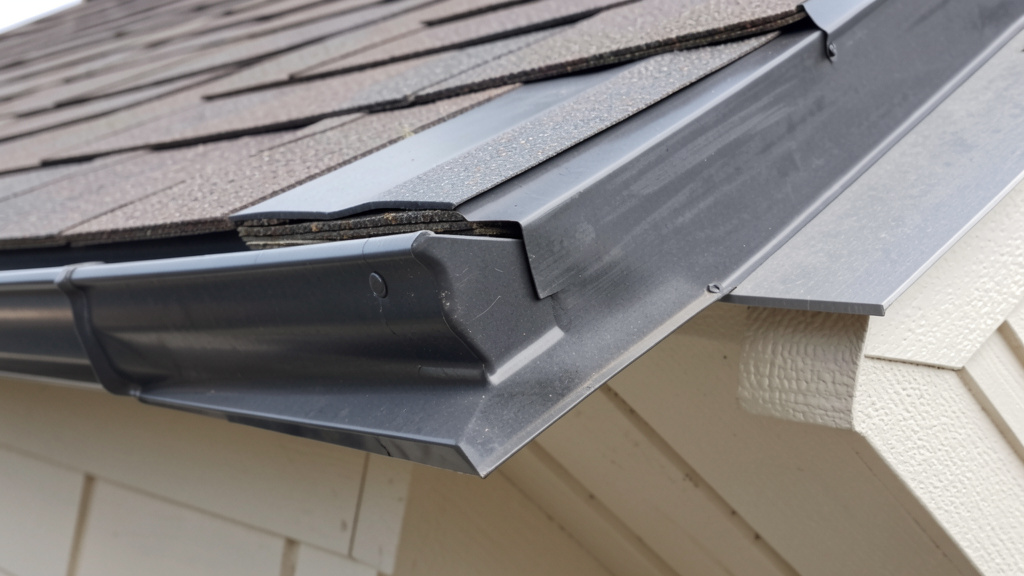
Method 3: Metal-Lined Valley (Recommended Standard)
A continuous or segmented metal channel creates a smooth, dedicated path for water and debris.
Installation essentials:
1. Substrate prep: Install straight, rigid valley boards (pressure-treated 1×4 or 2×4) secured every 16 inches. A slight crown (1/8″ rise at center) encourages water toward edges and prevents oil-canning.
2. Underlayment is critical: Apply two layers of ice and water shield. First layer centered; second offset by 6 inches. Extend minimum 36 inches up each slope (48+ inches in snow-prone regions). This is non-optional. The metal is the visible component; the underlayment is the true waterproofing layer.
3. Flashing selection & install:
– Preformed: Aluminum, copper, or stainless steel rolls with hemmed edges and a center rib (≥1/2″ high for stiffness). Easier for most installers.
– Site-built: Form a “W” profile with 8–10″ legs using a brake. Copper (16 oz) or steel (26-gauge min).
– Secure only along outer edges (1″ from edge, 12″ spacing). Never nail through the center channel—this creates dams and leak paths. For valleys >15′, use expansion clips every 8 feet.
4. Integration: Stop shingle courses 1.5–2 inches short of the metal edge. Overlap shingles onto the metal by 6–8 inches. Gently bend shingle tabs upward at the metal edge to encourage water flow onto the flashing.
Why it excels:
– Efficiently sheds water and debris—critical in forested or high-rainfall areas.
– Durable against UV, foot traffic, and weathering.
– Compatible with all slopes and climates when paired with appropriate underlayment.
– Simplifies inspection and maintenance (debris can be brushed out annually).
Material considerations:
– Copper: Long-lasting, flexible, develops protective patina. Ideal for freeze-thaw zones. Runoff may stain light surfaces; consider a sacrificial zinc strip above.
– Stainless Steel (316): Superior corrosion resistance for coastal/salt-air environments.
– Aluminum: Lightweight and cost-effective inland. Avoid contact with pressure-treated wood or mortar (risk of corrosion); isolate with butyl tape if necessary.
– Galvanized Steel: Budget option for dry inland climates. Verify heavy zinc coating (G-90); expect shorter lifespan in humid or acidic rain regions.
Termination detail: At the valley’s bottom end, install a kick-out flashing to divert water into the gutter. Without it, water tracks down the fascia, causing rot.
Illustrative scenario: A home in a region with frequent wind-driven rain experienced chronic valley leaks with a woven detail. Replacement included: removing compromised sheathing, installing triple-layer underlayment extending 48 inches up each slope, and fitting a custom stainless steel valley with a pronounced rib and integrated kick-outs. Five years later, the detail remains fully functional through multiple severe storms. The investment in robust detailing prevented recurring damage and costly interior repairs.
Chimneys and Roof Penetrations: Managing Mass and Movement
Chimneys introduce complexity: significant mass, thermal expansion/contraction cycles, multiple planes, and potential for water pooling. A single-piece flashing solution cannot accommodate these dynamics. Redundancy and movement tolerance are essential.
Why Layered Flashing is Non-Negotiable
A proper chimney flashing system comprises interdependent components:
– Base Flashing (Step Flashing): Individual L-shaped pieces integrated with each roofing course. Each piece overlaps the one below, allowing independent movement with roof deck expansion and chimney thermal shifts.
– Counterflashing: Segmented pieces embedded into a reglet (groove) cut into the chimney mortar joint, folded down over the base flashing. Crucially, it should not be sealed to the base flashing with caulk. This “dead caulking” trap is a frequent failure point. The mechanical lap provides the barrier; sealant belongs only in the reglet.
– Cricket (Saddle): A small peaked structure on the uphill side of chimneys wider than 30 inches (per IRC R903.2). Diverts water around the chimney, preventing pooling. Required by most codes for wide chimneys.
– Back Pan: Installed beneath the cricket on the uphill side to catch any bypass moisture.
– Through-Wall Flashing: Embedded in mortar courses below the roof line on masonry chimneys to intercept migrating moisture.
Physics insight: Water seeks the path of least resistance. A continuous flashing piece creates one long seam—a single point of failure. Step flashing breaks this seam into many small, overlapping segments. If one segment is compromised (e.g., by a fastener hole), water is intercepted by the segment below. This redundancy is why step flashing is mandated for shingle roofs intersecting masonry.
Step-by-Step Installation Protocol
Preparation (Do not skip):
1. Inspect chimney mortar and crown. Repoint cracks >1/8″ wide using compatible mortar (Type N typical). Seal hairline crown cracks with masonry-compatible sealant. A leaking chimney undermines even perfect roof flashing.
2. Install ice and water shield around the entire chimney base, extending 18+ inches beyond the chimney on all sides. Overlap seams 6 inches. In cold climates, extend underlayment 24 inches up the chimney face beneath the counterflashing zone.
3. Probe roof deck around the chimney base. Replace any soft, spongy, or discolored sheathing. Address the root cause of prior moisture before proceeding.
Installing Step Flashing:
1. Begin at the downhill side bottom. Slide the first L-shaped piece (typically 5″x7″) under the shingle course above the chimney base. Vertical leg against chimney; horizontal leg extending ≥6 inches onto the roof deck.
2. Install the shingle course below, covering the horizontal leg. Do not nail through the flashing. It should be secured by the overlapping shingle above and friction. Nails create leak paths and restrict movement.
3. Progress upward: For each course, slide a new flashing piece under the shingle above, overlapping the previous flashing vertically by ≥2 inches. Install the shingle below to cover its horizontal leg.
4. At corners, use pre-bent corner pieces or carefully form two flashing pieces to meet at ~45 degrees. Avoid kinks or stretching.
5. Pro technique: Lightly number pieces during install for easier future reference if partial removal is needed.
Installing Counterflashing:
1. Cut a reglet: Using a masonry saw or angle grinder (with diamond blade, eye protection, and respirator), cut a 3/4″-deep groove into the mortar joint ~1 inch above the top of the step flashing. Clean thoroughly with wire brush and air.
2. Fabricate counterflashing segments (12–18″ long) from compatible metal. Vertical leg inserts 1/2″ into reglet; horizontal leg extends down to cover step flashing top edge by ≥1 inch.
3. Insert vertical leg into reglet. Seal the reglet with polyurethane sealant (flexible) or lead wool (traditional, durable). Fold horizontal leg down over step flashing. Do not seal the lap between counterflashing and step flashing. Movement must be allowed.
4. For framed walls (non-masonry): Counterflashing isn’t embedded. Instead, install a continuous flashing piece under the wall siding above the chimney, lapping over the step flashing. The siding acts as the counterflashing.
Integrating the Cricket (for chimneys >30″ wide):
1. Frame a small peaked structure on the uphill side, matching the main roof pitch.
2. Sheath with plywood, apply ice and water shield over the entire cricket surface.
3. Shingle the cricket, integrating its flashing with the main roof flashing and chimney step flashing. The cricket’s ridge flashing should lap under the chimney’s back counterflashing.
4. Install a back pan beneath the cricket (between cricket sheathing and main roof deck) to catch bypass moisture. It should lap over the main roof underlayment.
Material Guidance:
– Copper: Excellent longevity and flexibility. Ideal for masonry chimneys and freeze-thaw climates. Isolate from dissimilar metals.
– Stainless Steel (316): Best for coastal environments. Rigid; ensure precise forming.
– Galvanized Steel (G-90): Cost-effective inland. Expect gradual corrosion in humid climates.
– Avoid Aluminum on Masonry: Reacts with alkaline mortar, causing rapid corrosion. If unavoidable, isolate thoroughly with butyl tape—but copper or stainless is strongly preferred.
– Lead: Used in historic restoration by specialists. Requires safety precautions (toxic dust) and skill. Not recommended for general use.
Common Failure Patterns to Recognize:
– Leaks on the uphill side of wide chimneys: Cricket omitted, causing water pooling.
– Leaks at counterflashing lap: Caulk used between counterflashing and step flashing; caulk failed due to UV/thermal cycling.
– Corner leaks: Continuous flashing used instead of step flashing; differential movement caused cracks.
– Corrosion at metal junctions: Dissimilar metals in contact without isolation (e.g., aluminum flashing against copper cricket).
Professional insight: When inspecting existing chimneys, look for staining patterns on the roof below. They often reveal the exact point of failure (e.g., staining concentrated at the uphill corner suggests cricket omission).
Windows and Doors: Protecting the Weakest Link
Windows and doors are intentional breaches in the envelope. Their flashing is arguably the most critical—and commonly misexecuted—detail in wall assemblies. A leak here can rot rough framing, compromise headers, and create hidden mold reservoirs. Remember: the window unit itself is not the waterproofing layer; the flashing system around it is.
The Four-Sided Sequence: Gravity Dictates Order
Flashing must follow this irreversible sequence: Bottom → Sides → Top → Integration. Reverse the order, and you create a bucket.
Step 1: Sill Pan – The Foundation
Catches moisture penetrating the window unit or seals and directs it outward. Industry analysis consistently identifies missing or improperly installed sill pans as a leading cause of window leaks.
Installation (Preformed Pan – Recommended):
1. Install pan before setting the window. It must extend up the rough opening jambs ≥2 inches (“ears” or “returns”).
2. Verify a slight outward slope (¼” per foot). Preformed pans often include this; confirm with a level. For site-built pans (peel-and-stick membrane), shim the back edge slightly higher.
3. Integrate with the WRB below: The WRB should lap over the front edge of the pan, but the pan’s end dams (side barriers) must remain exposed to allow drainage. Never seal the end dams.
4. Optional enhancement: Install small plastic weep screeds at the pan’s front edge if compatible with your cladding (e.g., stucco, fiber cement).
Installation (Site-Built Pan):
1. Apply sealant bead to rough sill.
2. Lay peel-and-stick membrane (≥12″ wide) over sill, extending ≥2″ up each jamb.
3. Fold membrane up jambs to form “ears.” Create end dams by folding membrane back on itself at jambs (forming a “U”).
4. Verify outward slope. Smooth seams firmly.
Why preformed often wins: Guarantees correct slope and end dams. Site-built requires meticulous attention to avoid flat spots (which pool water) or sealed dams (which trap it).
Step 2: Jamb Flashing – Creating the Chute
Directs moisture down the sides and into the sill pan.
Installation:
1. Apply flexible flashing tape (butyl, acrylic, or modified bitumen) to jambs, starting at the bottom. Overlap tape onto the sill pan’s vertical returns by ≥1 inch.
2. Alternatively, use preformed jamb flashing with integrated end dams. Slide behind window flange, over sill pan ears. Extend ≥2 inches above the window head for head flashing integration.
3. Seal the top edge of jamb flashing to the sheathing with compatible tape.
Critical check: Ensure jamb flashing does not block the sill pan’s drainage path. End dams must remain clear. Avoid wrinkles in tape—they create bypass channels.
Step 3: Head Flashing – The Final Defense
Intercepts water running down the wall above and diverts it over the window unit.
Installation (Rigid Z-Flashing – Preferred):
1. Install after window is set plumb/level and fastened, but before siding above is installed.
2. Slide top leg under the WRB (or siding course) above the opening. Middle leg covers the window head flange. Bottom leg (drip edge) projects ≥¼” beyond the window frame.
3. Seal the top edge where it meets the WRB with compatible tape—not caulk.
Installation (Flexible Tape Alternative):
1. Apply tape over the top flange, extending ≥2″ onto the window frame and ≥6″ up the wall under the WRB.
2. Seal top edge to WRB with tape.
Why rigid often wins: Maintains drip edge profile over time. Flexible tape can sag in heat, reducing effectiveness. Critical in high-rainfall or coastal zones.
Step 4: Integration & Verification
Seal the assembly into the continuous drainage plane.
Steps:
1. Seal window flanges to sheathing with compatible sealant (polyurethane typical; avoid silicone unless specified by manufacturer).
2. Apply WRB tape over flange seams, lapping onto the main WRB by ≥2 inches.
3. Install WRB above the window, lapping over the head flashing’s top leg.
4. Install siding above, lapping over the WRB.
Verification step (Highly Recommended): Before closing walls, perform a water test. Spray the window head and sides steadily with a garden hose for 3–5 minutes. Inspect the rough opening interior (with a flashlight) for moisture. Address any intrusion immediately.
Material Compatibility Notes:
– Flashing Tapes: Butyl offers strong adhesion in cold temps; acrylic provides UV resistance for exposed applications; modified bitumen is flexible and self-sealing. Choose based on climate and exposure.
– Preformed Pans: PVC, galvanized steel, or composite. Ensure compatibility with window material (e.g., avoid steel pans with aluminum windows due to galvanic risk).
– Sealants: Polyurethane is versatile and flexible. Silicone adheres poorly to many WRBs—use only if explicitly approved. Never use asphalt-based sealants (e.g., roofing cement) with PVC window components.
– Critical Reminder: Keep window weep holes (typically at the bottom of the frame) clear. Sealing them traps condensation inside the frame.
Illustrative scenario: A homeowner meticulously caulked all window seams during installation, believing this ensured waterproofing. Within two years, mold appeared on interior walls below windows. Inspection revealed: no sill pans, head flashing installed over the housewrap (not under it), and caulked weep holes. During wind-driven rain, water entered behind the housewrap at the head, ran down the cavity, and pooled at the unflashed rough sill. Repair required wall disassembly, framing replacement, and proper four-sided flashing installation. The lesson: Caulk is a temporary sealant; flashing is a permanent drainage system. Sequence and integration trump cosmetic sealing.
Wall Transitions: Roof-to-Wall Junctions
Where a sloped roof meets a vertical wall (e.g., gable end), water flowing down the roof can be driven by wind up behind cladding or flashing. This detail demands precise integration of roof and wall drainage planes.
Step Flashing vs. Continuous Flashing: Making the Right Choice
- Step Flashing: Required where the roof slopes into the wall (e.g., downhill side of a gable end meeting a perpendicular wall). Individual L-shaped pieces are installed with each roofing course, lapping shingle-style up the wall. This is the standard for asphalt shingle, wood shake, or slate roofs.
- Continuous Flashing (Apron Flashing): A single metal piece. Acceptable only where:
- The roof slopes away from the wall (e.g., front face of a dormer),
- The roof covering is continuous (standing seam metal, interlocking tile),
- Or the wall is entirely above the roof plane (parapet).
Golden Rule: For roofs with overlapping courses (shingles, shakes, slate), step flashing is almost always required at vertical intersections. Continuous flashing on these roofs creates a single point of failure vulnerable to movement and wind-driven rain.
Installing Step Flashing at a Sidewall
- Prepare the wall: Remove siding 12–18 inches above the roof line. Verify WRB integrity. Apply a bead of sealant at the roof-wall junction on the sheathing (secondary seal only).
- Start low: Install the first step flashing piece under the lowest roofing course meeting the wall. Vertical leg extends 4–6 inches up the sheathing. Cover horizontal leg with the first shingle course.
- Progress upward: For each subsequent roofing course:
- Slide a new flashing piece under the shingle above.
- Overlap the previous flashing vertically by ≥2 inches.
- Cover the horizontal leg with the shingle below.
- Pro tip: Gently bend the top outer corner of each flashing piece outward to create a micro-drip edge, encouraging water away from the wall.
- Integrate with wall WRB: As you reach the top of the roof slope, the vertical legs of the step flashing must be covered by the wall’s WRB. The WRB laps over the flashing legs by ≥2 inches. Reinstall siding over the WRB.
- Counterflashing (Masonry walls): Embed segmented counterflashing into a reglet in the mortar, lapping over the step flashing. For framed walls with siding, the siding itself acts as counterflashing when properly lapped over the WRB.
- Kick-Out Flashing (Essential): At the bottom termination where step flashing meets the gutter or eave, install a small L-shaped kick-out flashing. This diverts water into the gutter, preventing tracking down the fascia and behind the gutter.
Why Step Flashing Prevails:
– Accommodates differential movement between roof (thermal expansion) and wall (wind load).
– Provides redundancy: failure in one piece is contained by the piece below.
– Aligns with IRC Section R903.2 requirements for shingle roofs.
– Field evidence from high-wind regions shows significantly fewer failures compared to continuous flashing at these transitions.
Continuous Flashing Pitfalls (When Misapplied):
– Thermal expansion/contraction causes buckling or separation at ends, especially on long runs.
– Corners are vulnerable points; water tracks around bends.
– No redundancy: one puncture or seam failure compromises the entire length.
– Rare exception: Very short transitions (<3 feet) on steep pitches (≥8:12) in dry climates might tolerate continuous flashing if kick-outs are installed at both ends and WRB integration is perfect. Step flashing remains the prudent choice.
Deck Ledger Boards: A Critical Safety Detail
Flashing a deck ledger board is not merely a moisture issue—it is a structural safety imperative. Water intrusion behind the ledger can rot the house’s rim joist, compromising the deck’s attachment and creating collapse risk. IRC Section R507.2.3 mandates specific flashing details for this reason. This is not a detail for improvisation.
Code-Compliant Installation Protocol
- Expose and inspect: Remove siding and WRB 6+ inches above and below the ledger location. Probe the rim joist thoroughly with an awl. If penetration exceeds ¼ inch, or wood is soft/discolored, do not proceed. Consult a structural professional for rim joist repair/replacement.
- Prepare the ledger: Apply a continuous bead of high-quality polyurethane sealant (not silicone) to the back face of the ledger where it contacts sheathing. This is a secondary seal.
- Attach ledger: Secure with through-bolts or lag screws per engineered specifications (typically ½” diameter, spaced per local code/engineering). Use corrosion-resistant fasteners (hot-dipped galvanized or stainless steel). Do not caulk top or bottom edges yet.
- Install Z-Flashing (Primary Defense):
- Slide the top leg of Z-flashing under the WRB and siding above the ledger.
- Middle leg covers the top edge of the ledger.
- Bottom leg (drip edge) projects ≥¼” beyond the ledger face.
- Secure the top leg only through the WRB (not into the ledger) using roofing nails. Flashing must move independently.
- Seal the top seam: After flashing is positioned, apply a bead of high-quality, paintable sealant between the Z-flashing and the top of the ledger. Tool the bead smoothly for adhesion.
- Bottom flashing: Install L-shaped flashing under the ledger’s bottom edge, lapping over the siding below. Alternatively, use a preformed ledger pan that wraps under and up the sides. Critical: This flashing must have open weep paths or holes at the bottom—never seal it shut.
- Reinstall cladding: Install siding below the ledger, lapping over the bottom flashing. Maintain a ≥1-inch gap between the bottom of the siding and the top of the deck boards for ventilation and to prevent water wicking.
- Verification: Spray the ledger area thoroughly with a hose for several minutes. Check for moisture behind the ledger (via inspection port if accessible). No water should appear.
Why Sequence Matters:
– Z-flashing above prevents water entry at the critical top edge.
– Bottom flashing provides an exit path for incidental moisture.
– Sealing the ledger before flashing would trap moisture. Flashing is the primary barrier; sealant is secondary.
– The ventilation gap promotes drying of any minor moisture accumulation.
Critical Warnings:
– Never attach ledger over siding or WRB. It must bear directly on structural sheathing. Trapped moisture accelerates hidden rot.
– Never use deck screws or nails alone for structural attachment. Through-bolts or lag screws into solid framing are mandatory.
– Material compatibility: Pressure-treated lumber (ACQ, CA) accelerates corrosion of standard steel. Use fasteners and flashing explicitly rated for ACQ contact (stainless steel, hot-dipped galvanized). Avoid aluminum flashing entirely with pressure-treated wood.
Professional insight: Many jurisdictions require permits and inspections for deck ledger installation. Consult your local building department. When in doubt about structural integrity or flashing details, engage a qualified professional. The minimal cost of verification is insignificant compared to the consequences of failure.
Skylights: Light Without Compromise
Skylights merge roof penetration and window assembly vulnerabilities. Curb-mounted units (with a raised frame) are significantly more forgiving to flash correctly than deck-mounted units and are strongly recommended, especially for less-experienced installers.
Flashing a Curb-Mounted Skylight
- Install the curb: Frame a box curb (per manufacturer specs, typically 2×6 or 2×8) directly on the roof deck. Flash the curb-to-deck joint with peel-and-stick membrane before setting the skylight unit.
- Underlayment sequence (Critical):
- Install ice and water shield up the roof slope, extending ≥12 inches above the top of the curb location.
- Install underlayment down the slope from the bottom of the skylight location, extending ≥12 inches below the curb.
- The curb bridges the gap between these sections. This ensures water flows over the lower underlayment, not behind it.
- Set the curb: Position level and plumb. Secure to deck. Seal curb-to-deck joint with roofing cement.
- Integrate flashing kit: Most units include step flashing kits. Install in sequence with shingling:
- Begin with bottom flashing piece. Install shingles up to the skylight base.
- Install side step flashing pieces as you shingle up the sides, lapping shingle-style (each piece under the shingle above, over the shingle below).
- Install top flashing (apron) last, sliding under shingles above and over the skylight head. Ensure drip edge projects beyond the curb.
- Sealant sparingly: Use manufacturer-provided sealant only at specified overlap points. Avoid excessive caulk, which can trap moisture. The mechanical lap is the primary seal.
- Kick-out flashings: Install small kick-outs at the bottom corners of the skylight to divert water away from the curb sides and into the main roof plane.
Deck-Mounted Caution: These require custom flashing around the entire perimeter and precise shingle integration. Unless you have advanced metalworking and roofing experience, choose a curb-mounted unit with a manufacturer flashing kit. The modest additional cost is justified by significantly reduced leak risk.
Enhancement tip: For large skylights (>30″ wide) or high-rainfall areas, consider installing a small cricket (awning) flashing above the unit to divert water volume around it.
Common Errors to Avoid:
– Installing shingles first, then retrofitting flashing (sequence is everything).
– Skipping underlayment above the skylight (water can bypass head flashing).
– Sealing weep holes in the skylight frame (they allow condensation drainage—keep clear).
– Over-tightening clamps, distorting the frame and breaking seals. Follow torque specs.
Climate note: In snow-prone areas, ensure the curb pitch matches the roof slope to minimize snow accumulation. Address ice dam root causes (attic insulation/ventilation) rather than relying solely on flashing.
Clarifying Step Flashing vs. Continuous Flashing
This distinction is fundamental yet frequently misunderstood. Clarity prevents costly errors.
| Feature | Step Flashing | Continuous Flashing (Apron) |
|---|---|---|
| What it is | Multiple small L-shaped pieces, integrated between roofing courses | Single long piece spanning the transition |
| When to use | Vertical surfaces meeting roofs with overlapping courses (shingles, shakes, slate) | Continuous roof coverings (metal panels, tile); parapet walls; dormer fronts where roof slopes away |
| Why it works | Each piece moves independently; overlapping creates redundancy | Simpler install on compatible systems; smooth surface for debris shedding |
| Key applications | Chimneys on shingle roofs; sidewalls where roof slopes into wall; dormer sides | Metal roof valleys; front of dormers (roof slopes away); parapet counterflashing |
| Critical limitation | Requires careful sequencing during roofing install | Fails on shingle roofs: restricts movement, creates single point of failure, vulnerable at ends/corners |
| Decision trigger | Roofing material installed in courses? → USE STEP FLASHING | Roofing is continuous and wall is above roof plane? → Continuous may be appropriate |
When in doubt, choose step flashing. Its redundancy and movement tolerance make it the more reliable solution for the vast majority of residential roof-to-wall or roof-to-penetration details. The modest additional time and material investment is vastly outweighed by long-term performance and peace of mind.
Navigating Friction Points: Material Science and Climate Realities
Even correct technique can fail due to overlooked interactions. Address these proactively.
Galvanic Corrosion: The Silent Material Conflict
When dissimilar metals contact in the presence of an electrolyte (rainwater), electrochemical corrosion occurs. One metal deteriorates rapidly.
High-risk pairings to avoid:
– Aluminum flashing in contact with copper (gutters, cricket, runoff)
– Aluminum flashing against pressure-treated wood (ACQ/CA lumber contains copper)
– Steel fasteners used with copper flashing
– Galvanized steel flashing in direct contact with stainless steel fasteners
Solutions:
– Use compatible metals throughout an assembly (copper with copper, stainless with stainless).
– Isolate dissimilar metals with non-absorbent barriers: butyl tape, plastic shims, or rubber gaskets.
– Select fasteners rated for the flashing material (stainless nails for copper; aluminum nails for aluminum).
– In regions with acidic rainfall (e.g., industrial areas, parts of the Northeast), corrosion accelerates—prioritize noble metals (copper, stainless) or robust isolation.
Illustrative note: A detail using aluminum step flashing against a copper cricket may appear sound initially but can develop leaks within 1–2 years due to corrosion at the contact point. Prevention requires only minutes of planning during material selection.
The Caulk Misconception: Sealant ≠ Flashing
Caulk is a temporary sealant, not a flashing solution. Over-reliance creates traps.
Where caulk causes harm:
– Sealing weep holes or drainage paths (window pans, ledger bottoms) → traps moisture
– Sealing the lap between counterflashing and step flashing → restricts movement, fails prematurely
– Sealing the bottom edge of WRB to foundation → blocks drainage plane exit
– Using caulk as the primary seal around windows/doors instead of proper flashing
Appropriate caulk use:
– Secondary seal in reglets (counterflashing embedded in mortar)
– Sealing fastener penetrations outside water flow paths (use gasketed fasteners where possible)
– Temporary weatherproofing during multi-day installs (to be replaced by permanent flashing)
Professional perspective: In preservation work, breathable mortars (like lime-based) are sometimes used in reglets instead of caulk—they block liquid water while allowing vapor transmission. Modern equivalents include specialized breathable sealants. The principle remains: allow assemblies to dry.
Climate-Adaptive Detailing
Flashing details must respond to local environmental stressors.
- Cold Climates (Ice Damming Risk):
- Extend ice and water shield underlayment ≥24 inches inside the heated wall line at eaves, valleys, and penetrations.
- Prioritize metal valleys with pronounced ribs; install crickets on chimneys >24″ wide (more conservative than code minimum).
- Address root causes: ensure adequate attic insulation and ventilation to minimize snow melt/refreeze cycles.
-
Avoid materials that become brittle in extreme cold (some PVC flashings); prefer flexible membranes or copper.
-
Hot/Humid Climates (Mold & Rot Risk):
- Maximize drainage and drying capacity. Use vented cladding systems with ≥¼” air gap.
- Ensure all flashing details include unobstructed weep paths.
- Select corrosion-resistant materials (stainless steel, copper).
-
Prefer synthetic WRBs with higher perm ratings to facilitate vapor diffusion.
-
High-Wind/Coastal Areas (Wind-Driven Rain & Salt):
- Use mechanically fastened flashing (clips, not just nails) to resist uplift.
- Specify marine-grade materials: stainless steel (316), copper, or isolation-protected aluminum. Avoid standard galvanized steel.
- Install rigid head flashing (Z-flashing) with pronounced drip edges on all windows/doors.
- Seal all fastener penetrations with butyl tape or gasketed screws.
-
Verify kick-out flashings at all terminations to prevent water tracking.
-
Arid/Sunny Climates (UV Degradation):
- Use UV-stable flashing tapes (acrylic-based) for exposed applications.
- Select sealants rated for prolonged UV exposure (polyurethane, silicone).
- Consider light-colored or reflective flashing on dark roofs to reduce heat buildup on adjacent shingles.
Knowing When to Seek Professional Support
Flashing expertise has limits. Engage qualified professionals when:
– Structural elements show signs of compromise (soft sheathing, rotted framing, staining).
– Working on roofs with pitches exceeding 7:12 without certified fall protection.
– Dealing with historic materials (slate, clay tile, lead) requiring specialized techniques.
– Local codes mandate permits and inspections for the work (common for deck ledgers, roof replacements).
– You observe active water damage, mold growth, or are uncertain about sequence/material compatibility.
Responsible practice: A consultation fee with a roofing contractor, window specialist, or building envelope consultant is a prudent investment. It ensures safety, code compliance, and long-term performance—far outweighing the risk of incorrect DIY execution.
Material Selection Guide: Context Over Catalog
Choosing flashing material requires balancing longevity, compatibility, workability, climate, and budget. There is no universal “best”—only the right choice for your specific detail and environment.
| Material | Ideal Applications | Key Advantages | Critical Considerations | Climate & Compatibility Guidance |
|---|---|---|---|---|
| Copper | Chimneys, valleys, high-end/details, historic | Very long life; develops protective patina; highly flexible; recyclable | Higher initial cost; requires skill to form; runoff may stain light surfaces | Excellent in all climates; ideal for freeze-thaw; isolate from dissimilar metals |
| Stainless Steel (316) | Coastal zones, critical details, high-wind areas | Superior salt/ corrosion resistance; strong; low maintenance | Cost; harder to form without tools; can show handling marks | Essential for marine environments; 304 acceptable inland; avoid contact with carbon steel |
| Galvanized Steel (G-90) | Budget-conscious inland projects, valleys | Cost-effective; widely available; good strength | Rusts over time, especially in humid/coastal zones; zinc coating wears | Use G-90 minimum; avoid coastal/high-humidity; recoat cut edges; compatible with most woods |
| Aluminum | Non-masonry valleys, gutters, soffits (inland) | Lightweight; good corrosion resistance inland; affordable | Corrodes rapidly against mortar, pressure-treated wood, or copper; dents easily | Avoid alkaline environments (masonry); avoid with ACQ lumber; ideal for dry inland climates |
| Lead | Historic restoration (specialist use only) | Extremely malleable; very long life; traditional | Toxic (requires PPE); soft; restricted in some areas; specialist skill needed | Used by preservation experts for complex shapes; not DIY-appropriate |
| Flexible Flashing Tapes | Window/door pans, WRB seams, complex shapes | Conforms to irregular surfaces; easy application; self-sealing | UV degradation if exposed; adhesion fails on dirty/damp surfaces; temp-sensitive | Choose type for conditions: butyl (cold), acrylic (UV), modified bitumen (heat); follow temp guidelines |
| PVC/Composite Pans | Window/door sill pans, ledger pans | Preformed slope/dams; corrosion-proof; easy install | Can become brittle in extreme cold; not for high-heat areas | Ideal for vinyl windows; ensure UV-stabilized if exposed; compatible with most sealants |
Selection Framework:
1. Compatibility First: Will this material react with adjacent components (mortar, wood preservatives, other metals)? When uncertain, isolate or choose compatible alternatives.
2. Skill Match: Does your experience level match the material’s workability? Forcing metal causes kinks and weak points. Flexible tapes are more forgiving for beginners.
3. Code & Context: Verify local building code requirements and historic district guidelines. Coastal zones often mandate specific corrosion resistance.
4. Lifecycle Perspective: Consider total cost of ownership. A higher initial investment in durable, compatible materials often prevents costly repairs later.
5. Manufacturer Alignment: Always follow the window, door, skylight, or roofing manufacturer’s flashing specifications. Deviations may void warranties.
Your Questions, Answered
Q: Can I use caulk instead of proper flashing for a small repair?
A: No. Caulk is a temporary sealant, not a drainage solution. It degrades with UV exposure, temperature swings, and movement, typically failing within a few years. Proper flashing creates a gravity-driven path for water to exit. For even minor repairs, replicate the original flashing detail or consult a professional.
Q: How do I know if my existing flashing is failing?
A: Look for interior signs: water stains on ceilings/walls below penetrations, peeling paint or wallpaper near windows/doors, musty odors, or visible mold. Exterior clues include rust, corrosion, separation at seams, missing pieces, or staining on siding below the detail. If you suspect failure, have it inspected promptly—hidden damage often exceeds visible symptoms.
Q: Is ice and water shield underlayment always necessary under flashing?
A: For critical areas—valleys, eaves, rakes, chimneys, skylights, and penetrations in regions with snow, ice damming risk, or heavy wind-driven rain—yes, it is strongly recommended and often code-required. It provides a vital secondary barrier if the primary flashing is compromised. In very dry, mild climates with steep roofs, some details might omit it, but including it adds significant insurance with minimal cost.
Q: Can I install new flashing over old flashing?
A: Generally, no. Old flashing may be corroded, improperly installed, or incompatible with new materials. Removing old flashing allows inspection of the substrate (sheathing, framing) for hidden damage. Always start with a sound, clean surface. Exceptions are rare and detail-specific (e.g., certain retrofit valley strips), but full replacement is the reliable standard.
Q: What’s the most common flashing mistake DIYers make?
A: Reversing the sequence—especially installing head flashing over the WRB instead of under it, or sealing drainage paths (like window weep holes or sill pan end dams). Another frequent error is using incompatible materials (e.g., aluminum flashing against pressure-treated wood). Review the Four-Sided Sequence and material compatibility before starting.
Q: How often should flashing be inspected or replaced?
A: Inspect annually during routine roof/wall checks. Look for corrosion, separation, loose pieces, or sealant failure. Lifespan varies drastically by material, climate, and installation quality: aluminum may last 20–30 years inland but fail faster near coasts; copper can exceed 75 years. Replace flashing when signs of deterioration appear—not on a fixed calendar. Proactive replacement during roof replacement is often cost-effective.
Q: Are there flashing solutions for historic homes with original materials?
A: Yes, but they require specialist knowledge. Slate roofs often use custom-copper valleys and step flashing. Clay tile systems have specific pan and counterflashing profiles. Lead flashing is still used in preservation for complex shapes. Consult a contractor experienced in historic restoration. Matching original methods and materials preserves integrity and performance.
Q: Does proper flashing affect my home’s energy efficiency?
A: Indirectly, yes. By preventing moisture intrusion, flashing protects insulation from becoming wet (wet insulation loses R-value) and prevents rot that compromises air sealing. A dry, intact building envelope performs closer to its designed energy efficiency. Flashing is a moisture management component within the larger system of insulation, air sealing, and ventilation.
Q: Can I flash a window correctly from the interior only?
A: No. Effective window flashing must be installed from the exterior during construction or replacement, integrated with the WRB and cladding. Interior caulking or sealant is purely cosmetic and offers no meaningful moisture protection. If exterior access is impossible, the window likely needs full replacement with proper exterior flashing.
Q: What should I ask a contractor to verify they understand flashing?
A: Ask: “Will you install a sill pan under the window?” “How will you integrate the head flashing with the housewrap?” “For the chimney, will you use step flashing and a cricket if needed?” “Will you perform a water test before closing walls?” A knowledgeable contractor will explain the sequence clearly and emphasize drainage over sealing. Request to see examples of their flashing work.
Conclusion and Your Path Forward
Flashing is not a collection of isolated tricks. It is a coherent system grounded in physics, material science, and decades of observed performance. Mastery comes from understanding the why behind each detail—not just the how.
Recap: Three Foundational Principles
- Water follows gravity. Every flashing detail must guide moisture downward and outward—never trap it inward.
- Redundancy builds resilience. The Three-Layer Defense Framework (Primary Barrier, Secondary Barrier, Drainage Plane) ensures no single point of failure compromises the whole.
- Context dictates detail. Climate, materials, building age, and local codes all influence the optimal solution. There is no universal shortcut.
The 24-Hour Rule: One Action to Build Confidence
Within the next day, inspect one critical junction on your property: a window head, a chimney base, or a roof valley. Look for signs of separation, corrosion, missing pieces, or staining below. Take a photo. This simple act transforms abstract knowledge into tangible awareness. If you see concerns, note them for professional evaluation. If it looks sound, you’ve reinforced vigilance.
The Big Picture: Flashing as Stewardship
Thoughtful flashing is an act of stewardship—for your home’s structure, your family’s health, and your investment’s longevity. It reflects respect for the forces of nature and the craft of building. By applying these principles, you contribute to a legacy of dry, durable, and resilient structures. The details matter because the building matters.
Deepen Your Building Envelope Knowledge:
Understanding Roof Underlayment Systems | Weather-Resistant Barriers: Selection and Installation | Ice Dam Prevention: Beyond Heat Cables | Deck Safety: Ledger Board Inspection Guide | Window Installation Best Practices for Energy and Moisture Control | Historic Masonry Maintenance and Repair | Coastal Construction: Building for Wind and Salt Resistance