Create a shower that welcomes everyone—regardless of age, ability, or life stage—with a human-centered approach to universal design, practical safety, and enduring elegance.
A truly barrier-free walk-in shower harmonizes seamless accessibility with intentional design. This guide walks you through every meaningful decision—from slope considerations and evidence-informed grab bar placement to material choices that support secure footing without compromising visual warmth—so you can cultivate a space that feels inherently safe, deeply respectful, and personally inviting. Whether you’re planning for aging in place, accommodating temporary mobility needs, designing a forever home, or simply embracing inclusive living, this resource weaves together building science principles, accessibility standards, occupational therapy insights, and real-world implementation wisdom into one cohesive, actionable roadmap.
Introduction
Bathrooms sit at the intersection of daily ritual, personal dignity, and physical safety. Data from the Centers for Disease Control and Prevention indicates bathroom-related injuries account for hundreds of thousands of emergency department visits annually in the United States, with slips and falls in bathing areas representing a significant portion. These numbers reflect lived experiences: a parent bathing a young child, an adult recovering from surgery, a senior preserving independence, or someone navigating permanent mobility differences. Barrier-free shower design responds to this reality not through clinical austerity, but through thoughtful, human-centered architecture that anticipates need and honors autonomy.
True barrier-free design extends beyond minimum code compliance. Foundational standards like the Americans with Disabilities Act (ADA) Standards for Accessible Design and ICC A117.1 provide essential guardrails, yet the most successful residential implementations integrate these requirements with universal design principles—creating environments usable by the widest range of people possible, without adaptation. This philosophy aligns with occupational therapy frameworks emphasizing environmental modifications that support functional independence, reduce unnecessary strain, and affirm user agency. In this guide, we move beyond fragmented checklists to offer a unified, practical system. Every recommendation is grounded in structural considerations, material performance, usability insights, and cross-referenced with current International Residential Code (IRC), plumbing, and electrical standards. You will find clear rationale, actionable guidance, and adaptable pathways to help transform your shower into a sanctuary of confidence and grace.
The Universal Flow Framework: Three Integrated Layers for Inclusive Design
Creating a shower that genuinely works for diverse users requires moving beyond isolated features toward an integrated system. Imagine composing a piece of music: the structural foundation provides rhythm, safety elements form the melody, and sensory details create emotional resonance. The Universal Flow Framework organizes this complexity into three intentional, interdependent layers: the Foundation Layer (spatial planning, thresholds, water management), the Safety Layer (proactive hazard mitigation through surfaces and fixtures), and the Experience Layer (comfort, dignity, aesthetic integration). Progressing thoughtfully through these layers helps ensure no critical element is overlooked—from the engineered slope beneath tiles to the intuitive placement of a handheld showerhead. This approach has been informed by accessibility case studies, evolving building practices, and insights from environmental adaptation resources. By embedding safety into the architecture itself, elegance and inclusion become naturally aligned.
Layer 1: The Foundation Layer—Spatial Planning, Thresholds, and Water Management
The Foundation Layer establishes the physical conditions that make barrier-free bathing possible. Precision here supports the effectiveness of every subsequent safety feature. This layer addresses spatial dimensions, threshold transitions, drainage strategy, and structural preparation—translating concepts like “zero-entry” into buildable, reliable reality.
Spatial Dimensions and Clear Floor Space: Beyond Minimums
Accessibility standards specify a minimum clear floor space of 36 inches by 36 inches inside the shower compartment to accommodate mobility devices. However, this represents a baseline for public settings, not an ideal for residential comfort and safety. For a more functional, stress-reduced experience—especially when accommodating a caregiver, adaptive equipment, or users with wider mobility aids—a footprint of 42 inches by 60 inches is frequently recommended. This layout provides meaningful breathing room: space to adjust position comfortably, clearance around a standard shower chair (typically 18–24 inches deep), and buffer zones that reduce collision risks.
Why this dimension matters practically: In a 36×36 inch shower, a seated user may occupy nearly the entire space, making reaching for soap or accepting assistance physically demanding. The 42×60 inch configuration creates a “movement corridor” along one side, allowing safer caregiver access without crowding the user. For alcove showers (recessed into three walls), ensure the entrance width is at least 36 inches. For corner showers, a neo-angle design with sides measuring 42 inches or more significantly improves accessibility compared to tighter configurations, reducing the “pinch point” effect at the entrance.
Implementation insight: “Clear floor space” means truly unobstructed area. Protruding soap dishes, uneven tile transitions, or thick grout lines can compromise usability. During planning, map the intended clear zone using painter’s tape on the subfloor. Place a shower chair or simulate movements: reaching for controls, transferring on and off the seat, drying legs. If any motion feels constrained or requires awkward twisting, consider expanding the dimensions. Building codes establish floors, not ceilings—exceeding minimums often enhances safety and comfort.
Threshold Transitions: Achieving a Level Entry
The hallmark of a barrier-free shower is the elimination of tripping hazards at the entrance—a raised lip that can catch walker tips, impede wheelchair casters, or create psychological hesitation. Achieving a truly level transition (zero-threshold) requires thoughtful coordination between structural conditions, drainage, and waterproofing. Three primary approaches exist, each suited to different contexts:
- Recessed Shower Pan (Ideal for New Construction or Major Renovations): The shower floor is set slightly lower than the bathroom floor, with a consistent, gentle slope (approximately 1/4 inch per foot) leading to the drain. The entrance remains flush with the bathroom flooring. This method typically requires sufficient subfloor depth—often 2 to 4 inches below the finished bathroom floor level—and is most feasible when floor framing can be adjusted during construction. The recess creates the necessary fall for drainage without altering the bathroom floor height outside the shower.
- Linear Drain at Entrance (Ideal for Slab-on-Grade or Retrofit Scenarios): A linear drain is installed along the entire width of the shower entrance. The shower floor remains level with the bathroom floor, and water flows laterally into the drain channel. This approach minimizes the required slope inside the shower (sometimes as little as 1/8 inch per foot), creating a more stable walking surface. It is particularly valuable in homes built on concrete slabs where recessing the floor is structurally complex. The linear drain effectively captures water before it exits the shower zone.
- Fold-Down or Low-Threshold Pans (Generally Not Recommended for True Barrier-Free Goals): Products marketed as “low-threshold” often feature lips ranging from 1/2 inch to 1.5 inches. Even a half-inch lip can pose a tripping hazard for shuffling gaits or catch mobility device casters. Fold-down thresholds introduce mechanical components requiring user dexterity and maintenance. For designs prioritizing universal usability and long-term reliability, these options are typically not aligned with core barrier-free objectives. A truly level transition is the most inclusive solution.
Slope Consideration: Shower floor slope is critical for function and safety. Industry references (such as ANSI A112.19.2) commonly cite a slope of approximately 1/4 inch per foot of run toward the drain. For a shower 4 feet deep (from back wall to drain), this translates to roughly a 1-inch drop. A slope that is too steep may feel unstable underfoot; too shallow may allow water to pool, increasing slip potential and moisture-related concerns. During installation, verify slope consistency using appropriate tools (e.g., a long straightedge with a precision level) in all directions toward the drain point. Document measurements before tile installation.
Retrofit Insight: In existing slab homes where recessing isn’t feasible and a linear drain at the entrance isn’t desired, a hybrid approach may be considered: gently building up the entire bathroom floor (using a self-leveling underlayment) to create a very gradual ramp (adhering to accessibility slope guidelines) leading into a slightly recessed shower area. This preserves a level-feeling transition at the shower entrance but requires careful waterproofing at the transition and coordination with adjacent doorways. Consulting a structural professional is advisable before altering floor heights.
Drain Selection and Placement: Supporting Water Flow and Stability
The drain functions as both a plumbing component and a design element influencing slope geometry, user stability, aesthetics, and long-term maintenance.
Drain Type Considerations:
– Center Drain (Traditional): Requires slope radiating inward from all four walls. This can create subtle ridges where slopes intersect—potential footing inconsistencies. Water may pool more readily in corners. Generally not preferred for new barrier-free installations focused on predictable footing.
– Linear Drain (Highly Recommended): Installed along one wall (typically the back wall) or critically, at the entrance for zero-threshold designs. Enables a single, consistent slope direction (e.g., front to back), creating a more predictable, stable walking surface. Handles water volume efficiently. Modern linear drains feature wide, flush-mount grates available in various finishes (stainless steel, matte black, brass) that integrate seamlessly with tile. Placement along the back wall suits recessed pans; placement at the entrance is essential for slab-level zero-entry approaches.
– Offset Drain (Viable Alternative): Positioned near one corner, often closest to existing plumbing. Allows for a gentler, more uniform slope from the entrance toward the drain. Can simplify plumbing in retrofits. Ensure the slope direction doesn’t force users to stand on an awkward incline during use.
Grate Selection Guidance: The grate should be flush with the finished floor surface—minimal to no lip—to avoid catching toes, canes, or casters. Choose grates with openings wide enough to resist clogging yet fine enough to provide secure footing. Stainless steel offers durability and corrosion resistance. For enhanced safety, select grates with integrated non-slip texture. In showers used by individuals with visual impairments, a grate in a contrasting color to the surrounding tile (e.g., dark grate on light tile) can provide helpful visual cueing at the drainage point.
The Fundamental Principle: The shower floor should feel like a natural, predictable extension of the bathroom floor—seamless in transition, consistent underfoot, and secure—reducing cognitive load and physical hesitation.
Layer 2: The Safety Layer—Proactive Support Through Surfaces and Fixtures
With the structural foundation established, the Safety Layer integrates features designed to prevent accidents and support user movement. This transforms passive space into an interactive environment of trust. Every element—from grab bar placement informed by biomechanics to flooring selected for verified traction—is positioned to anticipate needs and mitigate risks thoughtfully. This layer embodies where engineering meets empathy.
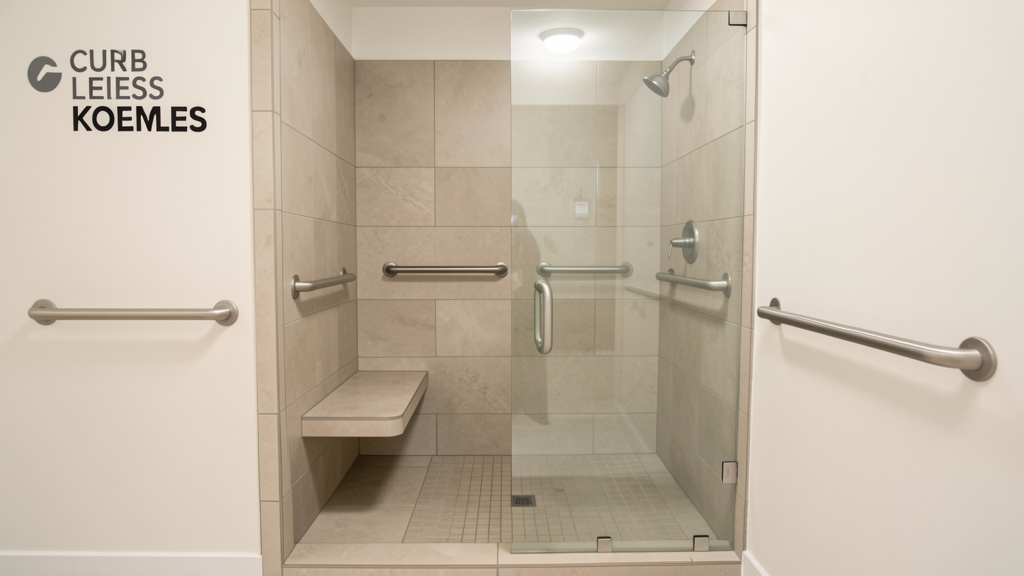
Grab Bars: Thoughtful Placement and Secure Installation
Grab bars serve as critical safety infrastructure. Their effectiveness depends entirely on correct placement, robust installation, and user-centered design. Misplaced or poorly mounted bars can create false confidence and risk injury.
Placement Guidance (Synthesizing Accessibility Standards and Occupational Therapy Insights):
– Horizontal Support Bar on Back Wall: Install centered horizontally, with the top of the bar approximately 33 to 36 inches above the finished shower floor. This range accommodates users of varying statures when standing or seated. The bar should extend at least 18 inches from the side wall toward the shower entrance, providing stable support for rising, lowering, or maintaining balance.
– Vertical Assistance Bar at Entrance: Mount on the wall immediately adjacent to the shower entrance (on the side where a user would naturally reach for support when stepping in/out). The bottom of the bar should start around 12 inches above the floor, extending vertically upward 24 inches. This orientation supports the natural hand motion used for leverage during entry and exit—moments of higher fall risk.
– L-Shaped or Fold-Down Bar Near Seating: If a built-in or wall-mounted seat is installed, position an L-shaped bar on the adjacent wall. The horizontal portion aligns with typical seat height (17–19 inches), and the vertical portion extends upward, creating supportive geometry for transfers. Fold-down bars conserve space when not in use but must be rated for equivalent structural load as permanent bars and installed with equal rigor. Note: Verify the swing path of fold-down bars doesn’t interfere with seating or user movement.
Installation Protocol:
Grab bars should be anchored directly into structural framing (wall studs) or substantial wood blocking installed between studs during the framing phase. Drywall anchors, toggle bolts, or molly bolts alone are generally insufficient for sustained dynamic loads. Use a quality electronic stud finder (calibrated for your wall type) to locate framing. If ideal placement doesn’t align with studs, install 2x blocking horizontally between studs at the precise bar height before closing walls. After installation, perform a stability check: apply firm, steady pressure in multiple directions (downward, outward). There should be no movement, creaking, or wall deflection. Document the verification.
Material and Visibility Considerations:
– Diameter: A grip diameter of 1.25 to 1.5 inches is often recommended. Bars thinner than 1.25 inches may be difficult for users with limited hand strength to grasp securely; thicker bars may be hard to wrap fingers around.
– Surface Texture: Choose bars with a textured, non-slip surface—such as knurled stainless steel, powder-coated finishes with grit, or thermoplastic coatings—to maintain grip when wet or soapy. Highly polished or smooth finishes may compromise security.
– Color Contrast: For users with low vision, select a bar color that contrasts distinctly with the wall surface (e.g., white bar on dark tile). A noticeable contrast ratio enhances visibility and usability.
– Clearance: Maintain approximately 1.5 inches of clearance between the bar and the wall to allow full finger grasp. Position bars away from sharp corners or protruding fixtures.
Important Note: Towel bars, robe hooks, or decorative shelf brackets are not engineered to bear dynamic human weight and should never substitute for properly installed grab bars. This distinction is critical for safety.
Non-Slip Flooring: Verified Traction and Practical Maintenance
Slip resistance is measurable, not merely subjective. Relying solely on visual texture or “feeling” the tile is insufficient. A key reference metric is the Dynamic Coefficient of Friction (DCOF), measured per ANSI A326.3. For level interior wet areas like showers, tiles with a wet DCOF of 0.42 or higher are commonly specified. Reputable manufacturers provide this data—request it during selection. However, real-world performance also depends on installation quality, ongoing maintenance, and user factors.
Material Selection Guidance:
– Porcelain or Ceramic Tile: Seek tiles explicitly labeled “slip-resistant,” “anti-slip,” or rated R10/R11 (European system; R10 is often considered minimum for wet areas, R11 preferred). Matte or honed finishes with uniform micro-texture provide reliable grip. Nuance: Avoid tiles where slip resistance relies solely on deep, grooved patterns. While peaks may feel grippy, valleys can trap soap scum and biofilm, becoming slippery when dirty and difficult to clean. Opt for tiles with a consistent, subtle texture across the entire surface (e.g., fine sand finish). Large-format tiles (e.g., 24×24 inches) minimize grout lines, which can become tripping hazards if unevenly installed.
– Natural Stone (Slate, Honed Granite): Offers inherent grip but requires diligent maintenance. Ensure the surface is honed (not polished) with consistent texture. Slate with deep fissures may be uncomfortable underfoot. Essential: Seal stone tiles with a high-quality impregnating sealer before grouting and reseal periodically as recommended by the supplier. Verify the specific stone’s suitability for constant wet exposure.
– Solid Surface Materials (e.g., Corian): Seamless, non-porous sheets fabricated into custom pans and benches. Can be textured during manufacturing for consistent traction. Ideal for users prioritizing hygiene (no grout lines to harbor mold) or ease of cleaning. Requires professional fabrication but offers repairability if scratched.
– Textured Acrylic or Fiberglass Pans (Prefab): Many modern units feature integrated, molded-in non-slip patterns. Inspect closely: texture should be part of the material, not a surface coating that wears. Ensure the texture is fine and uniform for comfort and safety.
Maintenance and Enhancement:
– Anti-Slip Treatments: Silica-based or polymer treatments can be applied to existing smooth tiles. They work by micro-etching the surface or adding a gritty layer. Considerations: They may alter appearance (slight haze), require reapplication every 1–3 years, and effectiveness diminishes with heavy cleaning. Test in an inconspicuous area first. Not a substitute for properly selected tile in new installations.
– Shower Mats: Suction-cup mats are a temporary solution. They can shift, trap moisture underneath (promoting mold), and create edge tripping hazards. If used temporarily, choose mats with drainage holes and inspect suction cups daily. Permanent solutions are generally superior for safety and hygiene.
– Cleaning Protocol: Use pH-neutral cleaners. Avoid vinegar, bleach, or abrasive pads on textured surfaces—they can degrade texture and grout over time. Rinse thoroughly. Squeegeeing walls and floor after use helps minimize soap scum buildup, which directly impacts slip resistance. Regular, gentle maintenance supports long-term safety.
Seating Solutions: Stability, Transfer, and Personal Dignity
A shower seat provides essential stability for users who cannot stand safely for the duration of a shower, reducing fatigue and fall risk. The right seat supports independence and comfort. Options should be evaluated for structural integrity, placement, and individual needs.
Types and Implementation:
– Built-In Tile Seat (Most Integrated): Constructed during installation using cement board substrate, reinforced framing, and tiled to match walls. Ideal height: 17 to 19 inches above the shower floor (mimicking standard chair height). Depth: 15 to 16 inches. Detail: The seat surface should slope very slightly (approximately 1/8 inch) toward the shower interior to prevent water pooling. Reinforce framing underneath to support concentrated loads. Waterproof meticulously where the seat meets the wall and floor.
– Wall-Mounted Folding Seat (Space-Efficient): Folds flat against the wall when not in use. Must be installed directly into wall studs or substantial blocking. Verify the manufacturer’s weight rating (a higher rating provides a safety margin). Look for seats with textured, non-slip surfaces and rounded edges. Ensure the folded position doesn’t protrude excessively into the clear floor space.
– Freestanding Shower Chair (Portable Flexibility): Adjustable-height chairs with non-slip rubber tips. Choose models with a contoured seat, backrest, and armrests for support. Ensure the base fits comfortably within the clear floor space. Check leg stability on sloped floors—some chairs have independently adjustable legs. Consideration: This option requires user setup/removal; assess if the primary user has the strength and dexterity to manage this safely.
Strategic Placement: Position the seat on the wall opposite the shower controls. This allows a seated user to easily reach water controls and the handheld showerhead without twisting or overreaching. Avoid placing the seat directly under the main showerhead spray, which may be uncomfortable. Ensure clear, unobstructed access paths to and from the seat.
Shower Controls and Fixtures: Intuitive Operation and Thermal Safety
Controls should be operable safely and intuitively by users with varying strength, dexterity, vision, or cognitive considerations. Thermal safety is essential.
Thermostatic Mixing Valve (TMV): Highly Recommended. This device blends hot and cold water before it reaches the showerhead, maintaining a consistent, safe outlet temperature. It helps prevent scalding from sudden pressure changes (e.g., toilet flush) and reduces the need for users to manually adjust temperature during use—a valuable feature for children, seniors, or anyone with sensory processing differences. Setting the maximum temperature limit to 120°F (49°C) aligns with safety recommendations from organizations like the Consumer Product Safety Commission. Install the TMV with access for future adjustment or maintenance.
Control Placement and Operation:
– Height: Mount the primary control handle(s) between 38 and 48 inches above the finished floor. This range supports accessibility for both standing users and those seated on a shower chair. Customize within this range based on primary user needs.
– Operation: Choose lever handles that require minimal force to operate and can be manipulated with a closed fist, knuckle, or elbow (helpful for users with arthritis, limited hand function, or when hands are soapy). Avoid small knobs, push-buttons requiring precise pressure, or complex digital interfaces that may cause confusion. Distinct, intuitive functions (e.g., lever up/down for volume, left/right for temperature) enhance usability.
– Visual/Tactile Cues: Incorporate color coding (red/blue indicators) and tactile markers (a raised dot on the “cold” stop) to aid users with low vision or cognitive differences. Ensure labels are high-contrast and durable.
Handheld Showerhead System:
– Slide Bar: Mount a vertical slide bar at least 24 inches in length. This allows precise positioning of the handheld for seated users, children, or targeted rinsing. Install the bar securely into studs.
– Holder: Choose a holder that allows easy one-handed removal and secure reinsertion (e.g., magnetic or positive-locking mechanism).
– Hose Length: A minimum 60-inch hose provides ample reach. Longer hoses (72 inches) offer greater flexibility but require careful management to avoid kinking. Ensure the hose is reinforced (braided stainless steel) for durability.
– Handheld Features: Select a model with a pause button (to conserve water while soaping) and multiple spray patterns. Verify the spray face is easy to clean. An ergonomic grip improves handling for users with weaker grip strength.
Layer 3: The Experience Layer—Sensory Comfort, Dignity, and Aesthetic Harmony
Safety forms the essential foundation; the Experience Layer elevates the shower into a space of comfort, calm, and personal resonance. This layer addresses lighting, acoustics, ventilation, color, and thoughtful details that reduce anxiety, support cognitive needs, and affirm the user’s dignity. Barrier-free design should feel like home—thoughtfully enhanced, never institutional.
Lighting: Layered, Adaptive, and Shadow-Reducing
Poor lighting can create hazardous shadows, distort depth perception, and increase fall risk. A single overhead light is rarely sufficient. Consider a layered lighting strategy using damp- or wet-rated fixtures:
- Ambient Lighting: Recessed LED downlights provide overall, shadow-minimizing illumination. Aim for approximately 75–100 lumens per square foot of shower area. Use multiple smaller fixtures rather than one bright central light to reduce harsh shadows. Choose a color temperature of 2700K–3000K (warm white) for a calming ambiance; cooler temperatures may feel clinical.
- Task Lighting: Waterproof LED strip lights installed under built-in shelves or niches illuminate soap, shampoo, and controls. A small, waterproof LED light near the shower seat provides focused light for grooming tasks. Ensure task lights do not create glare on wet surfaces.
- Accent/Safety Lighting: Low-voltage LED “toe-kick” lighting along the base of shower walls creates a soft, upward glow defining the shower perimeter. This is especially helpful for nighttime navigation, providing just enough light to move safely without disrupting sleep cycles. Use a separate switch or dimmer for this layer. For users with low vision, this perimeter lighting can significantly enhance spatial awareness.
Safety Consideration: Including a waterproof emergency call button or pull cord within easy reach of both the shower seat and standing areas (e.g., mounted on a grab bar or wall) can provide significant peace of mind. Connect it to an audible alarm outside the bathroom and/or a notification system for caregivers. Test regularly. This feature is a cornerstone of dignified aging-in-place design for many households.
Ventilation and Acoustic Comfort
Moisture control supports health and structural integrity. Inadequate ventilation can lead to mold, mildew, and respiratory irritants. Acoustic harshness may cause disorientation or anxiety for some users.
Ventilation Guidance:
– Fan Capacity: Size the exhaust fan for the entire bathroom. A common guideline is 1 CFM (cubic foot per minute) per square foot of bathroom area. For bathrooms over 100 sq ft, additional CFM may be needed for fixtures. Choose a fan rated at 1.0 sone or lower for near-silent operation; higher sone ratings become noticeable. Place the grille away from direct shower spray for efficient airflow capture.
– Operation: Install the fan switch outside the shower area, near the light switch at the bathroom entrance (“dry hand” principle). Consider a timer switch (15–60 minute duration) or a humidity-sensing fan that runs automatically until moisture levels drop.
– Ducting: Ventilate directly to the outdoors. Use rigid metal ducting for maximum airflow efficiency and minimal condensation buildup inside the duct.
Acoustic Refinement:
Hard tile surfaces can amplify sound (water spray, voices), which may be disorienting for users with dementia, autism, or hearing differences. Mitigation strategies include:
– Textured Surfaces: Tiles with subtle texture (honed stone, matte porcelain) diffuse sound waves better than perfectly smooth, glossy tiles.
– Strategic Soft Elements: If using a shower curtain, a fabric liner (over a waterproof inner layer) absorbs sound. Acoustic panels designed for high-moisture environments can be installed on the ceiling or upper walls—look for PVC or fiberglass core panels with antimicrobial finishes.
– Water Sound: A rainfall showerhead often produces a softer, more consistent sound than a high-pressure jet spray, contributing to a calmer auditory environment.
Aesthetic Integration: Beauty as a Component of Well-Being
Barrier-free design achieves its highest purpose when safety features are seamlessly woven into an aesthetically pleasing environment. Beauty reduces stigma, promotes psychological comfort, and affirms that accessibility and style coexist.
Design Strategies for Elegance:
– Grab Bars as Design Elements: Select grab bars in finishes that complement your faucet hardware—matte black, brushed nickel, oil-rubbed bronze, or warm brass. Curved or ergonomically shaped bars can feel more organic. Position them intentionally as part of the visual composition.
– Material Harmony: Use large-format tiles on walls and floor to minimize grout lines (which can appear cluttered and are harder to clean). Carry the same tile from the bathroom floor into the shower for visual continuity and to reinforce the zero-threshold concept. Choose a linear drain grate that matches your hardware finish.
– Thoughtful Niches: Install recessed niches at seated and standing heights instead of cluttered shelves. Line them with contrasting tile for visual interest and functionality. Round all inside corners of niches for safety and ease of cleaning. Place niches within easy reach of the shower seat and controls.
– Color Psychology and Contrast: Use color intentionally. High contrast between the shower floor and walls (e.g., light walls with a medium-gray floor) helps define the space clearly for users with low vision. Avoid busy patterns, high-contrast stripes, or checkerboards on floors, which can distort depth perception. Opt for calming, monochromatic palettes or soft, nature-inspired tones (soft greens, warm taupes, gentle blues) that promote relaxation. Ensure critical elements (controls, grab bars, seat edge) have sufficient contrast against their background.
– Biophilic Touches: If space and moisture allow, incorporate a small, well-drained planter niche for low-light tolerant plants like ZZ plants or snake plants (outside the direct spray zone). Natural elements can reduce stress. Alternatively, use nature-inspired tile patterns or artwork visible from the shower seat.
Pre-Design Reflection: Centering the Primary User
Before selecting materials or fixtures, pause to thoughtfully consider who will use this shower most frequently. A generic “accessible” design may miss critical nuances. Conduct a compassionate, user-centered reflection. This is not about diagnosis; it’s about empathy and anticipating needs. Involve the primary user directly whenever possible—their lived experience is invaluable.
Reflective Questions:
– Mobility & Transfer: Does the user navigate independently with a cane, walker, or wheelchair? Do they transfer from a wheelchair to a shower chair, or stand throughout? Is caregiver assistance typically needed? (Informs clear floor space, seat type, grab bar placement.)
– Strength & Dexterity: Are there challenges with grip strength, fine motor skills, or range of motion? (Guides control type—lever vs. knob—and handheld features.)
– Sensory Considerations: Are there concerns with balance, vision, hearing, or sensitivity to temperature, bright lights, or loud noises? (Informs lighting layers, acoustic treatment, thermal controls, visual cues.)
– Cognitive & Emotional Factors: Are there considerations around memory, task sequencing, anxiety in enclosed spaces, or sensitivity to change? (Influences simplicity of controls, visual clarity, calming aesthetics.)
– Future Visioning: Even with minimal current needs, how might needs evolve? What modifications would be difficult to add later? (Justifies investing in foundational elements like blocking for future grab bars or a slightly larger footprint.)
Applying Reflection to Design—Illustrative Scenarios:
– Scenario: User with Rheumatoid Arthritis (painful joints, limited grip strength)
Prioritize lever-style controls requiring minimal force. Select grab bars with ergonomic, textured grips. Choose a handheld showerhead with a large, easy-grip handle and a pause button. Install the slide bar at a lower starting height for easier reach. Large-format tiles reduce grout lines requiring cleaning.
– Scenario: User with Low Vision
Maximize color contrast: dark grab bars on light walls, light floor against darker walls. Consider a subtle tactile indicator (e.g., a strip of textured tile) at the shower entrance. Use high-contrast, large-print labels on controls. Ensure layered lighting eliminates shadows. Place the emergency call button on a brightly colored backing.
– Scenario: Child with Mobility Differences or Family Bathing
Install grab bars at multiple heights: standard adult height plus a lower bar (around 24 inches) for a child. Choose a shower seat that can be easily removed or folded. Ensure the handheld showerhead hose is long enough for caregiver assistance. Use welcoming colors and patterns.
– Scenario: User with Dementia or Cognitive Changes
Simplify the environment: minimize visual clutter, use clear sightlines. Avoid patterned floors that may be misinterpreted. Install controls with unmistakable visual cues. Keep the layout consistent and predictable. Consider a weighted shower curtain (instead of glass) which may feel less confining. Consult resources from organizations like the Alzheimer’s Association for additional guidance.
This reflection transforms the Universal Flow Framework from a template into a deeply personalized solution. It ensures every design choice serves a human need, fostering independence and preserving dignity.
Material Considerations: Safety, Longevity, and Maintenance Realities
Selecting materials involves balancing upfront investment, long-term durability, safety performance, and ease of upkeep. Informed choices prevent future concerns, reduce maintenance burden, and protect your investment. This section examines real-world performance beyond marketing claims.
Shower Pan Systems: Structural Comparison
| Material/System Type | Key Advantages | Critical Considerations | Ideal Application Context |
|---|---|---|---|
| Custom Tiled Pan (Mortar Bed + Membrane) | Ultimate customization (size, shape, slope); seamless aesthetic integration; highly durable when installed correctly; precise slope control. | Requires highly skilled installer; longer timeline; higher risk of leaks if waterproofing is imperfect; flood test is essential. | New construction; major renovations with budget and timeline flexibility; projects prioritizing bespoke design and longevity. |
| Pre-Sloped Modular Pan (Foam or Composite Core) | Factory-engineered consistent slope; integrated waterproofing; faster installation; lower skill barrier; reliable performance when installed per specs. | Limited size/shape options; seam at wall junction requires meticulous sealing; may feel less “solid” underfoot; verify load rating for seats. | Retrofits; projects with professional oversight; budget-conscious builds needing reliability; situations where construction timeline is critical. |
| Solid Surface (e.g., Corian) | Completely seamless (no grout lines); non-porous (hygienic, mold-resistant); can be thermoformed into integrated seats; repairable scratches; consistent texture options. | Higher material cost; requires specialized fabrication; can scratch if abused (though repairable); limited texture options. | Users prioritizing hygiene (allergies, medical conditions); modern/minimalist aesthetics; projects prioritizing easiest long-term cleaning. |
| Acrylic/Fiberglass (Prefab Units) | Lower upfront cost; quick installation; lightweight; integrated non-slip patterns. | Prone to scratching, yellowing, and cracking over time; limited size options; “institutional” aesthetic common; texture can wear; difficult to repair. | Tight budgets; temporary solutions; rental properties; situations where replacement is anticipated within 10–15 years. |
Waterproofing Note for Tiled Systems: The waterproofing layer is paramount. For custom tiled pans, a bonded sheet membrane system (e.g., Schluter-Kerdi, Laticrete Hydro Ban Sheet Membrane) is often preferred for its visible verification of coverage and seam integrity. All seams, corners, and penetrations must be sealed per manufacturer specifications. For prefab pans, meticulously follow sealing instructions at the wall-to-pan joint—this is a common failure point. Never rely solely on caulk; use the gasket or flange system designed for the unit.
Wall Systems: Beyond Standard Tile
While ceramic or porcelain tile remains common, consider these factors:
– Tile Size Strategy: Large-format tiles (12×24 inches, 24×48 inches) significantly reduce grout lines. Fewer grout lines mean less cleaning effort, reduced mold/mildew harborage, and a cleaner visual feel. Ensure your installer has experience with large tiles to avoid lippage (uneven edges), which creates cleaning difficulties and potential tripping hazards.
– Grout Selection: Epoxy grout is often recommended for shower walls and floors. It is non-porous, stain-resistant, does not require sealing, and resists mold/mildew growth better than traditional cementitious grout. While slightly more expensive and requiring more skill to install, its long-term performance and reduced maintenance burden make it a worthwhile consideration for barrier-free showers where hygiene is prioritized. If using cementitious grout, select a polymer-modified version and apply a high-quality grout sealer after full cure, reapplying as recommended.
– Grout-Free Alternatives: Solid surface wall panels offer completely seamless walls. They are more expensive but eliminate grout maintenance entirely. Ideal for users with chemical sensitivities or where rapid installation is needed. Verify system compatibility with your chosen shower pan and waterproofing method.
Sealants and Adhesives: Supporting Longevity
The durability of your shower depends on materials used at transitions and bonds.
– Perimeter Sealing: Use 100% silicone sealant (not “siliconized acrylic” or latex caulk) at all changes of plane: where wall meets floor, around the drain flange, at corners, and where fixtures meet tile. Silicone remains flexible for years, accommodating minor building movement. Acrylic/latex caulks harden, crack, and fail within 1–3 years in wet environments. Choose silicone formulated for kitchens and baths with mold/mildew resistance. Reapply silicone every few years as part of routine maintenance—peeling or cracking silicone is a warning sign.
– Tile Adhesive: For shower walls and floors, use a polymer-modified (latex-modified) thinset mortar. It provides superior bond strength, flexibility, and water resistance compared to unmodified mortar. This is crucial for preventing tile debonding over time. Follow manufacturer instructions precisely.
– Grab Bar & Fixture Mounting: Use stainless steel screws of adequate length (penetrating sufficiently into framing). Apply a small bead of silicone sealant under the flange of grab bars and fixtures after secure mounting to prevent water intrusion behind the mounting plate. Sealant is for waterproofing, not structural support.
Installation Considerations: Critical Phases for Confidence
While complex barrier-free showers warrant professional installation by contractors experienced in accessibility modifications (look for CAPS certification—Certified Aging-in-Place Specialist), understanding critical phases empowers informed communication, quality verification, and avoiding costly oversights. This section outlines key steps and verification points.
Phase 1: Demolition, Framing, and Subfloor Preparation
- Demolition: Remove existing fixtures, walls, and flooring down to studs and subfloor. Inspect thoroughly for hidden issues: rot, mold, outdated wiring, or inadequate framing. Address all concerns before proceeding.
- Framing for Zero-Entry (Recessed Pan Method): For a recessed pan, frame the shower area carefully. Lower the subfloor within the shower footprint as needed. Sister additional joists for support if cutting is required. Ensure the lowered area is level and structurally sound. Install wood blocking between studs at precise heights for all planned grab bar locations (back wall horizontal bar, entrance vertical bar, seat area bar). This is a critical framing step for safety—do not skip. Mark blocking locations clearly before closing walls.
- Plumbing Rough-In: Position the drain location per your design. Ensure supply lines for the thermostatic valve and handheld are accessible. Install an access panel (minimum 12×12 inches) in an adjacent closet or wall cavity behind the shower valve location for future maintenance. This small detail prevents major disruption during future repairs.
Phase 2: Waterproofing, Sloping, and Pre-Tile Verification
- Wall Preparation: Install cement board on all shower walls. Tape all seams and corners with alkali-resistant mesh tape embedded in thinset mortar. Apply a waterproofing membrane over the entire cement board surface per manufacturer instructions. Extend the membrane down the walls and onto the shower floor area.
- Pan Creation & Sloping: For mortar bed pans: Install the pre-sloped pan liner, then apply the dry-pack mortar bed establishing the final slope. For prefab pans: Set the pan precisely level; shim as needed. Seal the drain connection meticulously per manufacturer specs.
- Waterproofing the Pan: Apply the chosen waterproofing membrane over the entire sloped pan surface and up the walls a minimum of 3 inches above the finished floor level. Pay close attention to corners, seams, and the drain flange—use fabric tape and sealant as directed.
- The Flood Test: Before any tile is set, perform a flood test. Plug the drain securely. Fill the pan with water to a depth of 2 inches, marking the water level clearly. Wait 24 hours. Check the water level—if it has dropped, you have a leak. Check the area below the shower for any moisture. Do not proceed to tiling until the flood test is passed with zero leakage. Document the test.
Phase 3: Tile Setting, Fixture Installation, and Final Sealing
- Tile Installation: Begin setting tiles from the drain outward (for center/offset drains) or from the entrance inward (for linear drains at entrance). Use tile spacers consistently. For linear drains, follow the manufacturer’s precise instructions for cutting tiles to fit the grate channel. Allow mortar to cure fully per manufacturer specifications before grouting.
- Grab Bar Installation: Install grab bars after tiles are set but before final grouting around the bar flanges. This allows drilling pilot holes through the tile into the pre-installed blocking without damaging surrounding tiles. Use a diamond-tipped drill bit for ceramic/porcelain tile. Secure with stainless steel screws of adequate length. Apply a thin bead of 100% silicone sealant around the flange perimeter after mounting to prevent water ingress. Re-test stability firmly.
- Fixture Mounting: Install the thermostatic valve, shower arm, handheld slide bar, and seat (if wall-mounted) according to manufacturer instructions, ensuring all are anchored securely. Connect plumbing lines. Install the drain grate or cover, ensuring it is perfectly flush with the tile surface.
- Grouting and Final Sealant: Grout all tile joints. For epoxy grout, follow mixing and cleanup instructions precisely. After grout has fully cured, apply 100% silicone sealant at all changes of plane: perimeter of shower floor, corners, around drain, and where fixtures meet tile. Tool the silicone smoothly for optimal water shedding.
Phase 4: Final Verification and User Validation
- Structural Safety Check: Apply firm pressure to every grab bar in multiple directions. Zero movement is acceptable. Check seat stability.
- Water Flow Test: Run the shower at full volume for 10 minutes. Verify water flows efficiently to the drain with no pooling. Check for leaks at all seals, the drain, and the access panel area.
- Thermal Safety Check: Run water for several minutes. Use a thermometer at the showerhead outlet to verify temperature does not exceed your set limit (e.g., 120°F). Test the thermostatic valve’s response by flushing a toilet nearby—temperature should remain stable.
- User Validation (Most Important Step): If possible, have the primary user (or a representative of similar stature/needs) test the shower before final cleanup. Can they enter/exit comfortably? Reach controls and handheld easily while seated? Feel secure on the floor? Adjustments are far easier to make now than after project completion. Document feedback and make refinements.
Budget-Conscious Pathways and Strategic Retrofits
A fully custom barrier-free shower represents a significant investment. However, meaningful safety improvements are achievable at various budget levels. Prioritize interventions based on your Pre-Design Reflection—address the highest-priority needs first. This phased approach builds safety incrementally.
Tier 1: Low-Cost, High-Impact Upgrades ($100 – $500)
These modifications require minimal construction and deliver immediate safety benefits. Ideal for renters (with landlord permission) or interim solutions.
– Strategic Grab Bar: Install one critical grab bar at the shower entrance (vertical bar) using a stud finder and proper anchors. Focus on the highest-risk transition point. ($50–$150)
– Non-Slip Enhancement: Apply a high-quality anti-slip coating to the existing shower floor. Follow preparation instructions meticulously. ($30–$80). Alternative: Use a high-traction, suction-cup shower mat temporarily, checking suction cups daily.
– Handheld Showerhead Conversion: Replace a fixed showerhead with a handheld model on a slide bar. Many kits include a diverter valve for easy installation. Choose a model with a pause button. ($75–$200)
– Seating Solution: Add a sturdy, freestanding shower chair with non-slip tips. Ensure it fits securely within the shower. ($40–$150)
– Lighting & Visibility: Install battery-operated LED stick-on lights under shelves or at the shower entrance. Add high-contrast tape along the top edge of the shower threshold (if present) to improve visibility. ($20–$60)
Tier 2: Mid-Range Retrofits ($1,000 – $5,000)
These projects involve partial renovation but avoid major structural changes. Best undertaken by a contractor experienced in bathroom modifications.
– Threshold Reduction: Replace a high-threshold unit with a zero-threshold prefab pan designed for retrofits. This may require minor drain adjustment but avoids major floor reconstruction. ($1,500–$3,500)
– Linear Drain Retrofit at Entrance: For homes on slab, install a surface-mounted linear drain kit at the shower entrance. Re-tile the shower floor with a very slight slope toward the drain. Requires skilled tile work. ($2,500–$5,000)
– Targeted Grab Bar Installation with Blocking: Open a small section of wall behind planned grab bar locations to install wood blocking between studs. Patch, paint, and install bars securely. Far safer than surface-mounted bars relying on anchors alone. ($300–$800 per bar location)
– Lighting & Safety Upgrade Package: Hire an electrician to install dedicated, layered lighting and a waterproof emergency call button connected to an external alarm. ($800–$2,000)
Tier 3: Comprehensive Barrier-Free Renovation ($15,000+)
For new construction, major remodels, or when comprehensive safety and future-proofing are the priority. This is where the full Universal Flow Framework is implemented. Prioritize:
– True zero-threshold entry (recessed pan or linear drain at entrance)
– Minimum 42×60 inch footprint with clear floor space
– Full grab bar system installed into blocking
– Thermostatic mixing valve with temperature limit
– Layered lighting and ventilation
– High-quality non-slip flooring and materials
When to Seek Professional Guidance: Projects involving structural framing changes, plumbing rerouting, electrical work, or complex waterproofing require licensed, insured contractors. For accessibility-focused modifications, seek contractors with CAPS (Certified Aging-in-Place Specialist) certification from the National Association of Home Builders (NAHB). CAPS professionals are trained in technical building skills and understanding the unique needs of older adults and people with disabilities. Verify licenses, insurance, and request references specifically for bathroom accessibility projects. Expert planning prevents costly errors and ensures safety.
Navigating Common Considerations: Lessons from Practice
Even well-intentioned projects encounter challenges. Awareness of these frequent considerations allows proactive planning, saving time, resources, and frustration.
- Consideration: The Approach Path
A beautifully designed barrier-free shower is inaccessible if the path to it is obstructed. Verify the hallway width (minimum 36 inches clear), doorway width (minimum 32 inches, 36 inches preferred), and that thresholds at the bathroom entrance are minimized. Remove throw rugs along the path. Ensure adequate lighting from bedroom to bathroom. Safety begins long before the shower entrance. - Consideration: Future Maintenance Access
Failing to install an access panel behind the shower valve is a common oversight. When the thermostatic cartridge eventually needs replacement, not having access means demolishing tile. Install a discreet, moisture-resistant access panel during rough-in. Similarly, ensure the drain cleanout is accessible. - Consideration: Drain Sizing for Shower Size
A standard 2-inch drain suffices for smaller showers. For larger showers (e.g., 42×60 inch) or showers with multiple showerheads, discuss upgrading to a 3-inch drain line with your plumber to prevent slow drainage. Confirm during planning. - Consideration: The “Dry Hand” Principle
Placing the main light switch or exhaust fan switch inside the shower area forces users to reach into moisture. Always locate these controls outside the shower entrance, within easy reach but in a dry location. Use a timer switch for the fan to ensure adequate runtime. - Consideration: Grab Bar Placement Based on Function
Installing bars based solely on aesthetics ignores user needs. Placement must be driven by function: where support is needed for entry/exit, transfer, and bathing. Refer to evidence-based placement guidelines. When in doubt, mock up positions with painter’s tape and test with the user. - Consideration: The “Exit Strategy”
Consider rescue access if a user falls inside the shower. Is the entrance unobstructed? For maximum safety, eliminate doors entirely in favor of overlapping walls or a partial glass panel. If a door is necessary, ensure it is a hinged door that opens outward and has a quick-release mechanism. Frameless glass doors without external handles can be difficult for rescuers to open—avoid them in barrier-free contexts.
Your Questions, Answered
Q: Does a barrier-free shower have to look clinical or institutional?
A: Not at all. This is a common misconception. Today’s design landscape offers immense flexibility. Select grab bars in stylish finishes like matte black, brushed brass, or oil-rubbed bronze that complement your faucet hardware. Use large-format tiles in calming, contemporary colors. Incorporate a linear drain with a decorative grate. Build niches with integrated LED lighting. Many modern homes feature barrier-free showers celebrated for their clean lines, spacious feel, and thoughtful details. Safety and beauty are synergistic when design is intentional.
Q: What is the difference between “ADA compliant” and “barrier-free” or “universal design”?
A: “ADA compliant” refers specifically to meeting legal standards in the Americans with Disabilities Act, which primarily govern public accommodations and commercial facilities. These are minimum requirements for those contexts. “Barrier-free” and “universal design” are broader philosophies focused on creating environments usable by all people, regardless of age, size, ability, or disability. In a private residence, you are not legally required to meet ADA standards (though local building codes may adopt some elements). However, using ADA/ICC A117.1 standards as a foundation is often recommended because they are evidence-based. True barrier-free residential design frequently exceeds ADA minimums (e.g., larger clear floor space, additional grab bars) to enhance comfort, safety, and future-proofing. Always check your local building and plumbing codes, as they are the legally enforceable requirements for your project.
Q: Can I successfully install a true zero-threshold shower in a home built on a concrete slab?
A: Yes, with a specific approach. The most reliable method is installing a linear drain system at the shower entrance. The shower floor remains level with the bathroom floor, and water flows laterally into the drain channel. The bathroom floor outside the shower may need a very slight, gradual ramp (adhering to accessibility slope guidelines) leading up to the drain channel. Waterproofing at the transition between the shower floor build-up and the existing slab is critical. This is a complex detail best handled by contractors experienced in slab-level barrier-free installations. Avoid methods requiring cutting into the structural slab unless engineered specifically for your home.
Q: How do I properly clean and maintain a textured non-slip shower floor without damaging the texture?
A: Use a soft-bristle nylon brush and a pH-neutral, non-abrasive cleaner formulated for tile and grout. Avoid vinegar, bleach, acidic cleaners, or abrasive powders/pads, which can degrade grout, etch stone, or wear down textured surfaces over time. For textured tiles, the brush helps agitate cleaning solution into micro-grooves. Rinse thoroughly with clean water. Squeegee walls and floor after each use to minimize soap scum and hard water buildup, which directly impacts slip resistance. For stubborn mildew in grout lines, use a hydrogen peroxide-based cleaner instead of chlorine bleach. Re-seal grout (if cementitious) as recommended by the manufacturer. Regular, gentle maintenance preserves both safety and appearance.
Q: Are frameless glass shower doors acceptable in a barrier-free design?
A: Generally, no. Any door—frameless, framed, sliding—creates a physical and psychological barrier. For true barrier-free access, the ideal solution is to eliminate the door entirely. Use overlapping walls (a “pony wall” or return wall) or a partial fixed glass panel (no higher than 36 inches) at the entrance to contain water spray while maintaining an open, unobstructed entry. If privacy or significant water containment is essential, a hinged door that opens outward is the only acceptable door option, as it allows rescue access if a user falls against the door. Frameless glass doors without external handles are particularly challenging in this context. A weighted fabric shower curtain on a curved rod is a flexible, low-cost, and truly barrier-free alternative that provides privacy without obstruction.
Q: What is the commonly recommended height for a shower seat?
A: The optimal seat height aligns with standard ergonomic seating principles. The top of the seat is typically 17 to 19 inches above the finished shower floor. This height allows most adults to sit with feet flat on the floor (knees at approximately 90 degrees), promoting stability and making standing up easier. For users with specific needs, customization within this range is appropriate. Always verify comfort with the primary user during the planning phase. For wall-mounted folding seats, ensure the mounting hardware allows for precise height adjustment.
Q: How can I adapt the shower design for someone living with dementia?
A: Safety extends beyond physical hazards to cognitive and emotional needs. Key adaptations include: Visual Clarity: Use high-contrast colors to define the shower area (e.g., a dark non-slip mat at the entrance). Avoid patterned floors that may be perceived as water, holes, or obstacles. Simplicity: Minimize visual clutter. Use controls with clear, large visual indicators (red/blue). Keep the layout predictable. Reducing Anxiety: Avoid fully enclosed glass enclosures which can feel confining; opt for open designs or fabric curtains. Ensure adequate, shadow-free lighting. Install a handheld showerhead for gentle, controlled rinsing. Safety: Include an emergency call button if appropriate. Consult resources from the Alzheimer’s Association or an occupational therapist specializing in dementia care for personalized strategies. Involve the person in decisions where possible to preserve autonomy.
Q: Is heated flooring a recommended addition for a barrier-free shower?
A: Heated floors (electric radiant mats installed under the tile and over the waterproofing membrane) can enhance comfort, especially for users sensitive to cold floors (common with arthritis, neuropathy, or circulation issues). The gentle warmth may also help reduce condensation. However, safety must be prioritized: Ensure the system is installed by a qualified electrician, includes a GFCI-protected thermostat with a maximum temperature limit (typically capped around 85°F / 29°C), and is compatible with your flooring material. While a wonderful comfort feature, it should not be prioritized over foundational safety elements like verified non-slip flooring, proper slope, and secure grab bars. If budget is limited, allocate funds to core safety features first.
Q: What specific certifications or qualifications should I look for when hiring a contractor for this project?
A: Prioritize contractors with the CAPS (Certified Aging-in-Place Specialist) designation from the National Association of Home Builders (NAHB). CAPS training covers technical modifications, understanding the unique needs of older adults and people with disabilities, and business management for aging-in-place projects. Additionally, verify: State Licensing (general contractor, plumbing, electrical as needed), Liability and Workers’ Compensation Insurance, and References specifically for bathroom accessibility or aging-in-place projects. Ask to see photos of past barrier-free shower installations. A contractor experienced in this niche will speak knowledgeably about slope considerations, grab bar blocking, linear drains, and thermostatic valves.
Q: Can small mosaic tiles be used safely on a barrier-free shower floor?
A: Small mosaic tiles (under 2×2 inches) can create a slip-resistant surface due to abundant grout lines. However, this introduces risks if not executed perfectly. The primary concern is lippage—where individual tiles are set at slightly different heights. Even minor lippage creates tripping hazards and is extremely difficult to clean. Achieving a perfectly flat surface with mosaics requires an exceptionally skilled tile setter. Additionally, deep grout lines trap soap scum and require meticulous cleaning. For most barrier-free applications, large-format tiles (minimum 6×6 inches, ideally larger) with a verified non-slip texture (DCOF ≥ 0.42) and epoxy grout are a safer, more maintainable choice. If mosaics are desired for aesthetic reasons (e.g., a border), confine them to wall areas or use them sparingly on the floor with a highly experienced installer and a commitment to rigorous maintenance.
Q: How do I address water containment without a shower door or curtain?
A: Effective water management in an open-concept barrier-free shower relies on strategic design: Slope Precision: Ensure the floor slope is calibrated to direct water efficiently to the drain. Entrance Design: Use a “return wall” or partial wall (typically 18–36 inches long) extending from the side wall at the entrance to break the water spray path. Linear Drain at Entrance: As discussed, this captures water before it exits the shower zone. User Technique: Encourage using the handheld showerhead with spray directed downward and inward. Flooring Transition: Extend water-resistant flooring (tile, luxury vinyl plank rated for wet areas) several feet beyond the shower entrance. A small, discreet floor drain in the bathroom floor just outside the shower area (if plumbing allows) provides added security. In practice, with proper slope and a return wall, minimal water escapes during normal use.
Conclusion and Your Next Step
Designing a barrier-free walk-in shower is more than a construction project; it is an expression of care. It reflects a commitment to safety, dignity, and inclusion for yourself, your loved ones, or future inhabitants of your home. By thoughtfully applying the Universal Flow Framework—establishing a reliable Foundation Layer, integrating supportive Safety Layer features, and elevating the experience through the Experience Layer—you can cultivate a space where daily rituals are performed with confidence, comfort, and grace. This guide has provided detailed knowledge, nuanced considerations, and actionable pathways to help move from intention to reality.
Recap of Three Foundational Elements:
1. True Level Entry: Eliminate tripping hazards through meticulous slope engineering and strategic drain placement. The transition should feel seamless, both physically and psychologically.
2. Thoughtfully Placed, Securely Mounted Grab Bars: Installed into structural blocking, positioned based on biomechanics and user needs, and selected for optimal grip and visibility. They serve as anchors of trust within the space.
3. Verified Non-Slip Surfaces with Sustainable Maintenance: Flooring chosen for scientifically referenced slip resistance, installed carefully, and maintained with a clear protocol to support enduring safety.
The 24-Hour Step: Knowledge gains momentum through action. Within the next 24 hours, take one concrete step. Measure your existing shower space and map the clear floor area with tape. Research linear drain options compatible with your home’s structure. Contact one contractor with CAPS certification for a preliminary conversation. Sketch a simple layout incorporating one improvement identified in this guide. This single action transforms insight into forward motion.
The Broader Perspective: A thoughtfully designed barrier-free shower is a meaningful element of lifelong home design. It reflects a forward-thinking perspective that values human dignity across the lifespan. As awareness of inclusive design grows, homes that embrace these principles enhance quality of life for occupants and demonstrate foresight, increasing resilience, usability, and long-term value. You are not merely updating a bathroom; you are contributing to a legacy of empathy, safety, and belonging—one intentional detail at a time. The journey toward a truly welcoming home begins with a single, purposeful step. Take yours today.
Explore Our Complete System:
Designing Accessible Bathrooms: Beyond the Shower | Choosing Non-Slip Flooring for Every Room | The Homeowner’s Guide to Aging in Place Renovations | Universal Kitchen Design: Safety and Style for All Abilities | Lighting for Safety: A Room-by-Room Guide to Preventing Falls | Understanding Building Codes for Homeowners: A Practical Primer | Creating a Sustainable Maintenance Plan for Your Accessible Home