Move beyond temporary fixes with a unified diagnostic approach that addresses the interconnected physics of moisture, structure, and thermal performance in northern homes.
Cold climates present unique challenges for residential structures, but recurring issues like window condensation, wall cracks, and uneven heating stem from predictable physical interactions—not random failures. This guide provides a field-tested framework to diagnose root causes, prioritize evidence-based solutions, and build lasting resilience. Grounded in building science principles from the U.S. Department of Energy, International Code Council, and Building Science Corporation research, you’ll learn to interpret your home’s signals and implement targeted interventions that respect regional climate demands. Whether in Alaska, Minnesota, Maine, or similar zones, these adaptable strategies empower informed action without overpromising outcomes.
Introduction
For homeowners across northern regions, winter brings familiar concerns: moisture beading on windowpanes at dawn, subtle cracks appearing near doorframes, or inconsistent room temperatures despite furnace operation. These are not isolated glitches. They reflect dynamic interactions between indoor humidity, outdoor temperatures, building materials, and structural dynamics. When outdoor temperatures drop significantly, the entire building envelope responds—sometimes revealing vulnerabilities in moisture management, thermal continuity, or structural stability.
This guide reframes these challenges through a systems lens. Rather than treating symptoms in isolation, we examine how condensation patterns may signal air leakage paths that also contribute to heat loss, or how persistent moisture exposure can gradually compromise structural elements. The methodology presented aligns with diagnostic protocols used by Building Performance Institute (BPI) and RESNET-certified energy auditors. It emphasizes observable evidence over assumptions, contextual solutions over universal prescriptions, and phased implementation over overwhelming overhauls. By understanding the why behind common cold-climate phenomena, you gain agency to make strategic, budget-conscious decisions—whether acting independently or collaborating with qualified professionals. Your journey toward a more resilient, comfortable home begins with seeing connections others overlook.
The Interconnected Triad Framework: Seeing Beyond Isolated Symptoms
Most repair attempts fail because they target visible symptoms while ignoring underlying system dynamics. Wiping window condensation without addressing humidity sources or surface temperatures yields temporary relief at best. Similarly, filling a drywall crack without investigating foundation movement or moisture exposure invites recurrence. True resolution requires recognizing that moisture behavior, structural response, and thermal performance operate as interdependent subsystems.
Visualize your home as an integrated assembly:
– Moisture pathways move vapor from warm interior spaces toward colder zones (walls, windows, foundations).
– Thermal gradients drive heat flow outward while influencing where surfaces cool below dew point.
– Structural elements expand, contract, or shift in response to temperature swings, soil conditions, and material stress—often exacerbated by moisture exposure.
When one element shifts, others react. For example:
Inadequate attic air sealing → Warm, humid air enters attic → Melts roof snow → Water refreezes at unheated eaves (ice dam) → Moisture infiltrates wall cavities → Insulation degrades → Interior wall surfaces cool → Condensation forms on drywall → Prolonged dampness weakens framing connections → Minor cracks develop near windows.
This cascade illustrates why fragmented fixes falter. The Interconnected Triad Framework provides a diagnostic lens to trace symptoms back to origin points:
- Condensation as a moisture pathway indicator: Visible moisture reveals where indoor humidity contacts surfaces cooled below dew point. It rarely originates at the window—it signals unmanaged vapor drive, insufficient ventilation, or thermal bridging.
- Cracks as structural stress documentation: Crack location, pattern, and timing reflect material response to settlement, frost heave, differential movement, or moisture-induced degradation. They are diagnostic clues, not just cosmetic flaws.
- Heating inconsistencies as envelope performance metrics: Uneven temperatures or elevated fuel use often trace to air leakage, missing insulation, or pressure imbalances—not solely equipment deficiency.
The Guiding Insight: Condensation and cracks frequently share root causes in moisture management and thermal performance. Heating system strain often results from unaddressed envelope deficiencies. Sustainable solutions address system interactions, not isolated components.
This framework shifts inquiry from “How do I stop this symptom?” to “What system condition allows this symptom to manifest?” That subtle reframe unlocks durable, cost-effective interventions. The following deep dives apply this lens to each triad component with actionable diagnostics and tiered solutions.
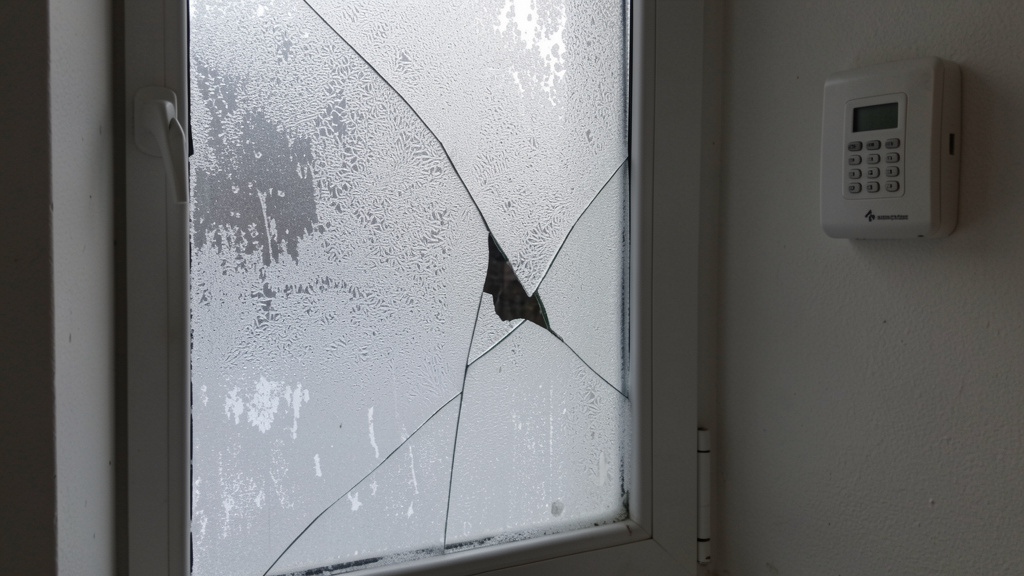
Deep Dive 1: Condensation – Interpreting Moisture Signals
Condensation on windows, walls, or pipes is your home’s most visible moisture indicator. Left unaddressed, it may contribute to mold growth, material degradation, or indoor air quality concerns. Understanding its physics—and where moisture truly originates—is essential for effective management.
Why Condensation Forms: Physics Over Assumption
Condensation occurs when warm, moisture-laden indoor air contacts a surface at or below the dew point temperature—the threshold where air can no longer retain all its vapor, forcing liquid formation. In cold climates, common condensation sites include windows, exterior walls, uninsulated pipes, or hidden within wall cavities (interstitial condensation).
Critical nuance: Visible condensation rarely originates at the site where it appears. Windows don’t “create” moisture; they reveal where existing indoor humidity meets a sufficiently cold surface. The core question becomes: What is elevating indoor humidity levels, and why are specific surfaces cooling below dew point?
Common Indoor Humidity Contributors (Contextualized)
| Source | Typical Influence | Practical Considerations |
|---|---|---|
| Daily Occupancy | Respiration, perspiration (1–2 pints/person/day) | Higher occupancy (guests, pets) increases load; aquariums add measurable moisture |
| Cooking & Bathing | Steam from showers, boiling water, dishwashing | Exhaust fans used <15 minutes post-activity often fail to remove peak humidity |
| Basement/Crawlspace | Evaporation from soil, standing water | Unsealed dirt floors can contribute gallons of vapor daily; check with hygrometer |
| Mechanical Systems | Whole-house humidifiers, unvented dryers | Humidifiers set above 35% RH in deep cold often trigger condensation; verify settings |
| Seasonal Factors | New construction drying, seasonal occupancy changes | First winter in new builds may show elevated moisture as materials stabilize |
A household may introduce significant moisture daily through routine activities. In tightly sealed homes (modern builds or older homes with updated windows but unchanged ventilation), this vapor accumulates. When outdoor temperatures fall, interior surfaces cool. If a surface temperature drops to or below the dew point—e.g., 38°F glass with 45°F indoor air at 40% RH—condensation forms. Single-pane windows are highly susceptible, but even double-pane units may show interior condensation if indoor humidity is elevated or surface temperatures are low.
The Hidden Risk: Interstitial Condensation
Visible window moisture is a warning you can see. Far more consequential is interstitial condensation—moisture forming within wall, ceiling, or roof assemblies. This occurs when humid indoor air infiltrates cavities through gaps (outlets, top plates, pipe penetrations) and contacts cold sheathing during extreme cold. Damage accumulates unseen: wet insulation loses effectiveness, wood framing may degrade, mold can colonize hidden surfaces. By the time interior stains or odors appear, significant remediation may be needed. This underscores why managing overall indoor humidity and air sealing are foundational in cold climates.
Diagnosing Condensation: A Field-Ready Protocol
Move from observation to evidence with this repeatable process (perform on a morning when outdoor temps are below 20°F):
- Map Patterns Precisely:
- Window condensation: Uniform across pane? Suggests elevated indoor humidity. Only at bottom edge? May indicate air leakage at sill or poor installation. Between panes? Seal failure—window unit requires service.
- Wall condensation: Dark streaks between studs? Indicates thermal bridging (studs conducting cold inward) combined with air leakage.
- Pipe condensation: On cold-water lines in basements? Signals high ambient humidity and/or missing pipe insulation.
-
“Ghosting”: Faint vertical lines on walls? Dust attracted to slightly cooler stud locations—reveals thermal bridging.
-
Measure Key Metrics:
- Hygrometer: Record indoor relative humidity (RH). In cold climates (<20°F outdoors), target RH typically ranges 25–35%. Consistently >40% increases condensation risk on common surfaces. Important: Ideal RH varies with outdoor temperature. Reference this contextual guide:
- Outdoor: 20°F to 40°F → Max Indoor RH: ~40%
- Outdoor: 10°F to 20°F → Max Indoor RH: ~35%
- Outdoor: 0°F to 10°F → Max Indoor RH: ~30%
- Outdoor: Below 0°F → Max Indoor RH: ~25%
- Infrared thermometer: Scan condensation sites. Note surface temperature. Compare to indoor air temp and calculated dew point (free online calculators available). If surface temp ≤ dew point, condensation is physically inevitable.
-
Thermal leak detector: Highlights cold spots indicating air leaks or missing insulation (highly valuable for prioritization).
-
Trace Moisture Sources:
- Run exhaust fans continuously during/after moisture-generating activities. Monitor condensation changes over 48 hours.
- Temporarily cover basement dirt floors with plastic sheeting. Check if upstairs humidity readings drop.
- Disable whole-house humidifiers for one week. Observe condensation patterns.
- Inspect for hidden moisture: under sinks, around plumbing penetrations, attic insulation for dampness/staining.
Tiered Solutions: Prioritized by Impact and Context
Address both symptom and root cause. Implement in this sequence for maximum effectiveness:
Tier 1: Source Control & Ventilation (Highest Impact, Lowest Cost)
- Exhaust fans: Install ENERGY STAR-rated bathroom fans (min. 80 CFM) and kitchen range hoods vented outside (min. 300 CFM). Critical detail: Run bathroom fans for 20+ minutes post-shower (use timer switches or humidity-sensing models like Panasonic WhisperGreen Select). Five-minute runs rarely suffice.
- Strategic ventilation: On cold, dry days (<30% outdoor RH), open windows briefly (5–10 mins) in kitchens/bathrooms to flush humid air. Avoid ventilating during rain, fog, or high outdoor humidity.
- Reduce indoor moisture generation: Cover pots while cooking; take shorter showers; dry clothes outdoors or in vented dryers; limit indoor plants in moisture-prone rooms. If a whole-house humidifier is installed: verify settings are ≤30% RH during deep cold, or disable entirely for winter. Many cold-climate homes require no added humidity.
- Subgrade moisture control: Install 6-mil+ polyethylene vapor barrier over entire crawlspace/basement dirt floor, sealed at seams and walls. Ensure downspouts extend ≥6 ft from foundation; verify grading slopes away from house.
Tier 2: Surface Temperature Management
- Window interventions:
- Immediate: Apply interior storm window inserts (e.g., Indow) or high-quality shrink-film kits properly installed (film taut, sealed tightly to frame). Creates insulating air gap, raising glass temperature significantly.
- Long-term: When replacing windows, prioritize: Low-E coatings designed for cold climates (high solar heat gain coefficient), warm-edge spacers, argon/krypton gas fill, and fiberglass/vinyl-clad wood frames (minimize thermal bridging).
- Wall surface warming: Install thermal curtains with sealed side tracks. Close at dusk. The trapped air layer can raise interior wall surface temperature by 5–10°F—often sufficient to stay above dew point. Ensure curtains don’t block heat sources.
- Pipe insulation: Wrap cold-water lines in unheated spaces with closed-cell foam insulation (min. ½” thick); seal seams with foil tape.
Tier 3: Mechanical Humidity Control (Context-Specific)
- Portable dehumidifiers: Appropriate only for basements/crawlspaces with persistent high humidity (>60% RH). Select units rated for lower temperatures (e.g., Frigidaire FFAD7033R1 operates down to 41°F). Avoid using in main living areas during heating season—they increase heating load.
- Balanced ventilation systems: For tightly sealed homes, Heat Recovery Ventilators (HRVs) or Energy Recovery Ventilators (ERVs) provide continuous, controlled air exchange. HRVs are generally preferred in very cold, dry climates (recover heat while exhausting moisture). ERVs offer humidity moderation in mixed conditions. Professional sizing and installation are essential. Look for units with >80% sensible recovery efficiency.
Common Missteps to Avoid
- Wiping condensation daily: Treats symptom only; moisture may already be damaging frames or sills. Focus on source and surface temperature.
- Raising thermostat to “dry” surfaces: Warmer air holds more moisture, potentially worsening condensation on cold surfaces while increasing energy use.
- Sealing leaks without adding ventilation: Traps moisture and pollutants indoors. Air sealing must be paired with intentional ventilation strategy (e.g., exhaust fans, HRV/ERV).
- Ignoring hidden condensation sites: Attic roof sheathing frost or crawlspace moisture indicates significant air leakage—address promptly to prevent structural impacts.
Condensation becomes manageable when approached systematically: reduce moisture at source, raise critical surface temperatures, and ventilate intentionally. Remember—this moisture signal often correlates with vulnerabilities manifesting elsewhere in your home’s system, particularly in structural integrity.
Deep Dive 2: Structural Cracks – Decoding Material Stress Responses
Cracks in drywall, masonry, or foundations prompt understandable concern. In cold climates, seasonal temperature swings, soil dynamics, moisture exposure, and snow loads create unique stresses. Learning to interpret crack characteristics—location, pattern, width, timing—provides critical insight into urgency and appropriate response. Panic is seldom warranted, but informed assessment prevents minor issues from escalating.
Climate-Specific Stressors in Cold Regions
Northern homes face recurring physical forces. Cracks document how materials respond:
– Frost heave: Water-saturated soil beneath footings freezes and expands upward. Upon thawing, soil may not settle uniformly. Repeated cycles cause cumulative shifting, especially on clay soils or properties with drainage challenges. Manifests as diagonal foundation cracks, stair-step masonry cracks, or cracks radiating from window corners in basements.
– Soil movement: Seasonal freezing/thawing causes subtle ground “breathing.” Prolonged drought followed by heavy rain affects expansive soils. Settlement occurs over time in all structures.
– Thermal movement: Building materials expand when warm, contract when cold. Wood framing may shift ⅛”–¼” seasonally in extreme climates. Differential movement occurs where materials meet (e.g., wood frame to brick veneer) or where sun exposure varies (south vs. north walls).
– Moisture interaction: Persistent condensation or interstitial moisture within walls can gradually degrade wood framing, corrode metal connectors, or reduce insulation effectiveness. Compromised elements become less resilient to normal stresses. A crack near a chronically damp window isn’t coincidental—it reflects cumulative stress.
– Snow loading: Heavy, wet snow on roofs (especially low-slope or complex designs) creates downward pressure. While engineered for design loads, older structures or those with pre-existing moisture damage may show deflection signs: ceiling cracks below valleys, wall cracks at roof connections.
Crack Assessment Guide: Location, Pattern, Context
Not all cracks indicate structural compromise. Use this evidence-based reference. Always measure width with a ruler or crack gauge. Monitor changes over time (photograph monthly with scale reference).
Foundation & Basement Wall Indicators
| Crack Type | Typical Appearance | Common Context | Assessment Guidance |
|---|---|---|---|
| Vertical (uniform width <⅛”) | Straight, consistent width | Concrete shrinkage during curing (common in first 1–3 years) | Monitor stability; seal if leaking. Low urgency if unchanged. |
| Vertical (widening) | Wider at top or bottom, >⅛” | Settlement, lateral pressure | Monitor closely; consult structural professional if growing. |
| Horizontal | Straight line across wall | Hydrostatic pressure, significant frost heave | Seek structural engineer evaluation promptly. |
| Stair-step | Follows mortar joints diagonally | Foundation movement, frost heave | Evaluate if >¼” wide, growing, or with other symptoms. |
| Diagonal at corner | From window/door top down at 45° | Localized settlement, frost action | Monitor width changes; engineer assessment if active. |
| With efflorescence | White, chalky residue nearby | Water infiltration through crack | Address water source and crack repair. |
Interior Drywall/Ceiling Indicators
| Crack Type | Typical Appearance | Common Context | Assessment Guidance |
|---|---|---|---|
| Corner cracks (windows/doors) | Radiating from top corners | Seasonal wood movement, truss uplift | Often cosmetic; repair after stabilization (late spring). |
| Vertical seam cracks | Along taped panel joints | Normal settling, truss uplift | Repair after confirming cause (e.g., address uplift first). |
| Center ceiling crack | Straight line down middle | Truss uplift (common with attic trusses) | Requires specialized repair technique; not simple re-taping. |
| Stud-aligned cracks | Vertical lines spaced 16″/24″ apart | Thermal bridging + moisture exposure | Investigate insulation/air sealing; address moisture risk. |
| Spiderweb pattern | Fine network over area | Paint/mud issue, not structural | Surface preparation and repaint typically suffice. |
| With bulge/sag | Visible wall/ceiling deformation | Potential structural compromise | Consult structural professional immediately. |
Exterior Masonry Notes
- Stair-step cracks in brick: Assess width, growth rate, and location (corners, openings). Growing cracks warrant masonry professional evaluation.
- Cracks above windows/doors: Horizontal cracks in brick veneer may indicate failing steel lintels (rust expansion) or inadequate support. Requires masonry assessment.
- Cracks at material transitions: Vertical cracks where brick meets siding/windows often reflect differential movement. Repair with flexible, paintable sealant.
Monitoring Protocol: Evidence Over Assumption
Before repair decisions, implement this low-effort tracking method:
1. Document: Photograph each crack with ruler/tape measure. Note location, date, weather conditions.
2. Mark: Place small tape pieces at crack ends; write date on tape.
3. Measure: Record exact width (use crack comparator card or digital caliper).
4. Track: Note outdoor temperature extremes, precipitation, or known water events nearby.
5. Reassess: Check after major weather events and at 30/60/90 days. Is width changing? Is tape pulling apart?
6. Correlate: Check door/window operation (sticking may indicate shifting); use level on nearby floors.
Stable crack indicators (generally cosmetic): Width unchanged for 6+ months, no associated bulging/sagging, no water intrusion, no change in operation of nearby doors/windows. Even stable cracks benefit from sealing to prevent dust/moisture ingress.
Active crack indicators (seek professional input): Widening >1/16″ in 6 months, new cracks appearing nearby, associated structural symptoms (sticking doors, sloping floors), water leakage, or appearance after significant weather event.
Repair Strategies: Matched to Assessment
Cosmetic Repairs (Stable, Hairline Cracks <⅛”)
- Drywall cracks:
Method: Remove loose tape/mud. Apply fiberglass mesh tape. Apply 3 thin joint compound coats, feathering widely. Sand smooth. Prime and paint.
Adaptation: For recurring corner cracks, use flexible joint compound or apply paintable silicone caulk under mesh tape before mudding to accommodate minor movement.
Budget option: Paintable elastomeric caulk smoothed over clean crack (less durable long-term). - Masonry/Foundation hairline cracks:
Method: Clean with wire brush. Inject with non-shrinking hydraulic cement or epoxy kit (for cracks <⅛”). For non-leaking vertical foundation cracks, high-quality polyurethane sealant may suffice.
Critical: Ensure crack is dry before sealing. Sealing moisture inside worsens damage.
Structural Repairs (Active Cracks, >⅛”, or Critical Locations)
- Foundation stabilization: For significant settlement, steel piers or helical piles may be installed deep into stable soil. Requires structural engineer design and licensed contractor. Cost varies significantly by scope.
- Wall reinforcement: For bowing walls due to lateral pressure, wall anchors or carbon fiber straps may be appropriate. Engineer assessment is essential to determine cause and solution.
- Lintel replacement: Failing steel lintels above brick openings require temporary shoring, brick removal, replacement, and repointing. Hire experienced masonry professional.
- Addressing root contributors:
- Frost heave mitigation: Improve drainage—install French drains if needed, extend downspouts ≥6 ft, regrade soil to slope away (min. 6″ drop over 10 ft). Below-grade foundation insulation (rigid XPS foam) may reduce frost penetration depth (consult engineer for applicability).
- Moisture control: Fix leaks contributing to wood degradation. Improve crawlspace ventilation or encapsulation. Resolve condensation issues identified in Deep Dive 1. Dry materials resist degradation.
When to Seek Professional Assessment
- Contact structural engineer promptly for: Horizontal foundation cracks, cracks >¼” wide, visible bulging/sagging, sudden door/window operation changes, cracks appearing after seismic activity or major flooding.
- Consult foundation specialist for: Growing stair-step cracks, diagonal corner cracks with movement, water leakage through cracks, repeated repair failures.
- Engage general contractor for: Recurring drywall cracks after proper repair, suspected truss uplift, assessment of framing integrity related to moisture history.
Cracks communicate your home’s stress history. By interpreting their language—location, pattern, behavior—you shift from anxiety to informed action. Addressing moisture and thermal issues often prevents crack formation or progression. Critically, unsealed cracks also represent pathways for air infiltration, directly impacting the third triad component: heating performance.
Deep Dive 3: Heating Inefficiencies – Optimizing Beyond the Thermostat
Uneven room temperatures and elevated heating costs frustrate many cold-climate homeowners. While furnace replacement seems logical, it rarely resolves underlying issues if the building envelope remains compromised. Heating performance is primarily determined by how effectively your home retains conditioned air—not solely by equipment capacity. This section focuses on diagnosing heat loss pathways and implementing envelope-focused solutions that deliver measurable comfort and efficiency gains.
Diagnosing Heat Loss: A Methodical Approach
Heat escapes through three physical pathways: conduction (through materials), convection (air movement), and radiation (through glazing). In existing homes, uncontrolled air leakage (convection) is frequently the most significant and fixable contributor. Begin with this systematic audit:
DIY Envelope Assessment Protocol
- Air leakage scan (perform on cold, windy day <20°F):
Slowly move hand around: - Windows/doors (tops, sides, thresholds)
- Electrical outlets/switches on exterior walls
- Baseboards where wall meets floor
- Attic hatches, ceiling fixtures (recessed “can” lights are common leaks)
- Pipe/wire penetrations from basement/crawlspace
- Fireplace dampers (ensure closed when not in use)
Mark draft locations with painter’s tape for later reference. - Door/window seal check:
Close a dollar bill in door/window sash. If it slides out with little resistance, seals need replacement. - Attic inspection (critical):
- Insulation depth: Measure at multiple points (eaves, center). Note compression or gaps.
- Recessed lights: Feel for drafts around non-ICAT rated fixtures.
- Hatches/stairs: Is attic access covered with insulation? Pull-down stairs need insulated cover boxes.
- Ventilation: Verify soffit vents aren’t blocked by insulation; ridge vents should be clear.
- Basement/crawlspace check:
Inspect rim joist area (where floor joists meet foundation wall)—a major leak source. Check for gaps around utility entries. Note presence/condition of foundation wall insulation. - Thermal imaging (highly recommended):
Rent a smartphone-compatible infrared camera (e.g., FLIR One). Scan interior walls on cold days. Blue/purple areas indicate cold spots from missing insulation, thermal bridging, or air leaks—providing visual prioritization data.
Contextual Insulation Targets for Cold Climates (Climate Zones 6–8)
| Location | Typical Code Minimum | Enhanced Target for Cold Climates | Practical Notes |
|---|---|---|---|
| Attic / Roof | R-49 to R-60 | R-60 to R-80+ | Blown cellulose or fiberglass; ensure soffit vents remain clear with baffles |
| Wall Cavities | R-13 to R-21 | R-21 to R-30+ | Dense-pack cellulose retrofit; exterior insulation during re-siding avoids thermal bridging |
| Basement Walls (Below Grade) | R-10 to R-15 (continuous) | R-15 to R-20+ | Rigid XPS foam board directly against concrete; seal seams |
| Crawlspace Walls | R-10 to R-15 (continuous) | R-15 to R-20+ | Rigid foam board; encapsulation often paired |
| Rim Joist | R-19 to R-30 | R-30+ | Spray foam (excellent air seal) or rigid foam + sealant; prioritize this area |
| Slab Edge | R-10 | R-15 to R-20 | Rigid XPS foam board; relevant for slab-on-grade homes |
Note: R-value indicates thermal resistance. Higher values reduce conductive heat loss. “Continuous” insulation minimizes thermal bridging through framing.
Tiered Solutions: Strategic Implementation Order
Critical sequence: Seal air leaks FIRST, THEN add insulation. Sealing without insulating traps conditioned air but doesn’t slow conduction. Insulating without sealing allows air to bypass insulation, drastically reducing effectiveness. Air sealing typically delivers the most immediate comfort and efficiency gains.
Tier 1: Immediate Air Sealing (Weekend-Feasible)
- Recessed lights: Install airtight retrofit covers (e.g., Tenmat FF10) before adding insulation. Or replace with ICAT-rated LED fixtures.
- Attic hatch: Build or purchase insulated cover box; seal edges with adhesive foam tape.
- Electrical outlets/switches: Install foam gaskets behind cover plates on exterior walls ($0.10/unit).
- Windows/doors: Replace worn weatherstripping. Use V-strip for sliders, adhesive foam tape for casements. Install quality door sweeps and threshold seals. Ensure smooth operation—over-tightening causes damage.
- Pipe/wire penetrations: Seal gaps around plumbing vents, conduits using fire-rated expanding foam (e.g., Great Stuff Fireblock) or silicone caulk. Never use standard foam near electrical boxes.
- Rim joist (basement/crawlspace): Clean area. Seal gaps between rim joist and sill plate with caulk. Fill cavities with rigid XPS foam board (cut to size), sealed at edges with spray foam. Wear appropriate PPE.
Tier 2: Strategic Insulation Upgrades
- Attic insulation boost: Most cost-effective upgrade. Add blown cellulose/fiberglass to reach R-60+. Hire professional for even coverage, especially near eaves. Install rafter vents to maintain soffit airflow.
- Basement/crawlspace walls: Install rigid XPS foam board (min. 1.5″ thick) directly against foundation walls. Seal seams with tape and foam. Avoid fiberglass batts against concrete—they trap moisture. Frame stud wall in front of foam if finishing, leaving small air gap.
- Existing wall insulation: Options vary:
- Dense-pack cellulose: Drilling small holes to fill cavities; effective but requires professional installation. Best for homes with little/no existing insulation.
- Exterior insulation: Adding rigid foam + new siding during renovation; highest performance (eliminates thermal bridging) but invasive.
- Interior insulation: Adding rigid foam + drywall inside; consult building science professional first—improper installation risks moisture trapping in cold climates.
- Window treatments: Thermal curtains with sealed side tracks significantly reduce nighttime heat loss. Close at dusk. Open south-facing curtains on sunny days for passive solar gain.
Tier 3: Heating System Optimization (After Envelope Improvements)
- Professional tune-up: Annual servicing ensures combustion efficiency, airflow, and safety. Replace filters regularly.
- Smart thermostat: Models like Ecobee or Nest learn schedules, enable setbacks. Cold-climate note: Avoid deep setbacks (>10°F) during extreme cold (<-20°F)—moderate setbacks (3–5°F) prevent system strain during recovery. Verify compatibility with your system type.
- Zoning systems: If rooms have persistent temperature differences, dampers and zone thermostats allow targeted heating. Best integrated during major HVAC work.
- Equipment replacement (final consideration): Replace only if:
- System is >15 years old with declining efficiency (<80% AFUE for gas)
- Frequent, costly repairs
- After significant envelope improvements, current system is oversized (short-cycles), reducing comfort
Crucially: Require a Manual J load calculation from a qualified HVAC contractor after envelope work to size new equipment correctly. Oversized units waste energy and reduce comfort.
Avoiding Common Heating “Fixes” That Backfire
- Space heaters: Electric resistance heaters (oil-filled, ceramic) are costly to operate (~$0.15–$0.30/hour). Use only for very short-term spot needs. Never use unvented combustion heaters (kerosene/propane) indoors—they produce moisture and carbon monoxide.
- Closing vents in unused rooms: Creates duct pressure imbalances, potentially increasing leaks elsewhere, reducing airflow, and straining equipment. Avoid closing >20% of vents.
- Cranking thermostat higher: Does not heat faster. Systems output heat at fixed rates; higher settings only extend runtime, increasing energy use. Maintain consistent, comfortable temperatures.
Triad Integration: The Systems Perspective
Heating performance is deeply linked to the other two components:
– Condensation connection: Air leaks introduce cold, dry outdoor air. To maintain comfort, heating systems run longer, raising indoor temperatures. Warmer air holds more moisture from daily activities. Without balanced ventilation, indoor humidity may rise, increasing condensation risk on cold surfaces. Conversely, sealing leaks without adding ventilation can trap moisture. Hence the need for integrated solutions (seal and ventilate).
– Cracks connection: Structural cracks—especially in foundations, walls, or around openings—are direct pathways for cold air infiltration. A ⅛” gap around a door equates to a significant hole in your thermal barrier. Repairing cracks improves structural integrity and reduces convective heat loss. Additionally, moisture from condensation can degrade structural elements over time, potentially creating new air leakage paths.
Optimizing heating comfort and efficiency begins with the building envelope. By methodically sealing leaks, adding insulation strategically, and then optimizing mechanical systems, you achieve compounding benefits across all three triad components. This holistic understanding sets the stage for the unified diagnostic protocol that follows.
The Holistic Home Health Audit: Your 7-Step Diagnostic Protocol
You now hold deep knowledge of condensation, cracks, and heating dynamics. This actionable audit transforms theory into personalized insight for your home. Conduct over two weekends (one cold day <20°F, one mild day) with basic tools: notebook, camera, tape measure, ruler, hygrometer, infrared thermometer (highly recommended), flashlight. This protocol identifies root causes—not just symptoms—and prioritizes actions by impact and urgency.
Step 1: Establish Baseline Metrics (“Vital Signs”)
- Indoor conditions: Record temperature and relative humidity (RH) in main living area, one bedroom, basement at 8 AM, 2 PM, 8 PM for 3 days. Note outdoor temperature each time. Calculate average indoor RH. Compare to contextual dew point guide (Deep Dive 1). Note: Consistently >40% RH when outdoor temps <20°F warrants investigation.
- Energy context: Gather last 12 months of heating bills. Note any unusual spikes correlating with weather events. (Optional: Calculate usage per heating degree day if utility data available.)
- Visual inventory: Photograph all cracks (with ruler), condensation patterns, visible insulation levels, window conditions, HVAC equipment. Create dated digital folder: “Home Audit [Date].”
Step 2: Moisture Mapping (“Follow the Water”)
- Condensation scan: On cold morning (<20°F), document exactly where condensation forms: which windows (note orientation—north faces are typically coldest), walls, pipes. Is pattern uniform or localized? Measure surface temperature at sites with IR thermometer. Calculate dew point. Key insight: If surface temp ≤ dew point, condensation is physically inevitable—focus shifts to raising surface temp or lowering humidity.
- Humidity source hunt: Identify potential sources (refer to Deep Dive 1 table). Check: humidifier settings (disable if present for test), exhaust fan operation/venting location, basement/crawlspace humidity readings, signs of leaks (stains, odors), indoor drying practices.
- Hidden moisture check: In attic, inspect roof sheathing underside for staining, mold, or frost (indicates air leakage). In crawlspace, check for standing water, damp soil, vapor barrier condition. Caution: Feel wall insulation near condensation sites for dampness only if safe and accessible.
Step 3: Structural Stress Assessment (“Read the Cracks”)
- Crack catalog: Using photos/notes, categorize every crack using Deep Dive 2 guides. Record: location, type, width (measure precisely), length, orientation, nearby features.
- Stability check: Apply monitoring protocol: mark crack ends with dated tape. Note associated symptoms: sticking doors/windows, floor slope (use level), wall bulging, recent changes after weather events.
- Foundation perimeter check: Walk exterior. Look for: foundation cracks, separation between foundation and siding, gaps around utilities, drainage issues (water pooling near foundation), vegetation touching walls. Check interior basement walls for efflorescence, bowing, or horizontal cracks.
Step 4: Thermal Envelope Audit (“Find the Leaks”)
- Air leakage scan: Perform “Hand Test” meticulously on cold, windy day. Mark every draft location with painter’s tape. Prioritize: attic hatch, recessed lights, rim joist area, windows/doors, exterior-wall outlets.
- Insulation inventory: In attic, measure depth at multiple points. Estimate R-value (cellulose/fiberglass: depth in inches × ~3.5). Note compression, gaps, missing areas. In basement, note presence/condition of wall insulation. Check rim joist area thoroughly.
- Window/door assessment: Note age, glazing type, seal condition. Perform Dollar Bill Test. Check operation—sticking may indicate frame movement.
Step 5: Heating System Context (“Beyond the Thermostat”)
- Equipment notes: Record age, model (if accessible), filter condition. Listen for unusual noises. Verify thermostat operation.
- Comfort mapping: On cold day, measure temperature in each room at floor level and head height. Note differences (>3°F between rooms, >5°F floor-to-ceiling). Correlate cold spots with air leak locations or missing insulation from Step 4.
- Duct inspection (if accessible): In basement/crawlspace, check supply/return ducts for visible gaps, disconnections, or missing insulation (ducts in unconditioned spaces should be sealed and insulated).
Step 6: Synthesis & Root Cause Analysis (“Connect the Dots”)
This critical step moves from data to insight. Create a simple table:
| Observed Symptom | Potential Root Cause(s) | Supporting Evidence | Triad Connection |
|---|---|---|---|
| Heavy condensation on NW bedroom window | 1. Elevated indoor humidity 2. Low window surface temp 3. Air leak at frame |
Avg RH 48% IR: glass 36°F, dew point 42°F Draft felt at top |
High humidity (Condensation) + air leak (Heating) cools surface |
| Diagonal crack at basement window corner | 1. Frost heave/settlement 2. Moisture damage to framing |
Crack widened after Jan thaw Water stain on sill below |
Moisture (Condensation) weakens structure; settlement increases air leaks (Heating) |
| Living room 5°F colder than hallway | 1. Missing attic insulation 2. Air leak at recessed light |
IR shows cold ceiling spot Draft at fixture North exterior wall |
Air leak (Heating) allows moisture risk (Condensation); cold wall promotes condensation |
Ask repeatedly: “What underlying condition allows this symptom to exist?” Trace each symptom through the triad. Does high humidity stem from inadequate ventilation after air sealing? Does a crack allow cold air infiltration that cools a wall surface enough to cause condensation? Identify the origin point.
Step 7: Prioritized Action Plan (“Your Roadmap”)
Rank issues using this evidence-based matrix:
| Priority | Criteria | Example Actions |
|---|---|---|
| CRITICAL | Safety hazard, active water intrusion, structural instability, visible mold | Fix leaking pipe; consult engineer for horizontal foundation crack; address active mold per EPA guidelines |
| HIGH | Significant energy waste, recurring damage, major discomfort | Seal major air leaks (rim joist, attic hatch); add attic insulation to R-60; repair window/door seals; address basement moisture source |
| MEDIUM | Improves comfort, prevents future issues, moderate investment | Install timer switches on exhaust fans; add thermal curtains; repair stable cosmetic cracks; HVAC tune-up |
| LOW | Incremental gains, aesthetic upgrades, long-term planning | Replace single-pane windows; install HRV/ERV; interior wall insulation upgrade; smart thermostat |
For each HIGH priority item, define:
– Specific action: “Seal rim joist cavities with 2″ XPS foam board and low-expansion spray foam.”
– Tools/materials: XPS foam, utility knife, caulk, foam, safety glasses.
– Estimated cost range: $100–$200 (materials only; professional installation higher).
– DIY or pro consideration: DIY feasible for careful homeowner; pro recommended for complex access or large scope.
– Expected impact: Reduced drafts in living area, lower heating load, reduced condensation risk on first-floor walls.
– Dependencies: Complete before adding basement wall insulation.
This audit replaces overwhelm with clarity. You now hold a data-driven, prioritized plan tailored to your home’s unique systems. You understand why issues exist and how solutions interconnect—enabling confident decisions and maximizing the impact of every action. The next section addresses practical implementation: budget constraints, professional collaboration, and avoiding common pitfalls.
Navigating Solutions: Budget Tiers, Professional Collaboration, and Pitfall Avoidance
With your audit complete, the path forward requires balancing ideal solutions with practical constraints. This section provides realistic guidance for phased implementation, vetting qualified professionals, and avoiding well-intentioned mistakes. Progress is cumulative—strategic small steps yield meaningful results.
Budget-Conscious Implementation: Phased Action Plans
Significant improvements are achievable at every budget level. Focus initial efforts on high-leverage actions that positively impact multiple triad components.
Tier 1: $0 – $200 (Immediate, High-Impact Actions)
- Impact: Addresses urgent symptoms, prevents minor issues from worsening, builds momentum.
- Key actions:
- Disable whole-house humidifier (if present and not medically necessary).
- Install foam gaskets behind exterior-wall electrical outlet/switch plates.
- Apply weatherstripping to drafty windows/doors; install door sweep.
- Seal visible gaps around basement pipes/wires with fire-rated foam/caulk.
- Create insulated attic hatch cover from rigid foam board.
- Install timer switches on bathroom exhaust fans (ensures 20+ min runtime).
- Regrade soil near foundation (shovel work) to slope away from house.
- Triad impact: Reduces air leaks (Heating), lowers humidity sources (Condensation), prevents moisture intrusion that stresses structure (Cracks).
- Pro tip: Track energy usage before/after via utility dashboard. Even modest reductions validate efforts and motivate continued progress.
Tier 2: $200 – $1,500 (Strategic System Upgrades)
- Impact: Targets high-priority audit findings; delivers measurable comfort and efficiency gains.
- Key actions:
- Add attic insulation to reach R-49 (blown cellulose DIY kit or partial pro install).
- Seal and insulate rim joist area (XPS foam + spray foam).
- Install high-CFM bathroom exhaust fan with humidity sensor.
- Apply interior storm window inserts to worst-condensation windows.
- Install vapor barrier over entire crawlspace dirt floor (6-mil poly).
- Professional HVAC tune-up and filter upgrade.
- Triad impact: Significantly reduces heat loss (Heating), raises interior surface temperatures to prevent condensation (Condensation), reduces moisture-driven structural stress (Cracks).
- Pro tip: Prioritize based on your audit’s “HIGH” items. If rim joist leaks dominate, address those before attic insulation for maximum ROI.
Tier 3: $1,500 – $10,000+ (Professional Structural & Systemic Solutions)
- Impact: Resolves chronic, complex issues; transforms long-term performance and resilience.
- Key actions:
- Foundation crack repair (epoxy injection, carbon fiber straps) per engineer specs.
- Basement waterproofing system (interior drain tile, sump pump) for chronic moisture.
- Professional dense-pack cellulose wall insulation retrofit.
- Install HRV/ERV system with HVAC integration.
- Replace critical windows (north-facing, failed seals) with high-performance units.
- Address structural issues (lintel replacement, minor stabilization) per professional assessment.
- Triad impact: Comprehensive resolution of root causes across all three areas. Creates a tighter, drier, more resilient building envelope.
- Pro tip: Phase work over 2–3 years if needed. Foundation repair Year 1, ventilation upgrade Year 2. Obtain multiple detailed bids; ensure proposals reference your audit findings.
Finding and Collaborating with Qualified Professionals
Not all contractors specialize in building science principles. Hiring the right partner prevents wasted resources and avoids creating new problems. Use this vetting framework:
Professional Types and Key Questions
| Professional | When to Engage | Critical Questions to Ask | Red Flags to Avoid |
|---|---|---|---|
| Energy Auditor (BPI/RESNET Certified) | Before major upgrades; to validate DIY audit | “Will you perform blower door test and thermal imaging?” “Do you provide prioritized report with cost/benefit analysis?” “How do you address moisture management in recommendations?” | Only sells specific products; no diagnostic testing; dismisses moisture concerns |
| Insulation Contractor | For attic, wall, or basement insulation | “How will you air seal before insulating?” “What R-value do you recommend for my climate and assembly?” “How do you handle ventilation and moisture barriers?” | Pushes single product (“spray foam solves all”); vague about air sealing; ignores vapor drive |
| Foundation Specialist | For active cracks, bowing walls, water | “Will you provide written assessment from structural engineer?” “What warranty covers the repair method?” “How does this address the cause (e.g., drainage)?” | High-pressure sales; “lifetime warranty” with exclusions; refuses engineer involvement |
| HVAC Contractor (NATE Certified) | For system replacement, HRV/ERV, ductwork | “Will you perform Manual J load calculation after my envelope improvements?” “How do you ensure proper sizing and duct sealing?” “What is your ventilation and IAQ approach?” | Quotes based solely on square footage; pushes oversized equipment; dismisses load calc |
| General Contractor | For multi-trade projects (windows + siding) | “Can you provide references for cold-climate projects?” “How do you coordinate subs to follow building science principles?” “What is your moisture management process during renovation?” | Vague contract details; poor communication; unwilling to provide references |
Proposal Evaluation Checklist
A credible bid includes:
– Detailed scope of work (materials, methods, areas)
– Reference to relevant codes/standards (IRC, IECC, BPI)
– Warranty details (materials and labor)
– Realistic timeline with milestones
– Proof of insurance (liability, workers’ comp)
– References from past clients (call them!)
– For structural work: Engineer’s stamped recommendations
Critical Pitfalls to Avoid: Lessons from Field Experience
-
Pitfall: Insulating Without Air Sealing
Why it fails: Adding insulation over air leaks is like wearing a coat with the zipper open. Air bypasses insulation, carrying heat and moisture. Trapped moisture risks material degradation.
Solution: Air seal first, then insulate. Verify sealing effectiveness where possible. -
Pitfall: Misapplying Vapor Barriers in Cold Climates
Why it fails: In cold climates, moisture drives from warm interior to cold exterior. Installing an interior poly vapor barrier in existing walls can trap moisture within the assembly during winter.
Solution: Prioritize air sealing (stops bulk airflow) and use vapor-permeable insulation (cellulose, mineral wool) that allows drying. For adding insulation to existing walls, exterior rigid foam is often safer. Consult a building science professional before adding interior vapor barriers. -
Pitfall: Over-Tightening Without Ventilation
Why it fails: Sealing leaks without adding controlled ventilation traps indoor pollutants and moisture, potentially worsening condensation and air quality.
Solution: If significant air sealing is performed, plan for balanced ventilation. Use exhaust fans consistently; consider HRV/ERV for very tight homes. Monitor indoor humidity. -
Pitfall: Cosmetic Crack Repair Without Diagnosis
Why it fails: Filling a crack caused by ongoing movement is temporary. The crack will likely reappear, often larger.
Solution: Always determine the cause (use Deep Dive 2 protocol) before repairing. Address root contributors (drainage, moisture) first. -
Pitfall: Prioritizing Window Replacement Prematurely
Why it fails: New windows are costly and address only a fraction of heat loss. Air leaks and insufficient attic insulation are typically larger contributors. Condensation on new windows often persists if humidity isn’t managed.
Solution: Prioritize air sealing and attic insulation first. Address window condensation with interior storms or thermal curtains. Replace windows only if failed, inoperable, or part of larger renovation.
DIY vs. Professional Decision Framework
Ask these questions before proceeding:
1. Safety risk? (Electrical, structural, working at height) → If yes, hire qualified professional.
2. Requires specialized tools/knowledge? (Blower door test, structural engineering, refrigerant handling) → If yes, hire professional.
3. Warranty or code compliance critical? (Foundation repair, major insulation) → Often requires licensed professional.
4. Time vs. cost trade-off? Be honest about your time value and skill comfort.
5. Confidence level? If anxious, consult a professional—even for an hourly assessment.
When DIYing: Review reputable resources (Building Science Corporation, Green Building Advisor), start small, prioritize safety (PPE!), and don’t hesitate to pause and seek guidance. Many contractors offer hourly consultations for complex steps.
Thoughtful implementation—aligned with your audit, budget, and capabilities—builds lasting resilience. Each informed action strengthens your home’s entire system and deepens your understanding as a steward of your property. Next, we address specific questions commonly encountered by cold-climate homeowners.
Your Questions, Answered
These questions reflect real concerns from homeowners across northern regions, energy auditor reports, and contractor consultations. Answers integrate building science principles with practical, contextual guidance.
Q: My windows sweat heavily even with the humidifier off. Should I buy a whole-house dehumidifier?
A: A whole-house dehumidifier is rarely the optimal solution for winter window condensation and may increase heating costs. First, verify indoor humidity with a hygrometer. If RH exceeds 40% when outdoor temps are below 20°F, the issue is likely inadequate ventilation rather than excess moisture generation. Focus on source control: ensure bathroom/kitchen exhaust fans run 20+ minutes post-use, confirm clothes dryers vent outside, and check for hidden moisture sources (basement humidity, indoor drying). If humidity remains high and your home is very tight (confirmed via energy audit), a Heat Recovery Ventilator (HRV) is the appropriate solution—it exchanges air while recovering heat. Dehumidifiers are best reserved for chronically damp basements or crawlspaces.
Q: I found a horizontal crack in my poured concrete foundation wall. How urgent is this?
A: Horizontal cracks in foundation walls warrant prompt evaluation by a licensed structural engineer. Unlike vertical shrinkage cracks, horizontal cracks often indicate significant lateral pressure from soil, hydrostatic pressure, or frost heave. While awaiting assessment: verify exterior grading directs water away from the foundation, ensure downspouts extend ≥6 ft from the house, and monitor the crack for widening or bulging. Do not seal the crack yourself—this can trap moisture and obscure critical evidence needed for professional diagnosis.
Q: After sealing air leaks and adding attic insulation, my house feels stuffy and window condensation increased. What happened?
A: This indicates successful air sealing without adding adequate ventilation—a common oversight. Tightening the envelope traps indoor moisture and pollutants. Immediate actions: use bathroom/kitchen exhaust fans consistently (install timers if needed), and briefly open windows on cold, dry days to flush air. For a permanent solution, consult an HVAC professional about installing a Heat Recovery Ventilator (HRV). HRVs are well-suited for cold, dry climates—they introduce fresh, filtered outdoor air while exhausting stale indoor air, transferring heat between streams to minimize energy loss and maintain healthy humidity levels.
Q: Are hairline cracks above my doorways a sign of serious foundation problems?
A: In most cases, no—especially if cracks are vertical, follow the corner, are under ⅛” wide, and have been stable for over a year. These commonly result from seasonal wood framing movement (truss uplift in homes with attic trusses, or normal expansion/contraction). Monitor them: mark ends with dated tape and check monthly. If cracks widen beyond ⅛”, lengthen significantly, or accompany sticking doors/windows or sloping floors, consult a structural professional. Cosmetic repair (using flexible joint compound or paintable caulk under mesh tape) is appropriate once stability is confirmed, typically in late spring after winter movement settles.
Q: My heating bill spiked this winter, but my furnace is only 5 years old. Should I replace it?
A: Replacing a relatively new, functioning furnace is seldom the most cost-effective response to a bill increase. Investigate first:
1. Check for new air leaks (recent renovations? damaged weatherstripping?).
2. Verify attic insulation hasn’t settled or been disturbed.
3. Review thermostat settings for accidental changes.
4. Schedule a professional HVAC tune-up; a dirty filter or minor issue reduces efficiency.
5. Compare this year’s heating degree days to last year—was it significantly colder?
Addressing envelope issues (air sealing, insulation) typically yields greater savings (10–30% reduction in heating load) than replacing a modern high-efficiency furnace. Only consider replacement if the unit malfunctions frequently, is significantly oversized (short-cycling), or after envelope improvements reveal it’s now mismatched to the reduced load.
Q: Can I insulate my basement walls with fiberglass batts?
A: Not recommended in cold climates. Fiberglass batts are vapor-permeable and provide no air barrier. When placed directly against cold concrete, warm indoor air penetrates the batts, contacts the cold surface, and condenses within the assembly. This trapped moisture promotes mold growth and degrades materials. The preferred approach: Install rigid extruded polystyrene (XPS) foam board (min. 1.5″ thick) directly against the foundation wall. XPS resists moisture and provides a thermal break. Seal all seams with tape and foam. If framing a wall in front, leave a small air gap and fill the cavity with vapor-permeable insulation (mineral wool) without an interior vapor barrier. This assembly allows incidental moisture to dry inward. Consult local building codes and a qualified professional for your specific conditions.
Q: How do I assess if a crack in my brick chimney is serious?
A: Chimney cracks require careful evaluation due to fire and structural implications. Focus on location and pattern:
– Vertical cracks in the flue liner (visible inside): Critical—can allow carbon monoxide or fire into living space. Requires immediate inspection by a CSIA-certified chimney sweep.
– Stair-step cracks following mortar joints: Indicate movement. If wider than ¼”, growing, or with leaning, consult a masonry specialist.
– Cracks at the chimney crown (top): Common; water intrusion accelerates deterioration. Repair with crown coating or replacement.
– Cracks where chimney meets house: Often due to differential movement. Seal with high-quality, flexible masonry caulk.
Annual inspection by a certified chimney sweep is strongly recommended. They can use cameras to assess flue liner integrity—a hidden crack there poses greater risk than a visible exterior crack.
Q: Will adding attic insulation cause ice dams?
A: Properly installed attic insulation prevents ice dams—but only when paired with thorough air sealing and adequate ventilation. Ice dams form when heat escapes into the attic (via air leaks or insufficient insulation), melting roof snow. Meltwater flows to cold eaves, refreezes, and backs up under shingles. The solution is threefold:
1. Air seal: Meticulously seal all attic floor leaks (recessed lights, plumbing vents, attic hatch) to prevent warm air entry.
2. Insulate: Add insulation to target levels (R-60+) after air sealing is complete.
3. Ventilate: Ensure soffit vents are unobstructed (use rafter vents/baffles) and ridge vents function. This allows cold air to flow under the roof deck, keeping it uniformly cold. Adding insulation without first air sealing can worsen ice dams by making the attic warmer if leaks remain. Always address air sealing first.
Q: Is it safe to use expanding foam around electrical outlets?
A: Exercise caution. Standard expanding foam is flammable and poses fire risk if it contacts electrical components inside the box. Safe protocol:
1. Turn off power at the breaker.
2. Remove outlet cover plate.
3. Insert fire-rated expanding foam (e.g., Great Stuff Fireblock) only into the gap between the electrical box and the wall framing. Do not fill the box cavity.
4. Alternatively, use pre-cut electrical box foam gaskets behind the cover plate (inexpensive, safe, effective for drafts).
5. For gaps around wires entering the box, use fire-rated caulk (intumescent sealant).
When uncertain, skip foam near electrical components and focus on sealing larger gaps around the box perimeter from the attic or basement side.
Q: My old single-pane windows are drafty and cause condensation. Are storm windows worth it?
A: High-quality interior storm windows (e.g., Indow inserts) are often the most cost-effective solution for sound single-pane windows. They:
– Reduce heat loss by 50–70% (comparable to some double-pane replacements)
– Raise interior glass temperature significantly, eliminating condensation
– Preserve historic window character and operation
– Cost approximately one-third to one-half the price of full replacement
– Install/remove easily for cleaning or seasonal use
Full replacement is justified only if original windows are rotten, inoperable, or severely damaged. For structurally sound wood windows, restoration plus interior storms typically delivers superior value and performance. Exterior storm windows are less effective for interior condensation and risk trapping moisture between panes if not properly vented.
Q: How often should I check my home for winter-related issues?
A: Establish a seasonal rhythm:
– Late fall (before deep cold): Check weatherstripping, clean gutters/downspouts, verify attic ventilation, test exhaust fans, inspect foundation perimeter.
– Mid-winter (during cold snap): Monitor condensation patterns, check for new cracks, feel for drafts, verify heating system operation.
– Early spring (thaw period): Inspect foundation for new cracks or water intrusion, check grading around house, examine roof for damage, assess winter wear.
– Annually: Schedule HVAC tune-up, chimney inspection (if applicable), review energy bills for anomalies.
Additionally, conduct the full Holistic Home Health Audit every 3–5 years, or after major weather events (severe freeze-thaw cycles, heavy snow loads).
Conclusion and Next Step
You began this guide likely seeking relief from recurring winter challenges—condensation on windows, concerns about cracks, frustration with heating costs. You now possess something more enduring: a systems-based understanding of your home’s behavior in cold climates. You can interpret moisture patterns, assess structural signals, and prioritize envelope-focused solutions. This knowledge transforms uncertainty into informed stewardship. It empowers clear communication with professionals and confident, phased implementation aligned with your resources.
Recap: The Three Pillars of Cold Climate Home Resilience
- Manage Moisture at the Source: Control indoor humidity through source reduction and balanced ventilation—not reactive dehumidification. Recognize condensation as a diagnostic signal of system interaction, not merely a surface issue.
- Read Structural Signals Contextually: Assess cracks through location, pattern, and behavior. Address root contributors (moisture, settlement, movement) rather than applying cosmetic fixes alone.
- Optimize the Thermal Envelope First: Prioritize air sealing and strategic insulation upgrades before modifying heating equipment. A well-managed envelope reduces strain across all systems and prevents interconnected issues.
The 24-Hour Rule
Within the next day, take one small, concrete step to initiate momentum:
– If condensation concerns you most: Place a hygrometer in your main living area. Record relative humidity and outdoor temperature at three different times today. Compare to the contextual dew point guide in Deep Dive 1.
– If cracks warrant attention: Select one crack that concerns you. Photograph it with a ruler beside it. Mark the ends with dated tape. Note its location and characteristics in a notebook.
– If heating efficiency is top of mind: Perform the “Dollar Bill Test” on your most drafty exterior door. If the bill slides out easily, schedule weatherstripping replacement within the next week.
This single action breaks the cycle of overwhelm and anchors your journey in observable evidence.
The Big Picture
Your home functions as an integrated system responding to climate, occupancy, and maintenance history. By adopting a systems-thinking approach—where moisture management supports structural integrity, which in turn enhances thermal performance—you cultivate resilience that transcends seasonal challenges. Each evidence-based decision, each targeted repair, compounds into a safer, more comfortable, and efficient living environment. This shift from reactive patching to proactive stewardship forms the foundation of enduring cold-climate home wellness. You are now equipped to navigate with clarity, confidence, and care.
Continue Your Home Resilience Journey:
Understanding Attic Ventilation in Snow Country | Foundation Drainage Solutions for Northern Homes | Choosing the Right HRV for Your Climate Zone | Historic Window Preservation in Cold Climates | Seasonal Home Maintenance Calendar for Northern Regions | Interpreting Your Home Energy Audit Report | Moisture Management in Crawlspaces and Basements