Transform Every Downpour into a Sustainable Water Resource—Thoughtfully, Legally, and Within Your Means
Rainwater harvesting moves far beyond placing a barrel beneath a downspout. It represents a deliberate integration of ecological awareness, practical engineering, and site-specific adaptation—turning atmospheric moisture into a reliable resource for landscapes, outdoor tasks, and household resilience. Yet many well-intentioned efforts encounter setbacks: systems that conflict with local regulations, attract pests, degrade prematurely, or deliver water of inconsistent quality. These outcomes often stem not from flawed intent, but from overlooked foundational steps. This guide offers a structured, adaptable framework to design, install, and maintain a rainwater harvesting system that aligns with legal requirements, prioritizes safety, matches your property’s constraints, and evolves with your needs. Whether capturing modest volumes for container gardens or scaling toward whole-yard irrigation support, you’ll gain clear, actionable knowledge grounded in current standards and practical experience.
Introduction
Water stewardship has become increasingly relevant across diverse U.S. regions—from communities navigating seasonal droughts to neighborhoods managing stormwater runoff in humid climates. Simultaneously, rooftops channel significant volumes of relatively clean water into municipal drainage systems during rainfall events, representing a missed opportunity for localized reuse. Rainwater harvesting bridges this gap. Rooted in ancient practices (evidenced by cistern systems in Mediterranean and Middle Eastern archaeology), the approach has been revitalized through modern materials, evolving building codes, and growing municipal support for water conservation. Frameworks such as the International Plumbing Code (IPC) Chapter 13 and EPA WaterSense guidelines acknowledge properly designed non-potable rainwater systems as viable contributors to reducing outdoor water demand. This isn’t niche environmentalism; it’s pragmatic resource management increasingly reflected in local green building incentives and resilience planning. Before selecting tanks or tools, success begins with context: understanding your location’s regulations, your property’s physical constraints, and your realistic usage goals. True sustainability emerges when human need, ecological responsibility, and regulatory alignment converge. This guide prioritizes that foundation—because thoughtful preparation prevents costly corrections later.
The Rainwater Harvesting Pyramid: A Three-Layer Framework for Lasting Success
Imagine constructing a structure on unstable ground. No matter the quality of materials above, integrity depends on what lies beneath. Rainwater systems follow the same principle. Analysis of documented installation challenges consistently reveals that difficulties arise when foundational layers are overlooked. To build resilience, adopt the Rainwater Harvesting Pyramid—a sequential framework where each layer supports the next. Layer 1 establishes legality and safety. Layer 2 tailors design to your site and goals. Layer 3 ensures longevity through consistent care. Progressing deliberately through these layers transforms aspiration into enduring function.
The Fundamental Principle: A rainwater harvesting system achieves lasting value only when legality, tailored design, and routine stewardship are equally prioritized.
Layer 1: The Legal and Safety Foundation (The Bedrock)
This layer addresses prerequisites that must be confirmed before purchasing components: What does local regulation require? What safety considerations are essential for my household and community? Overlooking this stage risks non-compliance, safety hazards, or system redesign. Approach this phase with curiosity, not assumption.
Understanding Regulatory Context: Location Shapes Requirements
Water regulations in the United States vary significantly by region. Rather than memorizing state statutes—which change—focus on a reliable verification process:
- Eastern U.S. (Generally Riparian Doctrine Regions): Rainwater harvesting for non-potable uses is commonly permitted. Local ordinances may address tank placement (setbacks from property lines), mosquito management, or signage. Many municipalities in Florida, Georgia, and the Carolinas actively encourage systems through rebates or streamlined permitting.
- Western U.S. (Historically Prior Appropriation Regions): States like Colorado, Utah, and Arizona have modernized regulations. Colorado permits residential collection under specific conditions (e.g., properties served by wells). Arizona explicitly authorizes systems. Crucially: Never rely on outdated information. Regulations evolve.
Your Action Path (IF/THEN Logic):
→ IF you are considering any system (even a single rain barrel), THEN contact your local building department and health department before purchasing.
→ Ask specifically:
– “Are permits required for non-potable rainwater systems under [e.g., 500] gallons?”
– “Are there setback requirements from property lines, septic systems, or wells?”
– “Does the health department specify mosquito-proofing standards?”
– “Are there restrictions on intended uses (e.g., vegetable garden irrigation)?”
→ IF your municipality participates in green building programs (LEED, WaterSense), THEN inquire about documentation needed to qualify for incentives.
→ Document responses: Note the name of the official, date, and key requirements. This creates clarity and accountability.
Pattern Observed: Municipalities increasingly view well-designed rainwater systems as assets that reduce stormwater burden. Proactive inquiry often reveals supportive staff and available resources—not barriers.
Safety Protocols: Non-Negotiable Protections
Safety integrates seamlessly into design when addressed early. Key considerations include:
- Child and Pet Safety: All storage containers require secure, tamper-resistant lids. For tanks exceeding 150 gallons, consider placement within a fenced area with self-closing gates. Never elevate tanks beyond manufacturer specifications without engineered structural support.
- Mosquito Prevention (A Public Health Priority): Stagnant water can support mosquito breeding. Implement layered defenses:
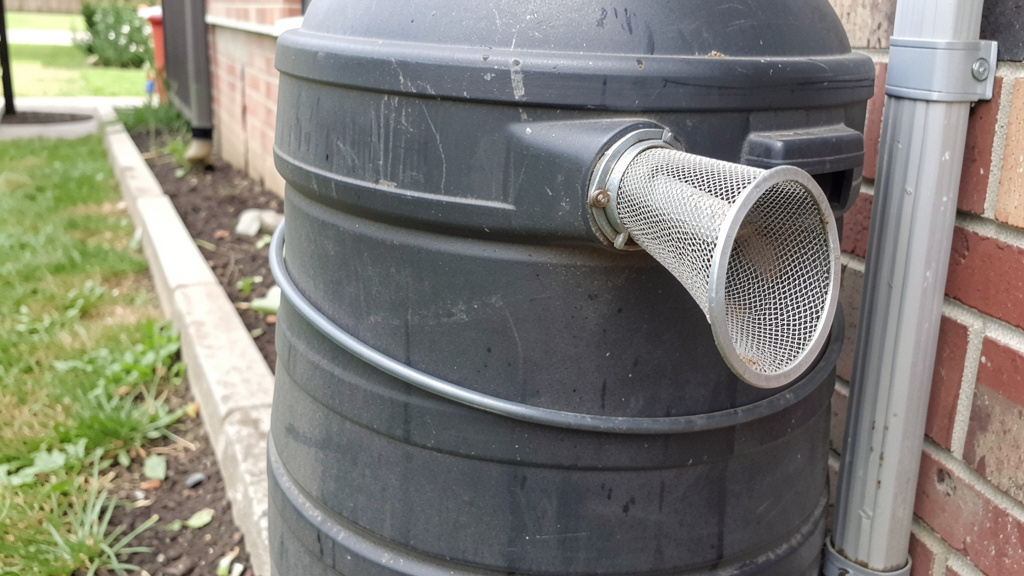
→ IF your system includes any open inlet, overflow, or vent, THEN install fine-mesh screening (≤16 mesh / 1.2mm openings) made of aluminum or stainless steel.
→ IF overflow discharge pools near the tank base, THEN slope piping downward and away from foundations.
→ IF water remains stored through warm months, THEN use Bacillus thuringiensis israelensis (Bti) dunks—biological larvicide safe for plants, pets, and wildlife. Replace per product instructions. Avoid chemical pesticides or oil films, which contaminate water and harm ecosystems.
→ Inspect screens monthly during growing season; debris accumulation compromises effectiveness. - Structural Considerations: Water weighs approximately 8.34 pounds per gallon. A 500-gallon tank exerts over 4,000 pounds of static load.
→ IF placing a tank on soil, THEN prepare a level, compacted base of 4–6 inches of crushed gravel topped with concrete pavers or a poured pad.
→ IF installing tanks over 300 gallons near slopes, foundations, or in high-wind zones, THEN consult a qualified professional regarding foundation requirements.
→ IF in a freeze-thaw climate, THEN ensure the foundation extends below the frost line or uses insulated design to prevent shifting. - Container History: Avoid repurposed industrial containers (e.g., IBC totes) unless you have verified, documented proof of prior safe contents (e.g., food-grade olive oil). Residual chemicals may leach into water. When in doubt, select new containers explicitly manufactured and certified for water storage.
Federal and Model Code References: Your Technical Compass
While enforcement is local, these widely referenced documents inform municipal requirements:
– IPC Chapter 13: Specifies requirements for non-potable systems, including mandatory “Non-Potable Water – Do Not Drink” signage on all outlets and tanks, backflow prevention where connections to municipal supply are possible, and material standards (e.g., NSF/ANSI 61 certification for components with incidental human contact).
– IRC Appendix S: Addresses structural placement, foundation design, and seismic considerations for storage vessels.
– EPA WaterSense Specifications: Voluntary benchmarks for system efficiency, increasingly cited in green building certifications.
Mentioning these frameworks during permit discussions (“I’m aligning with IPC Chapter 13 guidelines”) demonstrates informed preparation and facilitates constructive dialogue with officials.
Layer 2: System Design and Component Selection (The Architecture)
With foundational clarity secured, design your system around four interconnected components: Catchment (roof), Conveyance (gutters/downspouts), Storage (tank), and Distribution (delivery method). Choices in one area influence others. This layer transforms site assessment into a tailored, functional plan.
Step 1: Estimate Harvest Potential (Contextual Math)
Avoid guesswork. A simple calculation provides realistic expectations:
Estimated Gallons per Rain Event = Roof Drainage Area (sq ft) × Rainfall Depth (inches) × 0.623
- Roof Drainage Area: Measure the horizontal footprint of the roof section feeding your chosen downspout(s). For a simple rectangular section: Length × Width. Complex roofs may require sketching sections. Example: A 30′ x 40′ section = 1,200 sq ft.
- Rainfall Data: Use average annual rainfall for storage planning; use typical single-storm depth for overflow design. Reliable sources include NOAA’s National Centers for Environmental Information (NCEI) or your state climatologist’s office. Example: A region averaging 30″ annually may experience storms delivering 2–3″ in 24 hours.
- 0.623 Factor: Accounts for typical collection efficiency (85–90%), factoring minor losses from evaporation, splash-out, or wind.
Worked Context:
Roof section = 1,000 sq ft. A 1-inch rain yields approximately 623 gallons.
Annual potential (30″ rain): ~18,690 gallons.
→ IF your garden requires roughly 5,000 gallons annually for supplemental irrigation, THEN a 1,200-gallon storage capacity allows multiple refills per season.
→ IF your region averages under 15″ annual rainfall (e.g., parts of Arizona), THEN prioritize drought-tolerant landscaping and maximize storage within space/budget constraints.
→ IF a single storm could deliver 3+ inches, THEN design overflow pathways to handle excess volume safely away from foundations.
This calculation sets realistic expectations: a standard 55-gallon barrel fills rapidly during modest rain on most residential roofs. Scale intentionally.
Step 2: Optimize the Catchment Surface (Your Roof)
Roof material influences water quality. Understanding this guides filtration choices:
| Roof Material | Water Quality Consideration | Recommended Pre-Treatment |
|---|---|---|
| Metal (Standing Seam) | Smooth, non-porous surface; minimal debris retention. Zinc/aluminum alloys may offer mild antimicrobial properties. | Basic screen filtration; first-flush diverter beneficial |
| Asphalt Shingles | Granules, organic debris, and embedded treatments may wash off initially. | First-flush diverter strongly recommended |
| Concrete/Clay Tile | Generally inert but textured surfaces can trap organic matter. | Robust inlet screening; regular gutter cleaning |
| Wood Shakes | Tannins and preservatives may leach; organic debris accumulates. | Not recommended for harvesting systems |
| Green Roof | Growing media can wash into conveyance during establishment. | Advanced multi-stage filtration required |
First-Flush Diversion: A Quality Multiplier
The initial minutes of rainfall wash accumulated debris, pollen, and atmospheric deposits from the roof. Diverting this volume significantly improves stored water quality.
→ How it works: A chamber (typically sized at 10 gallons per 1,000 sq ft of roof area) captures early flow. Once full, clean water routes to storage. Chambers drain automatically or require manual reset.
→ IF your roof is asphalt shingle or surrounded by heavy foliage, THEN prioritize a calibrated diverter.
→ IF using metal roofing in a low-debris environment, THEN a simpler screen filter may suffice, though diversion remains beneficial.
→ Evidence Context: University extension research indicates first-flush diversion substantially reduces organic load and associated microbial activity in stored water—particularly valuable for vegetable garden irrigation.
Step 3: Conveyance – Guiding Water Safely to Storage
This pathway requires attention to flow capacity and debris management:
– Gutters: Aluminum offers durability and corrosion resistance. In regions with heavy snow/ice, avoid vinyl due to brittleness. For roof sections over 600 sq ft, 6-inch K-style gutters handle flow more effectively than standard 5-inch.
– Slope: Maintain a consistent ¼-inch drop per 10 feet of gutter length toward downspouts. Verify with a level during installation or inspection.
– Downspouts: Match size to gutter capacity. A single 3″x4″ downspout typically serves up to 1,200 sq ft of roof area in moderate rainfall zones. Larger roofs or high-rainfall regions benefit from multiple downspouts or upgraded sizing (4″x5″).
– Pre-Storage Filtration: Install before water enters the tank:
→ Leaf Eater/Screen Filter: Mounted at downspout inlet; rotating designs shed debris. Essential for shingle roofs.
→ Vortex Filter: Uses centrifugal action to separate debris; higher initial cost but lower maintenance.
→ Mesh Basket Filter: Simple screen inside tank inlet; requires frequent cleaning.
→ Pro Tip: Use flexible couplings (rubber or PVC) between rigid pipes and tank inlets to accommodate thermal expansion and minor settling without stress on connections.
Step 4: Storage – Selecting Vessels Aligned With Your Reality
Tank choice involves balancing material properties, space, budget, aesthetics, and longevity. No single option suits all scenarios.
Material Considerations:
-
Polyethylene (Poly) Tanks:
Profile: Affordable ($0.50–$1.50/gallon), lightweight, available in UV-stabilized formulations. Dark colors (black, forest green) inhibit algae growth. Seamless construction minimizes leak points.
Best Context: Most residential surface installations. Verify NSF certification for intended use.
Placement Note: Requires a perfectly level, stable foundation. Elevated placement demands stands rated for full fluid weight. -
Fiberglass Reinforced Plastic (FRP):
Profile: Higher initial cost ($1.50–$3.00/gallon), exceptional durability, UV-resistant, smooth interior resists biofilm.
Best Context: Coastal areas (salt air resistance), high-wind zones, or where decades-long service life is prioritized. -
Concrete/Cinder Block Cisterns:
Profile: Ideal for underground installation; thermal mass maintains cooler water temperatures. Requires NSF-certified interior sealant to prevent leaching and pH shifts. Heavy; demands professional installation.
Best Context: Permanent installations where above-ground space is limited. Critical: Sealant must be maintained per manufacturer schedule. -
Metal Tanks (Galvanized or Stainless Steel):
Profile: Galvanized steel requires interior lining to prevent rust; stainless offers longevity at higher cost. Corrugated designs can complement rural aesthetics.
Best Context: Properties valuing architectural integration; stainless for high-purity non-potable needs. Buried installations require soil compatibility assessment. -
Repurposed Containers:
Profile: Significant risk due to unknown prior contents and structural integrity.
Guidance: Only use containers explicitly manufactured and sold new for potable or non-potable water storage. Avoid “food-grade” industrial totes without verifiable, safe history documentation. Safety outweighs initial savings.
Sizing and Placement Strategy:
– Small Scale (50–300 gallons): Ideal for container gardening, balcony use, or educational projects. Slimline tanks (24″ depth) fit narrow side yards. IF space is extremely limited, THEN prioritize a single well-placed 50-gallon barrel over a poorly situated larger tank.
– Medium Scale (300–1,500 gallons): Supports vegetable gardens, drip irrigation for modest landscapes. Often the most practical residential range. IF budget allows, THEN two medium tanks offer redundancy and flexible placement over one large tank.
– Large Scale (1,500+ gallons): Whole-yard irrigation support, potential integration with toilet flushing (with additional treatment and permits). Requires engineered foundations, professional plumbing input, and thorough permit coordination. Underground options conserve space but increase installation complexity and cost significantly.
– Gravity vs. Pump Consideration:
→ IF the tank outlet sits higher than usage points (e.g., on a stable platform or hillside), THEN gravity feed may suffice for drip irrigation or filling cans (every foot of elevation provides ~0.43 PSI).
→ IF the tank is at grade or below usage points, THEN a pump becomes necessary. Factor in electrical access or solar compatibility. Always install a sediment filter (100–200 micron) before the pump to protect components.
Aesthetic Integration:
Camouflage tanks with trellised vines (jasmine, clematis), decorative fencing, or strategic landscaping. Dark green or brown blends more naturally than bright blue. Ensure 18–24 inches of clearance around the tank for maintenance access—avoid completely boxing it in.
Step 5: Distribution – Delivering Water Effectively
Match delivery method to water pressure and intended use:
– Gravity-Fed Systems: Simple, energy-free, reliable. Ideal for drip irrigation, soaker hoses, or manual watering. Install a ball valve at the tank outlet and a hose bibb for convenience. Add a pressure gauge to monitor available head.
– Pump-Assisted Systems:
→ Demand Pumps: Activate when outlet opens; suitable for intermittent garden use. Options include 12V DC (solar-compatible) or standard AC.
→ Submersible Pumps: Operate quietly inside the tank; less prone to freezing but harder to service.
→ Critical: Always filter water before it reaches the pump. A clogged impeller leads to premature failure.
→ Off-Grid Option: Pair a 12V DC pump with a small solar panel (20–50W) and battery for energy-independent operation—valuable for remote gardens or resilience planning.
– Irrigation Compatibility:
→ Drip Irrigation: Highly compatible with rainwater’s variable pressure and quality. Pressure-compensating emitters ensure even distribution on slopes.
→ Soaker Hoses: Effective under mulch; require pre-filtering to prevent clogging.
→ Sprinklers: Demand consistent pressure (typically 30+ PSI); generally require a pressure tank and booster pump. Less efficient due to evaporation; prioritize drip methods where possible.
Adaptive Insight: Many successful systems use a hybrid approach—relying primarily on harvested rainwater during wet seasons and seamlessly supplementing with municipal water (via a dedicated, backflow-protected connection) during dry spells. This balances conservation goals with plant health needs.
Layer 3: Maintenance, Optimization, and Troubleshooting (The Long Game)
A system’s longevity depends on consistent, manageable care. Integrate these practices into your seasonal rhythm—like pruning or soil amendment—to ensure safety, water quality, and component durability.
Seasonal Maintenance Calendar (Temporal Adaptation)
Spring (Pre-Growth Season):
– Inspect roof, gutters, and downspouts for winter damage, animal nests, or debris accumulation.
– Clean all inlet screens, filters, and first-flush diverter chambers. Verify seals and moving parts function smoothly.
– For accessible tanks, visually inspect interior (use a flashlight); scrub accessible areas if sediment or biofilm is visible. Never enter a confined space.
– Test pumps (if equipped): Listen for unusual sounds, verify pressure.
– Confirm overflow pathways direct water safely away from foundations.
– Install fresh Bti dunks if mosquitoes are a local concern.
Summer (Peak Usage Period):
– Monitor water levels weekly; note consumption patterns relative to weather.
– Check for algae growth (indicates light penetration—address with shading or repainting).
– Inspect connections for leaks, especially after heavy use or temperature swings.
– Clean inlet screens after windstorms or high-pollen events.
Fall (Pre-Winter Preparation):
– Clear gutters of leaves before autumn rains begin.
– Clean and prepare first-flush diverters for winter (drain completely if freezing is expected).
– IF in a freezing climate, THEN: Drain pumps, filters, and pipes below the tank outlet. Store pumps indoors. Insulate exposed pipes with foam sleeves. Do not fully drain the main tank—retained water provides thermal mass; empty tanks risk structural damage from snow load or vacuum if vents freeze.
– Trim branches overhanging the roof or tank to reduce debris.
Winter (Cold Climate Focus):
– Ensure tank remains full for thermal stability. Monitor ice formation at inlets/outlets.
– Clear heavy snow accumulation from tank tops per manufacturer load specifications.
– IF system is dormant, THEN: Close outlet valves. Slightly open drain valves on external components to relieve pressure if freezing occurs.
– IF in mild climates, THEN: Continue routine monitoring; clean screens after storms.
Water Quality Awareness: Simple, Practical Checks
Professional testing isn’t always necessary. Develop observational habits:
– Clarity: Fill a clear jar. Water should be relatively clear. Persistent cloudiness suggests inadequate pre-filtration—clean screens or inspect the diverter.
– Odor: Neutral or faintly earthy is typical. Sour, musty, or foul odors indicate stagnation or organic buildup. Solution: Partially drain and refill; improve screening; consider adding gentle aeration (small solar bubbler).
– Algae: Green tint or film signals light penetration. Solution: Ensure tank is opaque and dark-colored; add shade structure; avoid clear containers. Barley straw extract (in a mesh bag) offers a natural, plant-safe inhibitor.
– pH Awareness: Rainwater is naturally slightly acidic (pH ~5.6). Concrete tanks may raise pH. IF growing acid-loving plants (blueberries, azaleas), THEN this is beneficial. IF growing plants preferring neutral pH, THEN occasional testing with affordable strips can inform decisions. Significant, persistent imbalances warrant investigation into tank material or roof contributions. Avoid frequent chemical adjustments; focus on source quality first.
– When to Seek Testing: IF using water on edible crops (especially leafy greens or root vegetables consumed raw), THEN consider annual testing for indicator bacteria through your county cooperative extension office. This provides peace of mind and aligns with food-safe gardening practices.
Troubleshooting Common Scenarios
| Symptom | Likely Contributing Factor | Practical Response Pathway |
|---|---|---|
| Reduced Flow | Clogged inlet screen or filter | Clean screen/filter; verify first-flush diverter reset |
| Frozen component (cold climates) | Thaw gently; implement winterization steps next season | |
| Pump issue | Check power source; inspect for debris in impeller | |
| Unpleasant Odor | Organic buildup, stagnation | Partial drain/refill; clean accessible surfaces; add Bti |
| Anaerobic conditions | Improve aeration; enhance pre-filtration | |
| Visible Algae | Light entering tank | Repaint tank dark color; add shade cover |
| Nutrients from roof debris | Strengthen first-flush diversion; clean gutters more often | |
| Mosquito Activity | Inadequate screening | Replace screens with ≤16 mesh; inspect all vents/overflows |
| Stagnant water in diverter/overflow | Ensure diverter drains fully; slope overflow pipe downward | |
| Minor Leakage | Loose fitting or worn gasket | Tighten connection; replace gasket with compatible material |
| Small tank crack (poly) | Use NSF-certified tank repair epoxy for temporary fix; plan replacement | |
| Overflow Flooding | Undersized or clogged overflow pipe | Upgrade pipe diameter; install larger debris screen on outlet |
Thoughtful Optimization Pathways
Once core functionality is stable, consider enhancements aligned with evolving needs:
– Expanded Storage: Daisy-chain multiple tanks at the same foundation level using manufacturer-approved connectors. Prevents siphoning issues and maximizes space efficiency.
– Monitoring: Wireless water level sensors provide remote visibility via smartphone—helpful for scheduling irrigation or anticipating refill needs.
– Energy Integration: A small solar panel paired with a 12V pump creates an off-grid distribution loop for remote garden beds.
– Targeted Filtration: For sensitive applications (seed starting, greenhouse use), add a 5-micron sediment filter followed by an activated carbon stage at the outlet. Clarification: This improves clarity and reduces organic compounds but does not render water safe for drinking without additional certified treatment (UV, reverse osmosis). Always label non-potable outlets clearly.
Adaptive Pathways: Systems Scaled to Your Constraints
Rainwater harvesting is inherently adaptable. Your ideal starting point depends on budget, space, time, property constraints, and primary goals. There is no single “correct” system—only the right system for your current context.
Pathway 1: The Starter System ($50–$300) – “Focused First Step”
Ideal Context: Renters (with landlord permission), apartment balconies, small patios, container gardeners, educational projects with children, or those testing interest before larger investment.
– Core Components:
→ One new 50–60 gallon container explicitly sold for water storage (with spigot kit)
→ Level, stable base (cinder blocks on compacted gravel)
→ Downspout diverter kit ($25–$50) that redirects overflow to the original downspout when full
→ Fine-mesh screen over inlet
→ One Bti dunk (if mosquitoes are active seasonally)
→ Clear “Non-Potable Water” label
– Installation Focus: Ensure base is perfectly level. Secure all connections. Position overflow hose to direct excess water to a garden bed or permeable area.
– Realistic Uses: Watering potted herbs, flowers, filling bird baths, washing garden tools.
– Limitations Awareness: Fills quickly; requires manual emptying between rains. Not suited for large landscape areas.
– Adaptive Tip: Paint the container with UV-resistant outdoor paint to blend with surroundings. Drill a secondary overflow hole near the top with a hose attachment to guide excess water precisely.
Pathway 2: The Gardener’s System ($300–$1,500) – “Reliable Garden Partner”
Ideal Context: Homeowners with vegetable gardens, flower beds, or modest lawns (under 1,000 sq ft); those in regions with seasonal water restrictions or higher summer water rates.
– Core Components:
→ 200–500 gallon UV-stabilized poly tank (slimline for narrow spaces; dark color)
→ Calibrated first-flush diverter sized for roof area
→ Leaf eater or mesh screen filter at downspout
→ Stable foundation (crushed gravel pad with pavers or concrete)
→ IF elevation allows: Gravity-fed drip irrigation kit with timer
→ IF elevation is insufficient: 12V demand pump + sediment filter + drip kit
→ Bti dunks, basic pH test strips
– Installation Focus: Prepare foundation meticulously. Connect components sequentially: roof → gutter → filter → diverter → tank inlet. Route overflow safely away. Test flow before finalizing.
– Realistic Uses: Primary water source for intensive vegetable gardening, drip irrigation for ornamental beds, washing outdoor equipment.
– Value Context: In areas with tiered water pricing or summer restrictions, this system can meaningfully reduce municipal water use for outdoor tasks. Pairing with mulch and drought-adapted plants maximizes the impact of every harvested gallon. Many municipalities offer rebates; check local programs.
Pathway 3: The Integrated System ($1,500–$10,000+) – “Whole-Property Resource”
Ideal Context: Larger properties, households prioritizing drought resilience, xeriscaped/native landscapes, or those integrating multiple water conservation strategies.
– Core Components:
→ 1,000–5,000+ gallon storage (multiple poly tanks, FRP tank, or permitted underground cistern)
→ Engineered foundation per local code requirements
→ Multi-stage pre-filtration (vortex filter or equivalent)
→ Pump system with pressure tank (for consistent delivery)
→ Smart irrigation controller with rain sensor and tank level integration
→ Backflow prevention device (mandatory if near municipal line)
→ Professional installation strongly recommended for plumbing, electrical, and structural elements
– Permitting Pathway: Budget for permit fees ($100–$500+). Work with installers to submit plans referencing IPC Chapter 13. Documentation demonstrates professionalism and streamlines approval.
– Expanded Uses: Comprehensive landscape irrigation, car washing, outdoor cleaning, potential non-potable indoor uses (toilet flushing, laundry) only where explicitly permitted and installed per code with dedicated piping and labeling.
– Systemic Integration Note: IF local regulations permit and expertise is available, this system can complement a greywater reuse system (e.g., laundry-to-landscape) for maximum site water efficiency. This requires separate, code-compliant design and is not a DIY project. Consult local authorities and qualified professionals.
Budget-Conscious Adaptations That Maintain Integrity
- Tank Sourcing: Inquire with agricultural co-ops, nurseries, or fire departments about certified-clean retired tanks (e.g., thoroughly decontaminated chemical tanks). Verify history rigorously; safety is non-negotiable.
- DIY First-Flush Diverter: Build using 4″ PVC pipe, end caps, a ball valve, and float mechanism. Reputable university extension services (Texas A&M, University of Arizona) provide free, tested schematics online.
- Overflow Management: Direct overflow into a gravel-filled French drain trench to disperse water deep into soil away from foundations—reducing erosion and pooling.
- Natural Camouflage: Many municipalities offer free wood chips. Use around the tank base to suppress weeds, improve appearance, and absorb minor spills.
Navigating Common Concerns: Evidence-Based Perspectives
Addressing doubts with clarity builds confidence. These responses reflect current regulatory landscapes and practical experience.
“Is rainwater harvesting legal where I live? I heard it’s banned in some states.”
Current regulations in all U.S. states permit residential rainwater harvesting for non-potable outdoor uses, though specific requirements vary. Historical restrictions in states like Colorado and Utah have been updated through legislation (e.g., Colorado Senate Bill 09-080, Utah House Bill 2780). Always verify with your local building department, as municipal ordinances—not just state law—govern permits, setbacks, and safety features. The American Rainwater Catchment Systems Association (ARCSA) maintains a regularly updated regulatory resource. Approach inquiries with specific questions; most officials appreciate proactive, informed residents.
“Is rainwater safe for my vegetable garden?”
Rainwater is naturally soft and free of chlorine or salts often found in municipal supplies—traits many plants favor. The primary consideration is managing roof-derived debris. With basic precautions (first-flush diversion, inlet screening), harvested rainwater is widely used in vegetable production. University extension services (e.g., University of Massachusetts Amherst, University of Georgia) note that risks are comparable to or lower than municipal water when standard food-safe practices are followed: apply water at soil level (drip irrigation), avoid spraying leaves close to harvest, and wash produce thoroughly before consumption. For added assurance, annual water testing through your county extension office is a low-cost option.
“Isn’t it too complicated or expensive for an average homeowner?”
Complexity is manageable when approached incrementally. A starter system under $100 delivers immediate value for container gardening and builds foundational understanding. The perceived complexity often stems from skipping foundational research (Layer 1). Monthly maintenance for a basic system typically requires 15–20 minutes (screen cleaning, visual checks). Compare this to other garden systems. Starting small reduces upfront investment and builds confidence. Many components are designed for straightforward installation with common tools. Focus on progress, not perfection.
“What’s the point during drought when there’s no rain?”
Rainwater harvesting complements—not replaces—other water sources. Its greatest value often occurs during shoulder seasons (spring/fall) or after sporadic summer storms, reducing demand on municipal or well systems during peak pricing or restrictions. Even in arid regions, strategic collection captures meaningful volumes. In Tucson, AZ (approx. 11″ annual rainfall), a 1,000 sq ft roof section can yield over 6,800 gallons annually—sufficient for targeted deep watering of established native plants or vegetable beds. Pair harvested water with drought-resilient landscaping and mulch to maximize every drop. View it as a resilience buffer within a broader water strategy.
“Won’t my tank become a mosquito breeding site?”
This risk is effectively managed through design, not avoided. Municipal vector control agencies emphasize that properly maintained rainwater systems pose negligible risk compared to neglected bird baths, clogged gutters, or discarded containers. The multi-layered defense outlined in Layer 1 (fine-mesh screens on all openings, downward-sloping overflow, Bti dunks) is highly effective. Consistent screen inspection (monthly during warm months) is the single most important practice. Your maintained tank is likely safer than unmaintained features elsewhere on your property.
“How does this work in freezing climates?”
Cold climates require proactive seasonal adjustments, not system abandonment:
→ Tank: Keep full during winter for thermal mass. Empty tanks risk structural damage from snow load or vacuum if vents freeze.
→ Pipes/Filters: Drain all components below the tank outlet before first freeze. Store pumps/filters indoors. Insulate exposed pipes.
→ Inlets/Outlets: Angle connections downward to prevent water trapping. Use flexible couplings to absorb minor ice expansion.
→ Overflow: Ensure path is clear and slopes away; prevent ice dams that redirect water.
Homeowners across Minnesota, Vermont, and Colorado successfully operate systems year-round using these protocols. Winterization is a predictable, manageable task.
Your Questions, Answered
Q: How much can I realistically save on my water bill?
A: Savings vary significantly based on local water costs, rainfall patterns, roof size, landscape needs, and municipal rate structures (especially tiered pricing). For outdoor irrigation—which can represent 30–60% of summer water use—a well-matched system may reduce purchased water for these tasks substantially during rainy periods. Studies and utility reports (e.g., from University of North Carolina, City of Austin) suggest potential annual savings in the range of $100–$300 for typical suburban gardens using medium-scale systems, with faster payback in high-cost or rebate-offering regions. Track your usage before and after installation for personalized insight. Factor in available municipal rebates ($100–$2,000 in some Southwest cities) to improve initial investment recovery.
Q: Can I use rainwater for flushing toilets or laundry?
A: Some jurisdictions permit non-potable indoor uses under strict conditions outlined in IPC Chapter 13: dedicated purple piping, backflow prevention devices, filtration (sediment + carbon), often disinfection (UV), and clear labeling on all outlets. This significantly increases system complexity, cost ($2,000+), and requires professional plumbing design and permitting. Always consult your local building department first. For most homeowners beginning their journey, outdoor uses provide simpler, high-impact returns with lower regulatory hurdles. Never use untreated rainwater for drinking, cooking, or bathing.
Q: How do I prevent algae growth inside the tank?
A: Algae requires light, nutrients, and warmth. Address all three:
1. Block Light: Use only opaque, dark-colored tanks. Never use clear or translucent containers. Repaint light-colored tanks with UV-resistant exterior paint.
2. Reduce Nutrients: Enhance first-flush diversion and inlet screening to minimize organic debris entering storage.
3. Limit Warmth: Position tanks in shaded areas where roof catchment isn’t compromised.
If algae appears, partially drain the tank, scrub accessible interior surfaces with a long-handled brush, and refill. Avoid chemical algaecides. Barley straw extract (in a mesh bag submerged in the tank) is a natural, plant-safe option documented in horticultural resources.
Q: What’s the absolute minimum to start responsibly?
A: For under $100:
– One new container explicitly sold for water storage (55-gallon with spigot kit)
– Four to six cinder blocks for a level, stable base
– Downspout diverter kit ($25–$40)
– Fine-mesh screen for inlet
– One Bti dunk (seasonally appropriate)
– Weatherproof “Non-Potable Water – Do Not Drink” label
Place blocks on level, compacted ground. Position container. Install diverter on downspout. Attach screen. Add label and Bti. Use a watering can at the spigot. This captures meaningful water for containers and builds foundational knowledge.
Q: Do I need a permit for a small rain barrel?
A: Requirements vary widely. Many cities exempt systems under 100–200 gallons used solely for landscape irrigation (e.g., Portland, Seattle). Others require permits regardless of size. Always call your local building department. Ask: “What are the permit requirements for a non-potable rainwater collection system under [X] gallons used only outdoors for irrigation?” Document the response. When uncertain, obtaining the permit provides peace of mind and official documentation.
Q: Can I connect multiple downspouts to one tank?
A: Yes, and it’s often beneficial for larger roofs. Use gutter connectors to merge flows. Critical considerations:
– Ensure the combined flow capacity doesn’t overwhelm your inlet filter or first-flush diverter—upscale these components accordingly.
– Balance flow paths; longer runs may require larger diameter piping (4″ vs. 3″).
– Overflow capacity must handle the total potential inflow from all connected roof sections.
Sketch your roof drainage plan and calculate total contributing area before selecting components.
Q: How long will my tank last?
A: Lifespan depends on material, UV exposure, foundation stability, and maintenance:
– UV-Stabilized Polyethylene: Typically 15–25 years. Dark colors extend life in sunny climates.
– Fiberglass: Often 30+ years with minimal upkeep.
– Properly Sealed Concrete: 50+ years; sealant requires reapplication per manufacturer schedule (often 10–15 years).
– Galvanized Steel (with lining): 10–20 years; inspect lining periodically.
Maximize longevity by ensuring a level foundation, protecting from direct UV (shade or paint), avoiding physical impacts, and conducting annual visual inspections for cracks, fading (UV degradation indicator), or corrosion.
Q: What if my roof area is small?
A: Every square foot contributes. A 300 sq ft garage roof yields approximately 187 gallons per inch of rain. Focus on high-value, low-volume uses: seed starting, container herbs, or nurturing young native plants. A slimline tank fits narrow spaces. Consider adding a secondary catchment surface—a temporary “rain sail” (tarp on poles) over a garden bed channeling water via flexible gutter to a barrel. Small, well-maintained systems deliver tangible benefits and build confidence for future expansion.
Q: Is rainwater harvesting worthwhile if I have a well?
A: Absolutely. It offers complementary benefits:
– Reduces Pump Wear: Using rainwater for irrigation decreases well pump runtime, extending its service life (pump replacement is costly).
– Aquifer Stewardship: During droughts, reduced well draw helps maintain local groundwater levels.
– Water Quality: Rainwater lacks minerals (iron, sulfur, hardness) common in well water that can stain surfaces or stress sensitive plants.
– Resilience Redundancy: Stored rainwater provides critical backup for gardens, livestock, or basic hygiene if the well pump fails (power outage, mechanical issue).
View it as diversifying your water resources—enhancing overall household resilience.
Q: How does rainwater harvesting benefit my local environment?
A: Beyond personal savings, thoughtfully designed systems contribute positively:
– Reduces Stormwater Runoff: Capturing roof water decreases volume and velocity entering municipal drains, lowering erosion and pollution risks in local waterways.
– Supports Soil Health: Chemical-free rainwater nourishes soil biology better than chlorinated municipal water.
– Conserves Energy: Treating and pumping municipal water requires significant energy; reducing demand lowers this footprint.
– Promotes Awareness: Systems foster deeper connection to local rainfall patterns and watershed dynamics.
Your effort, however modest, aligns with broader community resilience and ecological stewardship goals.
Conclusion: Your Journey to Water Awareness Begins Today
Rainwater harvesting is more than hardware—it’s a shift in perspective. It invites you to see rainfall not as a nuisance to divert, but as a valuable resource to welcome. It deepens connection to your local environment, empowers proactive stewardship, and builds tangible resilience. You now hold a clear framework: establish your legal and safety foundation, design a system aligned with your site and goals, and commit to consistent, manageable care. You understand how to start small, scale thoughtfully, address concerns with evidence, and troubleshoot with confidence. This knowledge transforms intention into informed action.
Recap: The Three Pillars of Sustainable Harvesting
1. Foundation First: Regulatory clarity and safety protocols aren’t bureaucracy—they’re respect for community standards and personal responsibility. Verify before you invest.
2. Design with Context: Match system scale to your actual roof area, rainfall patterns, space, and primary needs. Prioritize water quality at the source (screening, diversion) over complex end-of-pipe fixes.
3. Steward Consistently: Integrate simple seasonal checks into your existing garden rhythm. Fifteen minutes of monthly screen cleaning prevents most common issues.
The 24-Hour Rule: Within the next day, take one concrete, no-cost step. Call your local building department. Ask: “What are the requirements for installing a rainwater harvesting system under 500 gallons for landscape irrigation?” Write down the name of the person you speak with and their key points. This single action replaces uncertainty with clarity and transforms aspiration into momentum. No purchase, no digging—just informed next steps.
The Bigger Picture: Every gallon you thoughtfully harvest reduces demand on shared resources, lessens stormwater burden on local infrastructure, and nurtures your immediate environment with chemical-free moisture. You join a growing community of residents—from suburban neighborhoods to urban rooftops—who practice quiet, practical stewardship. Your system, however modest, becomes a teaching tool for children, a support for soil life, and a testament to working with natural cycles. This isn’t about achieving perfection overnight. It’s about taking the next right step, learning as you go, and contributing to a more resilient relationship with water. The sky offers this resource freely. Today, you have the grounded knowledge to receive it wisely.
Explore Our Complete Water Wisdom Series:
Designing Drought-Resilient Landscapes: Native Plants That Thrive on Rainwater | Greywater Systems Decoded: Safe, Legal Reuse for Your Garden | Smart Irrigation Controllers: Automate Watering Without Wasting a Drop | Building a Rain Garden: Turn Problem Areas into Ecological Assets | Well Water 101: Testing, Treatment, and Sustainable Management | Emergency Water Storage: Beyond the Rain Barrel for True Resilience | Soil Health Secrets: How Water Quality Impacts Your Garden’s Foundation