Eliminate Guesswork, Conserve Resources, and Support Plant Health with a Thoughtfully Tailored System Aligned to Your Garden’s Unique Layout, Soil, and Plant Needs
Designing an effective drip irrigation system centers on understanding your garden’s specific hydration patterns rather than applying a universal template. This guide walks you through each essential decision point—from mapping microclimates and assessing soil behavior to selecting components that harmonize with your site’s topography and plant communities—so you can create a resilient, resource-conscious system that delivers moisture directly to active root zones. Move beyond fragmented advice and generic kits toward a cohesive approach that transforms irrigation into an intentional practice supporting both garden vitality and environmental stewardship.
Introduction
As water awareness grows and climate patterns shift, drip irrigation has become a cornerstone of adaptive, resource-conscious gardening. Compared to overhead methods that lose significant moisture to evaporation, wind drift, or non-target areas, drip systems deliver water slowly and directly to the soil surrounding plant roots. This approach aligns closely with how many plants naturally absorb moisture, helping maintain consistent soil moisture, reduce foliar disease pressure, suppress weed germination in unplanted areas, and minimize runoff. Research from agricultural extension programs consistently notes these benefits across diverse growing contexts. Yet many gardeners discontinue drip systems after encountering uneven watering, clogging, or installation complexity. Often, the root cause lies not in the technology itself but in foundational design gaps. This guide bridges that gap. Drawing on principles validated by irrigation science, soil studies, and field-tested practice, it offers a clear, sequential methodology to move from uncertainty to confidence—whether you’re nurturing container herbs on a balcony, managing a sloped perennial border, or cultivating a productive vegetable plot. The framework ahead transforms complexity into clarity, ensuring your system works with your landscape, not against it.
The Precision Hydration Framework: Four Pillars of Intelligent Drip Design
At the heart of every enduring drip irrigation system lies a deliberate, sequential design process. Jumping straight to purchasing tubing and emitters without this foundation is a common path to inefficiency or frustration. The Precision Hydration Framework distills professional-grade methodology into four interdependent pillars: Assess, Calculate, Select, and Install & Refine. This structure mirrors approaches used in landscape planning and agricultural consultation, adapted explicitly for home-scale application. Each pillar builds upon the previous one, creating a cascade of informed decisions. Rushing or skipping a pillar introduces vulnerabilities: inaccurate site assessment leads to miscalculated flow demands; incorrect component selection causes pressure imbalances; poor installation undermines even the best design. Progressing methodically ensures your system is not merely assembled, but thoughtfully engineered for your specific conditions. Remember: elegance in irrigation lies not in component quantity, but in functional harmony—delivering appropriate moisture to the right place at the right time, with minimal intervention. This framework is your blueprint for achieving that harmony.
Pillar 1: Comprehensive Site Assessment – Mapping Your Garden’s Unique Hydration Profile
Before unrolling a single inch of tubing, the most critical work happens with observation, measurement, and documentation. Site assessment is the diagnostic phase where you gather environmental intelligence that informs every subsequent decision. This pillar requires attentive observation of variables that significantly impact water movement and plant response. Skipping this step risks misaligned emitter placement, inefficient zoning, or recurring performance issues.
Step 1.1: Create a Detailed, Layered Garden Map
Begin with an accurate, to-scale sketch of your entire irrigation zone. Use graph paper (one square = one foot) or a free digital tool like SketchUp Free or Garden Planner. Include:
– Fixed infrastructure: Water source location (hose bib/spigot), property lines, pathways, fences, structures, utility lines (call 811 before digging!).
– Topography: Note elevation changes. Use a smartphone level app or a simple A-frame level to estimate slope percentages. Mark areas where water naturally pools after rain.
– Sun exposure zones: Track sunlight hourly over a full day. Label areas as Full Sun (6+ hours direct sun), Partial Shade (3–6 hours), Full Shade (<3 hours). Note seasonal shifts—does a deciduous tree create summer shade but allow winter sun?
– Microclimates: Identify pockets with unique conditions: a south-facing brick wall (radiant heat, faster drying), a low spot sheltered from wind (cooler, retains moisture longer), a raised bed (typically drains faster than in-ground soil), or containers on hot pavement (increased evaporation).
– Plant inventory: Group plants by water needs and root depth. Create a legend:
– Higher Water Needs / Shallow Roots: Lettuce, spinach, radishes, impatiens
– Moderate Water Needs / Medium Roots: Tomatoes, peppers, beans, roses, most perennials
– Lower Water Needs / Deeper Roots: Rosemary, lavender, established natives, fruit trees
– Special Considerations: Seedlings (require gentle, frequent moisture), bulbs (specific depth and seasonal needs)
Why this step is crucial: This map becomes your living blueprint. It prevents errors like underestimating tubing length, overlooking plant groups with unique needs, or placing emitters where future growth will obstruct them. It enables hydrozoning—grouping plants with similar water requirements on the same circuit. Common mistake to avoid: Creating a vague, non-scaled sketch. Accuracy here saves significant rework later. Measure twice; cut once. Illustrative example: Overlooking a microclimate created by a sun-exposed wall can lead to uneven plant performance. Plants in hotter, drier zones may require adjusted emitter placement, higher flow rates, or separate timing—details a detailed map helps reveal before installation begins.
Step 1.2: Analyze Soil Composition and Drainage Dynamics
Soil is a dynamic medium governing water movement, retention, and root access. Its texture directly influences emitter spacing, flow rate selection, and runtime duration. Perform these simple, revealing tests in multiple garden locations (beds can vary significantly):
- Texture Test (The Ribbon Test): Moisten a soil sample. Squeeze between thumb and forefinger:
- Sandy Soil: Feels gritty, won’t form a ribbon. Drains rapidly (<1 hour in drainage test).
- Loamy Soil: Smooth, slightly gritty. Forms a 1–2 inch ribbon before breaking. Ideal drainage (1–4 hours).
- Clay Soil: Sticky, slick. Forms a long ribbon (>2 inches). Drains slowly (>4 hours).
- Drainage Test: Dig a 12″x12″ hole. Fill with water, let drain completely. Refill and time drainage:
- <1 hour = Very Fast Drainage (Sandy)
- 1–4 hours = Good Drainage (Loam)
-
4 hours = Poor Drainage (Clay)
Why this step is crucial: Soil type directly determines emitter strategy. Sandy soils typically require closer emitter spacing (every 6–12 inches) and potentially higher flow rates (1.0–2.0 GPH) because water moves vertically downward quickly with minimal lateral spread. Clay soils generally need wider spacing (18–24 inches) and lower flow rates (0.5–1.0 GPH) to allow slow absorption without puddling. Loam offers flexibility but still benefits from tailored spacing. Practical illustration: In a raised bed filled with fast-draining potting mix (sandy-loam), 1.0 GPH emitters spaced 12 inches apart may create a moist zone ~10 inches wide after 30 minutes—suitable for closely spaced carrots. The same setup in heavy clay soil could create saturated pockets around emitters with dry zones between them. Important nuance: Organic matter content modifies behavior. A clay soil amended heavily with compost will drain faster, potentially requiring slightly closer emitter spacing than unamended clay. Re-test amended beds.
Step 1.3: Evaluate Topography and Slope Considerations
Water follows gravity. Even subtle elevation changes create pressure differentials that can disrupt uniform emitter output. Walk your site with intention:
– Identify all slopes. Estimate slope percentage: (Rise ÷ Run) × 100. (e.g., 6-inch rise over 10 feet run = 5% slope).
– Note direction of slope relative to your water source.
– Mark low points where runoff might accumulate.
Why this step is crucial: On a slope, emitters at higher elevations experience lower pressure than those downhill. Without design compensation, plants uphill may receive insufficient water while downhill plants get excessive moisture, potentially causing erosion or root issues. Pressure variation exceeding 10 PSI across a zone makes non-pressure-compensating emitters unreliable. Design considerations by slope:
– <5% Slope (Gentle): Often manageable with standard design. Run mainline tubing contouring along the slope (side-to-side), then run lateral drip lines perpendicular down the slope. This minimizes pressure variation along each lateral line.
– 5–15% Slope (Moderate): Pressure-Compensating (PC) emitters are strongly recommended. Continue contour mainline strategy. For runs over 150 feet, consider a secondary pressure regulator mid-zone.
– >15% Slope (Steep): PC emitters are essential. Break the area into smaller, level terraces if feasible. Run separate zones for each terrace level. Use larger diameter mainline tubing (5/8″ or 3/4″) to minimize friction loss on long contour runs. Install flush valves at the lowest point of each lateral line to clear sediment.
Common installation error: Running a single drip line straight down a slope without pressure compensation. Result: inconsistent plant moisture levels. Helpful insight: On slopes, placing emitters slightly uphill of the plant stem allows water to flow downward through the soil profile, naturally wetting the root zone below the emitter. Placing emitters downhill risks water moving away from roots before absorption.
Step 1.4: Catalog Plant Water Requirements and Growth Patterns
Plants signal water needs through physiology and growth habits. Effective design anticipates these needs across seasons and growth stages. Create a plant profile noting:
– Water Category: Higher, Moderate, Lower (as mapped in Step 1.1).
– Root Depth: Shallow (6–12″), Medium (12–24″), Deep (24″+). This informs emitter placement depth (if burying lines) and runtime duration.
– Growth Habit: Does the plant spread? Will it shade neighboring plants next season? (e.g., squash vines).
– Seasonal Needs: Seedlings need frequent, light moisture; fruiting tomatoes benefit from deep, consistent watering; dormant perennials require minimal water.
Why this step is crucial: Hydrozoning—grouping plants with similar water needs—is a foundational efficiency strategy. Mixing high and low-water plants on one circuit forces compromise: overwatering drought-tolerant species or underwatering thirstier ones. Practical application: In a mixed border with lavender (lower water) and hostas (moderate-high water), run two separate lateral lines: one with widely spaced 0.5 GPH emitters for lavender, another with closer 1.0 GPH emitters for hostas. Connect both to a manifold with individual valves for independent timing. Consideration for containers: Potted plants dry out faster than in-ground plantings. Group containers by material (terracotta dries fastest), size (small pots dry fastest), and plant type. A single adjustable emitter per pot offers precise control. Forward-looking note: Account for root zone expansion. A young tomato seedling has roots concentrated in the top 6 inches; a mature plant’s roots extend 18+ inches deep and wide. Design emitter placement to allow adjustment outward as the plant grows—using spaghetti tubes with stakes rather than fixed inline emitters provides valuable flexibility.
The Fundamental Principle: Water is applied to the root zone, not merely to the soil surface. Design your system around the living, dynamic root systems of your specific plants, within your specific soil and microclimate—not around arbitrary tubing layouts.
Pillar 2: Hydraulic Calculation – Quantifying Flow, Pressure, and System Capacity
This pillar translates observation into practical parameters. Straightforward measurements and calculations ensure your water source can support the system and components are appropriately sized. These steps prevent common technical issues: low pressure causing erratic dripping, uneven output across zones, or component stress from pressure mismatches. Embrace this preparatory work—it’s the foundation for reliable, long-term performance. The goal is to work with your water’s natural characteristics, not against them.
Step 2.1: Measure Your Water Source’s True Flow Rate (GPM)
Your hose bib’s flow rate sets the absolute ceiling for your system. Never assume; always measure. Household plumbing varies based on pipe age, diameter, municipal pressure, and simultaneous water use.
Accurate Measurement Method:
1. Attach a short garden hose directly to the spigot you’ll use.
2. Place a 5-gallon bucket under the hose end.
3. Turn spigot to full open.
4. Time precisely how many seconds to fill the bucket.
5. Calculate: GPM = (Bucket Gallons ÷ Seconds) × 60
Example: 5 gallons fills in 25 seconds → (5 ÷ 25) × 60 = 12 GPM
Why this step is crucial: The total flow demand of all emitters running simultaneously in one zone should not exceed 80% of your measured GPM. This buffer accounts for pressure loss through filters, regulators, and tubing friction. Exceeding capacity causes pressure to drop, making emitters drip weakly or erratically—especially at the end of long runs. Illustrative scenario: Your spigot measures 8 GPM. Safe zone capacity = 8 × 0.8 = 6.4 GPM. A vegetable zone with 100 plants using 1.0 GPH emitters: Total demand = 100 GPH = 1.67 GPM. Well under capacity—feasible as one zone. Adding 10 fruit trees with 2.0 GPH bubblers (20 GPH = 0.33 GPM) brings total to 2.0 GPM—still feasible. However, keeping them as separate zones allows tailored runtimes and isolates issues. Important nuance: Measure flow with other household water use minimized (no showers, dishwashers running). For accuracy, repeat 3 times and average. Common pitfall: Relying on “typical” values from online guides (e.g., “most spigots are 10 GPM”). Actual flow can vary widely. Measure yours.
Step 2.2: Determine Static Pressure and Regulation Needs
Household water pressure typically ranges from 40–80 PSI. Drip irrigation components perform best within 20–30 PSI. Operating above this range risks:
– Tubing stress at fittings
– Emitters dislodging
– Premature component wear
– Non-PC emitters spraying instead of dripping
Measure Static Pressure:
1. Attach an inexpensive pressure gauge (available at hardware stores) to your spigot.
2. Turn spigot on fully.
3. Read PSI with no water flowing elsewhere in the house.
Why this step is crucial: This measurement guides your pressure management strategy. Practical guidance:
– Standard Municipal/Well Pressure (40–80 PSI): Install a 25 PSI pressure regulator rated specifically for drip irrigation. Place it immediately after the backflow preventer (see Pillar 3). This is essential for system longevity and consistent emitter performance.
– Low Pressure Sources (<25 PSI): Rain barrels (gravity-fed), distant spigots on long hose runs, or older homes with weak pressure. Solutions:
– Use larger diameter mainline tubing (5/8″ or 3/4″) to reduce friction loss.
– Select non-pressure-compensating emitters (they may function more predictably at very low pressures than PC types).
– Keep runs short (<100 feet).
– Consider a small 12V diaphragm pump designed for rain barrels (with appropriate safety features and pressure regulation).
– Very High Pressure (>80 PSI): Consult a plumbing professional about a whole-house pressure reducing valve (PRV) before the spigot if persistent. For drip, still use the 25 PSI regulator after the backflow preventer.
Note: Some modern emitter systems claim higher pressure tolerance, but regulation remains a best practice. Consistent, appropriate pressure ensures uniform emitter performance and extends component life. Safety reminder: Never omit the pressure regulator. The cost of replacement parts after a failure far exceeds the regulator’s price.
Step 2.3: Calculate Total Zone Demand and Validate Capacity
Quantify the water demand of your planned emitter layout for each zone. A “zone” is all components controlled by one valve/timer station running simultaneously.
Calculation Worksheet:
– List every emitter type and quantity per zone:
– ___ emitters × 0.5 GPH = ___ GPH
– ___ emitters × 1.0 GPH = ___ GPH
– ___ bubblers × 2.0 GPH = ___ GPH
– ___ micro-sprayers × 10 GPH = ___ GPH
– Total GPH for Zone = Sum of all lines above
– Total GPM Required = Total GPH ÷ 60
– Compare to Safe Capacity: Total GPM Required ≤ (Measured Spigot GPM × 0.8)
Why this step is crucial: This validation prevents the “fade-out” effect where emitters near the water source drip heavily while those at the end sputter. Example validation:
– Spigot GPM = 7.0 → Safe Capacity = 5.6 GPM
– Zone A (Vegetable Bed): 80 plants × 1.0 GPH emitters = 80 GPH = 1.33 GPM (Feasible)
– Zone B (Fruit Trees): 10 trees × 2.0 GPH bubblers = 20 GPH = 0.33 GPM (Feasible)
– Combined Demand (if run together): 1.66 GPM < 5.6 GPM → Technically feasible, but…
– Recommendation: Keep as separate zones. Why? If a leak develops in Zone B, Zone A still functions. Independent timing allows tailoring runtimes to plant needs (trees often need longer, less frequent watering than vegetables). Helpful tip: Maintain a 10–15% buffer below safe capacity. This accommodates minor pressure fluctuations and allows for minor future expansions.
Step 2.4: Account for Pressure Loss Over Distance and Elevation
Water friction against tubing walls causes pressure to drop over distance. Elevation changes amplify this effect. Ignoring this can lead to uneven watering, especially on slopes or long runs.
Key Principles:
– Friction Loss: For standard 1/2″ poly tubing, pressure drops approximately 2–5 PSI per 100 feet of run with emitters active, depending on total flow rate. Higher flow = greater loss.
– Elevation Effect: Pressure decreases by ~0.433 PSI for every foot of rise in elevation. Conversely, pressure increases by 0.433 PSI per foot of drop.
Example: A drip line running 10 feet uphill from the mainline loses ~4.3 PSI. The same line running 10 feet downhill gains ~4.3 PSI.
Why this step is crucial: On a 15-foot slope with non-PC emitters, pressure differences between top and bottom emitters could exceed 6 PSI—causing significant flow variation. Plants at the top may receive insufficient water; plants at the bottom may receive excess. Design Solutions:
– For Long Runs (>150 feet):
– Upgrade mainline tubing to 5/8″ or 3/4″ diameter for the long run (significantly reduces friction loss).
– Split the zone: Run two shorter lateral lines from a central manifold.
– Use Pressure-Compensating (PC) emitters—they maintain consistent flow across a wide pressure range (e.g., 10–50 PSI).
– For Slopes:
– Run mainline tubing contouring along the slope (minimizes elevation change along the mainline).
– Use PC emitters on all lateral lines running up/down the slope.
– Install flush valves at the lowest point of each lateral line to drain sediment.
– For severe slopes (>15%), consider separate zones for different elevation bands.
– Rule of Thumb Validation: After regulator (25 PSI), a 250-foot run of 1/2″ tubing with moderate flow might drop to 12–15 PSI at the end—too low for non-PC emitters to function properly. Using 3/4″ mainline might maintain pressure above 20 PSI throughout. PC emitters would deliver consistent flow regardless.
Practical aid: While precise hydraulic formulas exist, for home gardens, rely on manufacturer charts (often found in product catalogs or websites) showing maximum run lengths for specific tubing sizes and flow rates. When uncertain, choose the more conservative option (larger tubing, PC emitters, zone splitting).
Pillar 3: Strategic Component Selection – Choosing Tools Aligned with Your Design
With assessment data and calculations complete, component selection shifts from overwhelming to purposeful. Every choice is now anchored in your site-specific intelligence. This section explains why a component suits your documented conditions. Think of components as precision instruments; selecting the right tool supports the entire design.
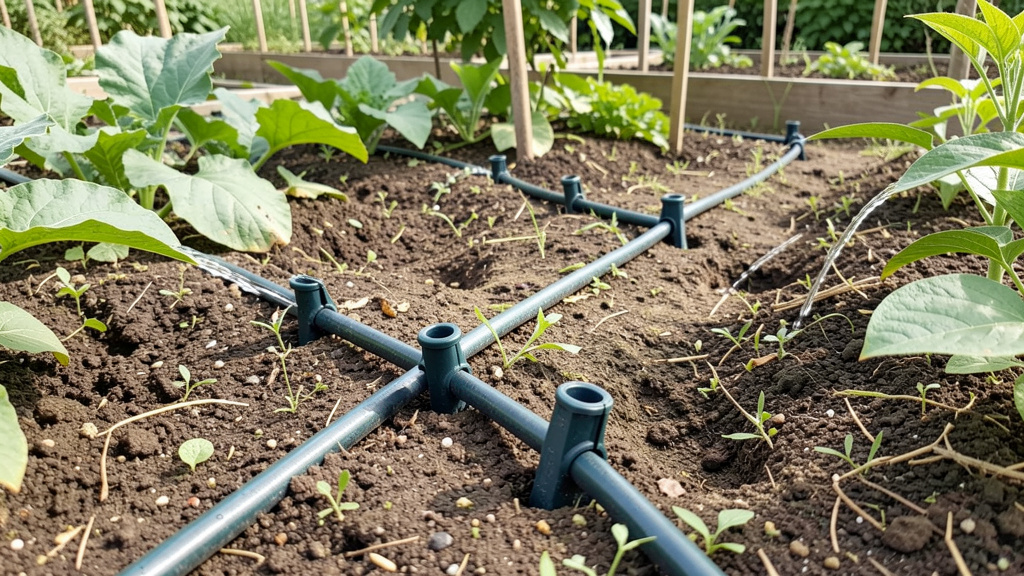
Step 3.1: Tubing Selection – Arteries and Capillaries of Your System
Tubing serves distinct roles. Matching type and size to function is critical.
Mainline Tubing (The Artery): Carries water from source to garden zones.
– 1/2″ Polyethylene (Poly): Standard for runs under 150 feet with moderate emitter counts (<200 emitters). UV-resistant black poly is durable and widely available. Best for: Small to medium flat gardens.
– 5/8″ or 3/4″ Poly: Recommended for runs over 150 feet, high emitter counts (>200), sloped terrain, or low-pressure sources. Larger diameter significantly reduces friction loss. Best for: Large gardens, slopes, systems fed by rain barrels. Consideration: Slightly higher upfront cost, but prevents performance issues and future upgrades. Often a worthwhile investment for serious systems.
– Material Note: Always specify “UV-resistant” tubing. Standard vinyl tubing degrades rapidly in sunlight. Black is standard; brown offers slight aesthetic blending but no functional advantage. Tip: Buy tubing on a reel for easier unrolling. Store unused portions in shade.
Lateral Lines (The Capillaries): Deliver water directly to plants. Two primary approaches:
– Pre-Installed Emitter Tubing (Drip Line/Tape): Tubing with emitters factory-installed at fixed intervals (6″, 12″, 18″, 24″).
– Advantages: Very fast installation for straight, evenly spaced plantings (vegetable rows, hedge plantings). Emitters are protected within the tubing wall.
– Disadvantages: Inflexible. If plant spacing changes, tubing becomes obsolete. Fixed spacing may not match your soil type (e.g., 12″ spacing is too wide for sandy soil).
– Selection Guide: Choose emitter spacing based on soil test (Step 1.2): Sandy soil = 6–12″ spacing; Loam = 12–18″; Clay = 18–24″. Choose flow rate (0.5, 1.0 GPH) based on plant needs and soil.
– Blank Tubing (Poly or Vinyl): Tubing without emitters. You punch holes and insert emitters/spaghetti tubes as needed.
– Advantages: Maximum customization. Essential for irregular plantings (flower beds, shrubs, containers), slopes, mixed plantings, or anywhere plant spacing varies. Allows precise emitter placement adjustment as plants grow.
– Disadvantages: Slower installation. Requires careful hole punching.
– Selection Guide: 1/2″ blank poly for main laterals; 1/4″ micro-tubing for precise emitter placement to individual plants (especially containers, pots, or plants offset from main line).
Why this step is crucial: Using narrow tubing for a long mainline restricts flow. Oversized tubing for a tiny container garden is unnecessarily expensive. Budget consideration: For very small gardens (<50 sq ft), a kit with 1/4″ micro-tubing may suffice, but recognize its severe distance limitation (<30 feet total run). Quick fix: Accidentally punch a hole? Insert a “goof plug” immediately. Always keep a bag of goof plugs and repair couplings in your garden toolkit.
Step 3.2: Emitter Selection – Precision Instruments for Root Zones
Emitters are central to precision irrigation. Selecting the right type and flow rate aligns with soil, slope, plant needs, and pressure conditions.
| Emitter Type | Flow Range | Best Applications | Critical Considerations | Soil/Slope Guidance |
|---|---|---|---|---|
| Non-PC Inline | 0.5–2.0 GPH | Flat terrain, short runs (<100 ft), consistent pressure, budget-conscious projects | Flow varies with pressure changes. Avoid on slopes or long runs. Lowest cost. | Sandy: 1.0–2.0 GPH, close spacing. Clay: 0.5–1.0 GPH, wider spacing. Avoid slopes. |
| PC Inline | Fixed (0.5, 1.0, 2.0 GPH) | Slopes (>5%), long runs (>100 ft), variable pressure, critical plantings | Maintains consistent flow rate despite pressure fluctuations (e.g., 10–50 PSI). Essential for challenging terrain. Slightly higher cost justified by performance. | Recommended for most home gardens. Compensates for soil variability and minor elevation changes. Worth the small premium. |
| Adjustable | Variable (0–10+ GPH) | Individual trees/shrubs, container gardens, plants with unique needs, seedling flats | Screw-top allows flow adjustment. Prone to clogging if left fully open; set desired flow and leave undisturbed. | Ideal for containers (adjust per pot size/plant). Use for young trees: start low (1 GPH), increase as tree grows. |
| Bubblers | 1.0–20+ GPH | Trees, shrubs, large containers, areas needing quick soil saturation (basins) | Delivers water in a small flood. Use with caution on slopes—can cause runoff. Place in a small soil basin to contain flow. | Best for deep-rooted plants in loam/clay. Avoid in sandy soil (water drains too fast before spreading). |
| Micro-Sprayers/Misters | Varies (fan, jet, mist) | Ground covers, dense plantings (strawberries), seedlings, cooling plants in extreme heat | Creates fine spray pattern. Higher evaporation loss than drip. Use only where coverage area is needed. Keep foliage dry when possible. | Useful for establishing new ground cover. Avoid in windy areas. Not ideal for water conservation focus. |
Why emitter selection is crucial: An emitter is a calibrated device. A 2.0 GPH bubbler on shallow-rooted lettuce may deliver too much water too quickly; a 0.5 GPH emitter on a mature apple tree may be insufficient. Soil-Specific Guidance:
– Sandy Soil: Water moves down rapidly with minimal lateral spread. Strategy: Higher flow rates (1.0–2.0 GPH) to deliver volume before percolation; closer emitter spacing (6–12 inches); PC emitters ensure consistency despite faster drainage dynamics. Runtime may need to be longer or more frequent.
– Clay Soil: Water moves slowly, spreads laterally well, but saturates easily. Strategy: Lower flow rates (0.5–1.0 GPH) to allow gradual absorption; wider spacing (18–24 inches); non-PC may suffice on flat terrain, but PC adds a safety margin. Shorter, less frequent runtimes prevent waterlogging. Watch for surface pooling.
– Loamy Soil: Often the most adaptable scenario. Standard 1.0 GPH PC emitters spaced 12–18 inches apart is a reliable starting point. Adjust based on specific plant needs.
Real-Life Application Scenarios:
– Raised Bed Tomatoes (Loamy Mix, Moderate Water Needs): 1.0 GPH PC inline emitters spaced 12 inches apart along blank lateral line. Supports consistent moisture for fruit development while minimizing foliar disease risk.
– Potted Rosemary on Sunny Patio (Fast-Draining Mix, Lower Water Needs): Single adjustable emitter on 1/4″ spaghetti tube, set to 0.5 GPH, placed near base. Allows precise control; easy to adjust if pot dries too fast/slow.
– Young Apple Tree on Gentle Slope (Clay-Loam, Deep Roots): Four 1.0 GPH PC emitters on spaghetti tubes, placed in a circle at the current drip line (edge of canopy), not at trunk. As tree grows, move emitters outward annually. PC technology compensates for minor slope pressure variation.
– Strawberry Patch (Dense Ground Cover, Shallow Roots): Micro-sprayer on a stake, set to a low-volume fan pattern, placed every 3 feet. Provides gentle coverage over the mat of plants without disturbing fruit. Alternative: 0.5 GPH PC emitters spaced 6 inches apart in drip tape.
Important Emitter Insight: Emitter orifice size affects clogging resistance. Larger orifices (found in bubblers, some adjustable emitters) resist clogging better than tiny orifices in low-flow non-PC emitters. In areas with hard water or sediment, slightly higher flow rates (1.0 GPH vs. 0.5 GPH) can support long-term reliability.
Step 3.3: Essential Supporting Components – The Foundation of Reliability
A drip system is only as strong as its supporting elements. These components ensure safety, longevity, and peak performance. Never omit them to “save money”—the cost of failure far exceeds their price.
- Backflow Preventer (Critical Safety Component): Prevents contaminated water (from fertilizers, soil pathogens, pesticides) from siphoning back into your household drinking water supply. Required by plumbing code in most municipalities.
- Type: Atmospheric Vacuum Breaker (AVB) for hose-bib connections. Must be installed vertically, at least 6 inches above the highest point of the irrigation system.
- Placement: First component after timer/spigot. Never install after the pressure regulator.
-
Why essential: Health hazard prevention and legal requirement. Skipping this risks fines and endangers water safety.
-
Pressure Regulator (System Protector): Reduces household pressure (40–80 PSI) to the 20–30 PSI range required for drip components.
- Type: Drip-specific regulator (typically 25 PSI). Must be installed after the backflow preventer.
-
Why crucial: Prevents tubing stress, fitting leaks, emitter dislodgement, and erratic performance. Extends system lifespan significantly. A modest investment protects the entire system.
-
Filter (Clog Prevention Guardian): Removes microscopic particles that will inevitably clog emitter orifices. The most frequently cited cause of system performance issues is inadequate filtration.
- Types:
- Screen Filter (150–200 mesh): Minimum for city water. 200-mesh is strongly recommended. Choose one with a clear bowl for easy visual inspection.
- Disc Filter: Better for well water or water with organic matter. Stacked discs trap particles in grooves.
- Sediment Filter (Cartridge): Essential for well water, rain barrels, or heavily sedimented sources. Install before the screen/disc filter as a pre-filter.
- Placement: Install after the pressure regulator. Note flow direction arrow.
-
Maintenance: Clean monthly during peak season. Rinse screen under tap; soak in vinegar for mineral deposits. A clogged filter causes low pressure downstream—symptoms mimic other issues. Tip: Keep a spare screen on hand.
-
Timer (Automation & Consistency Tool):
- Hose-End Timer: Battery-operated, screws between spigot and backflow preventer. Look for features: multiple start times, rain delay sensor port, manual override, vacation mode.
-
Why valuable: Eliminates human error and forgetfulness. Ensures consistent watering critical for plant health (especially vegetables). Saves significant time. Water savings from precise scheduling often offset cost within one season. Note: While optional, the return on investment in water savings, plant productivity, and time saved makes it a wise consideration. Start with a basic model; upgrade later.
-
Flush Valve / End Cap (Line Maintenance Tool): Every lateral line must be sealed at the end.
- End Cap: Simple, inexpensive. Seals the line.
- Flush Valve (Highly Recommended): A cap with a small hole or a valve you can open. Allows periodic flushing of debris from the line end. Install at the lowest point of each lateral line, especially on slopes. Open for 2–3 minutes monthly during operation to clear sediment. Critical for longevity.
Component Sequence is Critical: Install in this exact order at the spigot:
Spigot → Timer → Backflow Preventer (vertical) → Pressure Regulator → Filter → Hose Adapter → Mainline Tubing
Reversing this sequence (e.g., filter before regulator) can compromise component function or create safety hazards. Verify flow direction arrows on filter/regulator.
Step 3.4: Fittings, Connections, and Installation Accessories
The quality of connections influences system integrity. Invest in quality fittings appropriate for your tubing type.
- Fitting Types:
- Barb Fittings: Inexpensive plastic fittings with ridged “barbs” that grip tubing interior. Push tubing firmly onto barb until seated. Best for: Permanent installations in stable temperatures. Consideration: Can leak if tubing shrinks in cold weather or is pulled. Use stainless steel hose clamps for critical connections (e.g., at water source).
- Compression Fittings: Screw-on fittings with a compression ring that seals tightly. More expensive but creates a leak-resistant, vibration-resistant connection. Best for: Connections that may need disassembly (water source), areas with temperature swings, or critical junctions. Worth the investment for mainline connections.
- Essential Fitting Inventory:
- Couplings (join two tubing ends)
- Elbows (90° turns—use instead of sharp bends)
- Tees (split flow into two directions)
- End Caps / Flush Valves
- Hole Punch (specifically designed for your tubing size—do not substitute scissors/knife)
- Goof Plugs (seal unused holes or repair mistakes)
- Landscape Staples (secure tubing every 3–5 feet; use galvanized for longevity)
- Spaghetti Tubing & Stakes (for precise emitter placement away from main line)
Why connection quality matters: A single leaking fitting wastes water daily and undermines system pressure. Installation Techniques:
– Punching Holes: Use the provided hole punch. Place tubing on a solid surface. Press firmly and twist slightly. Remove punch cleanly. Insert emitter immediately to prevent debris entry. Never use scissors or knives—they create ragged holes causing leaks or emitter blowouts.
– Inserting Emitters/Fittings: For stubborn fittings, dip tubing end in warm water for 30 seconds to soften. Push firmly until fully seated. A slight twist can help seat barbed emitters. For compression fittings, hand-tighten firmly, then give a quarter-turn with pliers—do not overtighten.
– Securing Tubing: Use landscape staples every 3–5 feet, especially on slopes, curves, or windy areas. For buried lines, staple before covering with soil. For surface lines in vegetable gardens, staples keep lines tidy and prevent tripping.
Common Fitting Mistake: Forcing a 1/4″ barb into 1/2″ tubing. Use the correct size adapter. Mismatched fittings guarantee leaks. Verify all components match your tubing specifications (e.g., “fits 1/2″ poly tubing”).
Pillar 4: Installation, Refinement, and Long-Term Management
Design and component selection culminate in physical installation. This pillar provides a meticulous, step-by-step installation guide, followed by critical post-installation protocols: rigorous testing, data-driven refinement, and establishing a sustainable maintenance rhythm. A beautifully designed system installed carefully will outperform a complex system installed hastily. Precision in execution honors the intelligence of your design.
Step 4.1: Pre-Installation Preparation – The Dry Run
Never connect components to water before this step. Preparation prevents most installation errors.
– Gather Tools: Hole punch, sharp tubing cutters (scissors work but cutters are cleaner), measuring tape, landscape staples, bucket of warm water (softens tubing), gloves, marker, your detailed garden map.
– Dry Layout: Unroll all tubing along your planned paths without connecting to water. Position emitters near intended plants. Lay out fittings at junctions. Walk the entire layout.
– Check: Tubing length sufficient? Any sharp bends? Emitters positioned correctly relative to plants? Enough slack at turns?
– Adjust: Cut tubing, reposition components. This is your zero-cost error correction phase.
– Site Prep: Clear installation path of sharp rocks, roots, or debris that could puncture tubing. For permanent in-ground installations (recommended for UV protection and aesthetics), dig shallow trenches (2–4 inches deep). For seasonal vegetable gardens, surface installation is practical—plan staple placement.
Why the dry run is essential: Fixing a miscalculation before pressurization takes seconds; fixing it after water is flowing takes minutes and wastes water. It builds confidence and ensures your design translates to reality. Tip: Take a photo of the dry layout with your phone. Reference it during assembly if interrupted.
Step 4.2: Sequential Assembly at the Water Source – Order Matters
Follow this exact sequence. Reversing steps risks component damage or safety hazards. Work deliberately.
- Attach Timer (if using) directly to the spigot. Hand-tighten firmly.
- Screw on Backflow Preventer. Ensure it is perfectly vertical (as required by code and function). Hand-tighten.
- Attach Pressure Regulator to backflow preventer. Note flow direction arrow (usually molded into plastic).
- Attach Filter to pressure regulator. Confirm flow direction arrow points away from source.
- Attach Hose Adapter / Swivel Adapter to filter. A swivel adapter prevents kinking at the connection point.
- Connect Mainline Tubing to adapter. Use a compression fitting here for reliability, or a barb fitting with a stainless steel clamp.
Verification Step: After each connection, give a gentle tug. All should feel secure. Do not overtighten plastic threads—hand-tight plus a quarter-turn with pliers is sufficient. Overtightening cracks fittings. Critical Safety Check: Confirm backflow preventer is vertical and positioned before the pressure regulator. This sequence is mandated by plumbing codes for safety.
Step 4.3: Running Mainline and Installing Lateral Lines
- Unroll Mainline: Gently stretch tubing to remove kinks. Avoid sharp bends—maintain a minimum bend radius of 6 inches for 1/2″ tubing. Use elbows at corners; don’t force bends.
- Secure Mainline: Insert landscape staples every 3–5 feet. On slopes, staple more frequently (every 2 feet). For buried lines, staple before covering with soil.
- Install Branches: At planned junctions, cut mainline cleanly. Insert tees or elbows. For blank lateral lines:
- Use hole punch to create openings at precise emitter locations (refer to your map).
- Insert emitters directly, or insert barbed connectors for spaghetti tubes.
- For spaghetti tubes: Attach tube to connector, run to plant base, insert emitter stake firmly into soil near root zone. This allows precise placement independent of mainline path.
- Emitter Placement Guidance:
- Vegetables/Annuals: Place emitters 2–4 inches from plant stem initially. As plants grow, emitters will naturally align with expanding root zones.
- Shrubs/Trees: Place multiple emitters (2–4 for shrubs, 4–8 for trees) in a circle at the current drip line (outer edge of canopy), not at the trunk. Roots concentrate here. As canopy expands, add emitters outward annually.
- Slopes: Place emitters slightly uphill of the plant. Water flows downward through soil, naturally wetting the root zone below.
- Containers: Run 1/4″ micro-tubing along pot edges. Use adjustable emitters on stakes inserted into soil. One emitter per small pot; two for large pots or thirsty plants.
Why placement precision matters: An emitter placed too far from a small plant’s roots waters soil, not the plant. Strategic placement ensures water reaches the active root zone immediately. Common Installation Error: Over-tightening barbed fittings. Push until snug; the barb’s ridges grip securely. Forcing can crack tubing. Technique: Dip tubing end in warm water for 30 seconds before inserting onto barbs—makes insertion smoother and reduces stress on tubing.
Step 4.4: System Pressurization and Comprehensive Testing – The Quality Gate
This is the most critical quality control step. Never skip testing. Allocate 30–45 minutes for thorough evaluation.
- Pre-Pressurization Check: Ensure all flush valves are closed (or end caps secure). Verify no kinks in tubing. Confirm all emitters are inserted.
- Slow Pressurization: Turn spigot on slowly to 1/4 open. Listen for hissing (indicating leaks). Wait 10 seconds. Open to 1/2. Wait. Open fully.
- Walk the Entire System Slowly: Observe every connection, fitting, and emitter for 5 minutes.
- Leaks at fittings? Tighten slightly. If persistent, cut out section, install coupling. Do not ignore small drips—they worsen.
- Emitters spraying/gushing? Indicates pressure too high (regulator issue) or wrong emitter type. Turn off water immediately.
- Emitters not dripping/weak flow? Check for kinks, closed flush valves, or clogs. Inspect filter bowl for cloudiness.
- Uneven flow (strong at start, weak at end)? Note locations—indicates pressure loss (too long run, too many emitters, slope issue).
- Wetting Pattern Observation: Let system run 15–20 minutes. Observe soil around emitters.
- Water should form a moist “bulb” expanding downward and outward.
- After shutdown, gently dig near an emitter (2–4 inches deep for shallow roots; 6–8 inches for deep roots). Measure the wetted zone diameter and depth.
- Ideal: Moisture reaches bottom of root zone without pooling on surface or draining below roots.
- Document Findings: Note any dry spots, pooling, leaks, or uneven output on your garden map. This is your refinement checklist.
Why testing is essential: Catching a small leak during testing prevents a flooded garden bed overnight. Observing wetting patterns validates your emitter selection and spacing against your actual soil. Refinement Example: Testing shows a 1.0 GPH emitter in clay soil creates only a 6-inch wide wetted bulb after 30 minutes, but plants are spaced 18 inches apart. Solution: Add emitters midway between plants, or increase runtime significantly. In sandy soil, the same emitter creates a 12-inch bulb—12-inch spacing is sufficient. Data drives decisions.
Step 4.5: Fine-Tuning Runtime and Establishing a Dynamic Schedule
Initial testing provides baseline data. Calibration tailors the system to your microclimate and plant responses. Avoid “set it and forget it” thinking—plants’ water needs are dynamic.
- Determine Baseline Runtime:
- Catch Cup Method: Place small containers (tuna cans) under several emitters. Run system 15 minutes. Measure water depth. Calculate: (Desired inches of water × 60) ÷ (Inches collected in 15 min × 4) = Runtime minutes. Example: Want 0.5″ water; collect 0.125″ in 15 min → (0.5 × 60) ÷ (0.125 × 4) = 30 ÷ 0.5 = 60 minutes.
- Simpler Starting Point: For most vegetable gardens in average soil: 30 minutes per session, 2–3 times per week. Adjust based on observation.
- Calibration Through Observation (Most Reliable Method):
- Soil Moisture Test: 1–2 hours after watering, dig 2–4 inches deep near plant roots. Soil should feel moist like a wrung-out sponge—not soggy, not dry. For deep-rooted plants, check 6–8 inches.
- Plant Response: Temporary wilting during peak heat (2–4 PM) is normal for many plants. Wilting in morning/evening indicates underwatering. Yellowing lower leaves can indicate overwatering.
- Weather Adjustment: Increase frequency during heat waves (>90°F), windy periods, or low humidity. Decrease during cool, cloudy weather or after significant rain. A timer with a rain sensor or smart features (Wi-Fi connected to weather data) automates this effectively.
- Seasonal Adjustment Framework:
- Spring (Establishment): Shorter, more frequent runs (e.g., 20 min, every other day) to encourage root growth in seedlings/transplants.
- Summer (Peak Demand): Longer runs less frequently (e.g., 45 min, 3x/week) to wet deeper root zones, promoting drought resilience. Monitor closely during heat spikes.
- Fall (Maturation): Gradually reduce frequency as growth slows and temperatures drop. Focus on deep watering before dormancy for perennials/trees.
- Winter (Dormancy): In mild climates, minimal watering (e.g., 15 min, once every 2–3 weeks). In freezing climates, winterize system (see below).
Why fine-tuning matters: Plants communicate their needs. Responding builds resilience. Insight: The goal is to wet the entire active root zone without waterlogging. For shallow-rooted plants (lettuce), frequent short runs maintain surface moisture. For deep-rooted plants (tomatoes, trees), less frequent but longer runs encourage roots to grow deeper, accessing moisture reserves and increasing drought tolerance. This “deep watering” principle supports water-wise gardening.
Step 4.6: Maintenance Protocol – The Ritual of Longevity
A drip system thrives on proactive care. Integrate these tasks into your gardening rhythm. Neglect turns efficiency into waste.
- Weekly (During Active Watering Season):
- Visual Inspection: While system runs, walk the garden. Look for leaks, dislodged emitters, dry spots (clogged emitters), or pooling (broken emitter).
- Filter Check: Glance at filter bowl. If cloudy, clean immediately. Don’t wait for scheduled cleaning.
- Monthly:
- Flush Lines: Open all flush valves (or remove end caps) and run water 2–3 minutes to clear sediment. Do this before cleaning the filter to avoid pushing debris backward.
- Clean Filter: Shut off water. Unscrew bowl. Rinse screen under tap. For mineral deposits (white crust), soak screen in white vinegar 30 minutes, rinse thoroughly. Reassemble.
- Inspect Components: Check pressure regulator, backflow preventer, and connections for leaks or damage. Tighten if needed.
- Seasonally (End of Growing Season in Freezing Climates): WINTERIZATION IS ESSENTIAL
- Shut off water supply at spigot.
- Open all flush valves and remove end caps to drain water from lines.
- Disconnect components back to the timer (if possible). Store timer, filter, regulator, and backflow preventer indoors where they won’t freeze.
- For in-ground lines that can’t be fully drained: Use an air compressor on very low pressure (<20 PSI) to blow out remaining water—exercise extreme caution; high pressure destroys drip systems. Alternatively, accept that exposed above-ground components may need replacement in spring. Never rely on “self-draining” claims in freeze-prone areas.
- Cover exposed spigots with insulation.
- As Needed:
- Unclog Emitters: Remove emitter. Soak in white vinegar 30 minutes to dissolve mineral deposits. Rinse. Use a fine needle gently to clear orifice if needed. Reinstall.
- Repair Leaks: Cut out damaged tubing section. Insert a coupling. For small punctures, use a repair clamp or polyurethane sealant tape designed for irrigation tubing.
- Adjust for Growth: Move emitter stakes outward for expanding shrubs/trees. Add emitters for new plantings.
Why maintenance is part of design: A neglected system becomes inefficient and wasteful. Regular flushing prevents clogs; winterization prevents costly replacements. Budget-Friendly Tip: Keep a dedicated “Drip Repair Kit” in your garden shed: spare emitters (multiple types), goof plugs, couplings, hole punch, landscape staples, vinegar, small brush. It pays for itself after one repair. Mindset Shift: View maintenance not as a chore, but as mindful stewardship—a few minutes of care ensuring months of reliable performance.
Addressing Real-World Frictions and Objective Alternative Analysis
Even meticulously designed systems encounter challenges. This section addresses frequent pain points with actionable solutions and objectively compares drip irrigation to common alternatives, reinforcing when a well-executed drip design aligns with the goal of targeted watering—while acknowledging scenarios where other methods may be preferable.
Solving Top Drip Irrigation Challenges: A Diagnostic Framework
Challenge: Persistent Emitter Clogging
– Root Causes: Inadequate filtration (most common), poor water quality (high sediment, iron bacteria, mineral hardness), infrequent line flushing, or using non-soluble fertilizers in fertigation.
– Solution Framework:
1. Prevention (Primary Defense): Install correct filter (200-mesh minimum screen; disc filter for well water; sediment pre-filter for rain barrels). Flush lines monthly. Never fertigate without a dedicated injector and thorough post-flush.
2. Immediate Action: Clean filter thoroughly. Flush entire system for 5 minutes. Remove visibly clogged emitters; soak in white vinegar 30 minutes; rinse; reinstall. Check water source for temporary contamination (e.g., after municipal line work).
3. Long-Term Strategy:
– Well Water with Iron Bacteria: Consult a water treatment professional. Options include chlorination injection system (requires careful dosing and neutralization) or specialized iron filters.
– Hard Water (Mineral Deposits): Install a water softener for the irrigation line (not drinking water) or use periodic vinegar flushes (run diluted vinegar solution through system; check emitter compatibility first).
– Rain Barrel Water: Install a fine-mesh screen at barrel inlet and a sediment pre-filter before the drip filter. Clean barrel annually.
– Why this works: Addresses the problem at its source (filtration) and implements routine protocols to prevent recurrence. Insight: Studies from university extensions (e.g., UC Davis, Texas A&M) indicate that upgrading to 200-mesh filtration and establishing a monthly flushing schedule resolves the majority of clogging issues. Prevention is vastly more efficient than cure.
Challenge: Uneven Watering on Slopes or Long Runs
– Root Cause: Pressure variation due to elevation changes (hydrostatic pressure) or friction loss over distance exceeding emitter tolerance.
– Solution Framework:
1. Design Correction (Most Effective): Reconfigure mainline to run contouring along the slope (side-to-side), minimizing elevation change along the mainline. Run lateral lines perpendicular down the slope. Use Pressure-Compensating (PC) emitters exclusively on all lateral lines in sloped areas.
2. Component Upgrade: For runs over 200 feet, install a secondary pressure regulator mid-line. Upgrade mainline tubing to 5/8″ or 3/4″ diameter to reduce friction loss.
3. Zoning Adjustment: Split the problematic area into two separate zones controlled by individual valves/timer stations. This reduces the length and elevation change per zone.
– Why this works: PC emitters are engineered with diaphragms that maintain a consistent flow rate across a wide pressure range (typically 10–50 PSI). This technology directly addresses the physics of pressure variation. Field Insight: Research from agricultural institutions demonstrates that PC emitters significantly reduce flow variation on slopes compared to non-PC types, supporting uniform plant growth and water use efficiency. The modest cost premium is often justified by performance and reduced troubleshooting.
Challenge: System Damage from Freezing Temperatures
– Root Cause: Water trapped in tubing, filters, regulators, or backflow preventers expands upon freezing, causing cracks and ruptures.
– Solution Framework:
1. Proactive Winterization (Essential in Freeze Zones): Complete the seasonal shutdown steps in Pillar 4.6 before the first hard freeze. Meticulous draining is the only reliable method. Pay special attention to low spots where water pools.
2. Component Selection for Vulnerable Areas: Use “freeze-resistant” tubing (thicker wall) for above-ground sections, though drainage remains essential. Store all sensitive components (timer, filter, regulator, backflow preventer) indoors.
3. Design Adaptation for Permanent Systems: In cold climates, bury mainlines below the local frost line (consult county extension office for depth). However, lateral lines with emitters are typically installed shallowly; thus, seasonal drainage of laterals is still required. Consider designing laterals as removable sections for easy indoor storage.
– Critical Reminder: Even a small amount of trapped water in a filter bowl can cause failure. Winterization is not optional in freezing climates—it’s an annual maintenance step as essential as pruning. Perspective: Replacing a cracked filter ($15) and regulator ($12) is minor; replacing hundreds of feet of tubing and dozens of emitters due to multiple leaks is costly and time-consuming. Prevention is economical.
Drip Irrigation vs. Common Alternatives: An Evidence-Based Comparison
While drip irrigation excels at targeted root-zone watering, it’s not universally optimal. Understanding alternatives helps confirm when drip is the right solution for your specific goals. This comparison focuses on core metrics relevant to home gardeners.
| Feature | Drip Irrigation | Soaker Hoses | Sprinkler Systems | Hand Watering |
|---|---|---|---|---|
| Water Efficiency | ★★★★★ (High efficiency; minimal evaporation/runoff) | ★★★★☆ (Moderate efficiency; some evaporation, can puddle on slopes) | ★★☆☆☆ (Lower efficiency; higher evaporation, wind drift, runoff) | ★★★☆☆ (Variable; efficient if done carefully at soil level, but often inconsistent) |
| Targeting Precision | ★★★★★ (Water delivered exactly to root zone of each plant; hydrozoning possible) | ★★☆☆☆ (Waters entire hose length; floods areas between plants; no plant-specific control) | ★☆☆☆☆ (Broadcasts water over entire area; waters weeds, paths, non-target plants) | ★★★★☆ (High precision possible with watering can, but labor-intensive and subjective) |
| Weed Suppression | ★★★★★ (Keeps soil between plants dry, significantly inhibiting weed germination) | ★★☆☆☆ (Moistens soil continuously along hose path, encouraging weeds between plants) | ★☆☆☆☆ (Waters entire bed surface, promoting prolific weed growth) | ★★★★☆ (Can avoid watering weed seeds if careful, but difficult to maintain consistently) |
| Disease Prevention | ★★★★★ (Keeps foliage dry, reducing risk of fungal/bacterial diseases) | ★★★☆☆ (Keeps soil surface moist; can increase humidity around plants) | ★☆☆☆☆ (Wets foliage extensively, creating conditions favorable for foliar diseases) | ★★★☆☆ (Depends entirely on technique; avoid wetting leaves for best results) |
| Labor & Automation | ★★★★☆ (Low labor after install; easily automated with timer; minimal monitoring) | ★★★☆☆ (Moderate labor; can be automated but less precise; hoses degrade, kink, move) | ★★★★☆ (Low labor; highly automatable; requires seasonal setup/teardown for portable types) | ★☆☆☆☆ (High labor; no automation; time-consuming; inconsistent without discipline) |
| Initial Cost | ★★★☆☆ ($50–$300+ DIY; scales with garden size/complexity) | ★★★★☆ ($20–$100; very low entry cost) | ★★☆☆☆ ($100–$500+; higher for in-ground systems) | ★★★★★ ($0–$30 for watering can/hose nozzle) |
| Best Use Cases | Vegetable gardens, raised beds, shrubs, trees, containers, slopes, water-conscious areas, disease-prone plants | Straight rows of closely spaced plants (carrots, radishes), new seedlings needing gentle moisture, temporary setups | Lawns, large open areas, ground covers requiring uniform surface moisture, plants benefiting from foliar wash (some herbs) | Seedlings, container plants, spot-watering established plants during drought, gardens where intimacy with plants is prioritized |
| Key Limitation | Requires upfront design/planning; not ideal for establishing lawns from seed | Poor pressure regulation; output degrades with length/slope; hoses crack, kink, degrade in sun; difficult to repair | High water waste; promotes weeds/disease; ineffective on slopes/windy days; runoff on clay soils | Highly inconsistent; time-intensive; impractical for large gardens/vacations; easy to over/under-water |
Synthesis and Guidance:
Drip irrigation is highly effective for water conservation, plant health optimization, and targeted delivery in defined planting areas. Its advantages are most pronounced in water-conscious regions, on slopes, in raised beds, and for disease-sensitive crops like tomatoes. Soaker hoses offer a simpler, lower-cost entry point for small, flat, straight-row gardens but lack precision, durability, and adaptability. Sprinklers remain necessary for turfgrass establishment and large uniform areas but are less efficient for beds. Hand watering fosters garden connection but is unsustainable for larger spaces or consistent results.
When Drip Might Not Be Best:
– Establishing a New Lawn from Seed/Sod: Requires uniform soil surface moisture for germination. Temporary sprinklers are standard. (Note: Subsurface drip can be used for established lawns but typically requires professional installation.)
– Very Small, Temporary Plantings: A single pot or tiny herb garden may not justify system setup. Hand watering suffices.
– Plants Requiring Foliar Moisture: Some ferns or tropicals benefit from misting; micro-sprayers within a drip system can address this selectively.
The decision ultimately hinges on your garden’s layout, your water priorities, time investment willingness, and commitment to upfront design. For the explicit goal of “watering precisely where needed,” drip irrigation—when designed using the Precision Hydration Framework—is a highly effective, evidence-supported solution.
Your Questions, Answered
Gardeners consistently encounter specific uncertainties when designing and maintaining drip systems. These answers synthesize common queries with evidence-based guidance, drawing from agricultural extension resources and field-tested practice.
Q: How much might I save on water use with drip irrigation?
A: Savings vary significantly based on local water rates, garden size, previous watering method, climate, and system design. However, resources from the EPA’s WaterSense program and university extensions (e.g., University of California Division of Agriculture and Natural Resources) indicate drip irrigation can reduce outdoor water use by 30–50% compared to traditional sprinkler systems in similar applications. For illustration, a suburban vegetable garden of approximately 400 square feet previously watered with a hose-end sprinkler might use around 15,000 gallons per season, whereas a well-designed drip system could reduce this to approximately 8,000 gallons. Actual savings depend on many factors. Beyond direct water savings, many gardeners note additional benefits:
– Increased Plant Productivity: Healthier, less-stressed plants (e.g., tomatoes, peppers) may produce more consistently.
– Reduced Plant Loss: Minimized disease pressure (e.g., tomato blight) can reduce replacement costs.
– Time Savings: Automation frees time during peak season.
– Long-Term Resilience: Established plants often develop deeper roots, requiring less supplemental water over time.
For a DIY system costing $100–$200, many gardeners report the investment is recouped within one to two growing seasons through combined water savings, increased productivity, and reduced plant replacement costs. In regions with tiered water pricing or drought restrictions, savings can be more pronounced. Track your own usage to understand your specific impact.
Q: Can I use drip irrigation with a rain barrel?
A: Yes, but success requires specific design adaptations due to very low pressure (typically 2–10 PSI, depending on barrel height and water level). Standard drip components designed for 20–30 PSI will perform poorly or not at all. Follow this protocol:
1. Elevate the Barrel: Place on sturdy cinder blocks or a stand. Every foot of elevation adds ~0.43 PSI. Aim for barrel base at least 18–24 inches above garden level.
2. Use Gravity-Flow Components:
– Mainline: 1/2″ or larger diameter tubing (minimizes friction loss).
– Emitters: Non-pressure-compensating types (they may function better at very low pressure than PC types). Avoid micro-sprayers.
– Keep runs short: Total system length under 100 feet.
3. Filtration is Critical: Install a fine-mesh screen filter (200-mesh) at the barrel outlet and a sediment pre-filter if water is murky. Clean frequently.
4. Simplify the Layout: One zone only. Group plants with identical water needs.
5. Consider a Pump (For Larger Systems): A small 12V diaphragm pump designed for rain barrels (e.g., 3–5 PSI output) can enable use of standard drip components. Crucially: Install a pressure regulator after the pump to protect drip components, and include a certified backflow preventer. Never connect a rain barrel directly to municipal water without a certified atmospheric vacuum breaker—this is a severe contamination hazard and illegal in most areas.
Realistic Expectation: A single 55-gallon rain barrel can effectively water a 100–150 sq ft garden bed 1–2 times per week during dry spells. Monitor barrel level closely.
Q: How do I know if my plants are getting enough water?
A: Relying solely on timer settings is unreliable. Combine these observational techniques:
1. Soil Moisture Test (Most Reliable): 1–2 hours after watering, dig down to the bottom of the plant’s active root zone (2–4″ for lettuce; 6–8″ for tomatoes; 12″+ for trees). Grab a handful of soil. It should feel moist and cool, forming a loose ball that crumbles easily when poked. If it’s soggy/muddy → possible overwatering. If it’s dry/dusty → possible underwatering.
2. Plant Physiological Signs:
– Temporary Wilting: During peak heat (2–4 PM), many plants wilt slightly as a survival mechanism. If they perk up by evening → likely adequate water.
– Chronic Wilting: Wilting in morning or evening → possible underwatering.
– Yellowing Leaves: Especially lower leaves turning yellow while soil is wet → possible overwatering/root issues.
– Leaf Curling/Browning: Can indicate underwatering or overwatering—check soil moisture to diagnose.
3. Catch Cup Test: Place small containers under several emitters during a cycle. Measure output to verify uniformity and calculate actual runtime needed.
4. Technology Aid: Inexpensive soil moisture meters ($10–$20) provide instant readings. Insert probe to root depth. Calibrate by comparing meter reading to the “feel test” initially.
Expert Consensus: The “finger test” combined with plant observation remains the most accessible, reliable method for home gardeners. Technology supplements but doesn’t replace mindful observation. Adjust runtimes based on soil texture, weather, and plant response—not a calendar.
Q: Are pressure-compensating (PC) emitters worth the extra cost?
A: In most home garden installations, yes—the modest premium is often justified by performance benefits. PC emitters maintain a consistent flow rate (e.g., exactly 1.0 GPH) across a wide pressure range (typically 10–50 PSI). This addresses core challenges:
– Slopes: Helps prevent uneven watering (dry top, flooded bottom).
– Long Runs: Reduces “fade-out” where emitters at the end of the line drip weakly.
– Variable Pressure: Compensates for pressure fluctuations from household water use (e.g., toilet flush, shower).
– Zoning Flexibility: Allows mixing emitter types on one zone with greater confidence.
For a very small, flat garden under 100 sq ft with very short runs (<50 feet) and no elevation change, non-PC emitters may suffice and save a few dollars. However, the price difference per emitter is often minimal (a few cents to $0.25), and the consistency and reduced troubleshooting make PC emitters a prudent choice for nearly all installations. Think of them as insurance against uneven watering—a small cost for reliable performance. Agricultural extension publications frequently recommend PC emitters for home landscapes due to their reliability across variable conditions.
Q: Can I fertilize through my drip system (fertigation)?
A: Yes, and it can be highly efficient—delivering diluted nutrients directly to the root zone where plants absorb them. This process, called fertigation, can maximize nutrient uptake and minimize waste. Follow this protocol for safety and effectiveness:
1. Use a Dedicated Fertilizer Injector: Install a hose-end or inline injector after the filter but before the tubing network. Never pour fertilizer directly into the system.
2. Choose Soluble Fertilizers: Use products labeled “water-soluble” or “for fertigation.” Avoid granular fertilizers or organic amendments that aren’t fully dissolved (e.g., fish emulsion must be strained).
3. Pre-Filter Fertilizer Solution: Strain liquid fertilizers through a fine mesh bag before adding to the injector reservoir to prevent clogs.
4. Flush Thoroughly: After every fertigation cycle, run clean water through the system for 10–15 minutes. This flushes residual fertilizer from lines and emitters, preventing salt buildup and clogs.
5. Start Dilute: Begin with half the fertilizer concentration recommended on the label. Monitor plant response; adjust upward cautiously. Over-fertilizing through drip can cause root issues more easily than soil application.
Critical Caution: Fertigation demands meticulous filtration. Upgrade to a 200-mesh filter or add a secondary fine filter. Clean the filter before and after each fertigation session. Always follow manufacturer instructions for your specific injector. For organic gardening, use certified organic liquid fertilizers and flush aggressively.
Q: How do I design drip irrigation for potted plants on a patio or balcony?
A: Container drip systems are highly effective, conserve water that would drain from pots, and are ideal for automation. Design considerations:
– Water Source: Use a nearby hose bib. A compact timer and filter/regulator assembly keeps the setup tidy.
– Tubing: Run flexible 1/4″ micro-tubing along railings, under benches, or along the patio edge. It’s discreet and easy to route. Secure with small clips or landscape staples.
– Emitters: Use adjustable emitters or micro-bubblers on stakes. Place one emitter per pot, inserted into the soil near the plant base. For large pots (>12″ diameter) or thirsty plants (tomatoes, cucumbers), use two emitters.
– Drainage Management: Ensure pots have drainage holes. Place pots on saucers if staining is a concern, but empty saucers 30 minutes after watering to prevent roots sitting in water (can cause rot).
– Automation Advantage: A timer is especially valuable here—container plants dry out faster and require more frequent watering. Group pots with similar water needs on the same line if possible (e.g., all succulents on one circuit, all vegetables on another).
– Winter Care: In freezing climates, disconnect and store the entire system indoors. Drain all components thoroughly.
Tip: Use weighted emitter stakes that stay securely in potting mix even when pots are moved slightly. Label lines if multiple plant types are grouped.
Q: What’s a common oversight beginners make?
A: Overlooking or undersizing the filter. It’s tempting to view the filter as an optional “extra,” but it is critical for long-term system performance. Without adequate filtration, microscopic particles present even in clear municipal water—sand, rust, mineral crystals—will accumulate in emitter orifices, causing partial or complete blockages within weeks or months. This leads to uneven watering, plant stress, and frustrating troubleshooting. Installing a properly sized filter (150–200 mesh minimum) and committing to monthly cleaning is one of the highest-impact habits for drip system success. Agricultural extension publications consistently emphasize filtration as essential. Never skip it. Never clean it only when problems arise. Make filter inspection a monthly ritual.
Q: Can drip irrigation be used for establishing new lawn seed or sod?
A: Standard drip tubing is not suitable for establishing lawns from seed or sod. Lawn establishment requires uniform, consistent moisture across the entire soil surface to encourage germination and root establishment. Drip irrigation wets discrete points, leaving large areas dry—resulting in patchy, failed germination.
– For Seed/Sod Establishment: Use temporary sprinklers (impact, oscillating, or misters) set to provide light, frequent watering across the entire area until roots are established.
– For Established Lawns: Subsurface drip irrigation can be used but typically requires professional design and installation to ensure uniform coverage. It is not a standard DIY solution for lawn establishment.
Conclusion and Next Step
Designing a drip irrigation system is an act of garden stewardship—a deliberate choice to align water use with plant needs, soil conditions, and your local environment. By moving through the Precision Hydration Framework—Assess, Calculate, Select, Install & Refine—you transform irrigation from a routine task into a responsive practice that supports plant vitality and resource conservation.
- Recap: The three foundational pillars are (1) thorough site assessment to understand your garden’s unique patterns, (2) thoughtful component selection matched to your documented conditions, and (3) consistent observation and refinement after installation.
- The 24-Hour Rule: Within the next day, sketch a simple map of one garden area you’d like to irrigate. Note sun exposure, slope, and plant groupings. This small step builds momentum.
- The Big Picture: Your system is part of a larger ecosystem. Efficient watering supports soil health, reduces runoff, and contributes to a resilient garden that adapts with the seasons. Each thoughtful adjustment reinforces a deeper connection to your landscape.
Explore Our Complete System:
Soil Testing Fundamentals | Water-Wise Plant Selection Guide | Rainwater Harvesting for Gardeners | Seasonal Garden Maintenance Calendar | Understanding Garden Microclimates | Organic Mulching Techniques for Moisture Retention | Container Gardening Mastery