Stop guessing and start solving—learn how to diagnose, adjust, and maintain ideal water pressure for comfort, efficiency, and peace of mind.
Water pressure problems range from the mildly annoying—a shower that trickles when the dishwasher runs—to potentially damaging: accelerated wear on fixtures, stressed pipes, and shortened appliance lifespans. Yet most homeowners react to symptoms without understanding the root cause. This definitive guide transforms confusion into clarity. You’ll learn precisely how to measure your pressure, diagnose whether it’s too high, too low, or just right, implement targeted solutions (from quick aerator cleans to PRV installation), maintain ideal flow long-term, and recognize when professional help is essential. No jargon, no fluff—just actionable steps grounded in established plumbing principles and practical application.
Introduction
Water is your home’s circulatory system. Pressure is its heartbeat. Too forceful, and components experience accelerated stress; too weak, and daily routines become frustrating while appliances work inefficiently. Unlike a flickering light switch or a sticking door, water pressure operates invisibly—until it doesn’t. You notice it when the shower sputters during laundry day, when the toilet refills with a hesitant gurgle, or when a sudden BANG echoes through the walls after turning off the faucet. These aren’t random annoyances; they’re diagnostic signals. Industry standards from the International Association of Plumbing and Mechanical Officials (IAPMO) and the Uniform Plumbing Code establish 40–80 PSI as the acceptable residential range, with 50–60 PSI representing the optimal balance for performance, efficiency, and system longevity. Municipal supplies vary, aging infrastructure introduces restrictions, and household modifications alter demand. This guide is built upon established plumbing engineering principles synthesized into a practical, step-by-step methodology. We move beyond fragmented online tips to deliver a unified framework: measure accurately, diagnose systematically, solve precisely, and maintain proactively. Whether you live in a century-old bungalow with galvanized pipes, a modern subdivision home on municipal water, or a rural property with a private well, this guide meets you where you are—and equips you to achieve water pressure that feels effortless and sustainable.
The Goldilocks Framework: Understanding the Three Pressure Zones
Before reaching for tools or calling a plumber, establish a foundational mental model. Water pressure isn’t merely “strong” or “weak.” It exists within three distinct zones, each with measurable ranges, observable symptoms, and specific consequences. This framework—named for the fairy tale character seeking what’s “just right”—replaces subjective impressions (“the shower feels weak”) with objective criteria. Anchor your understanding here, and every subsequent decision gains clarity.
Zone 1: Too High Pressure (Above 80 PSI)
High pressure is often a silent stressor. Unlike low pressure, which announces itself through immediate inconvenience, excessive pressure works invisibly, accelerating wear across your plumbing ecosystem. You might initially perceive benefits: sinks fill rapidly, showers feel powerfully invigorating. But this comes at a compounding cost. Hydraulic stress fatigues pipe joints, compresses seals beyond design limits, and subjects appliances to forces they weren’t engineered to withstand. Consider the physics: water at 100 PSI exerts significantly more force on pipe walls than water at 60 PSI. Over time, this relentless pressure contributes to microscopic cracks, seal degradation, and component fatigue.
Observable Symptoms of High Pressure:
– Water hammer: A sharp, metallic BANG or rhythmic knocking when faucets shut off abruptly. This occurs because high-velocity water slams against closed valves, creating shockwaves that reverberate through pipes. It’s not merely noise—it’s evidence of hydraulic impacts stressing joints.
– Premature fixture wear: Faucet cartridges develop leaks sooner than expected. Toilet fill valves cycle erratically or drip persistently. Washing machine hoses show signs of bulging. These often reflect components operating beyond intended stress levels.
– Elevated water usage: A showerhead flowing at 2.5 GPM (gallons per minute) at 60 PSI may flow noticeably higher at 90 PSI. That extra volume accumulates monthly. Studies suggest households reducing pressure from 100 PSI to 60 PSI can achieve water savings in the range of 10–15%.
– Spitting or splashing faucets: Water exits aerators with such velocity it atomizes, creating mist that coats countertops and mirrors. This isn’t aerator design—it’s uncontrolled force.
– Moisture at connections: Persistent dampness under sinks, near the water heater, or around pipe joints may signal seals fatiguing under pressure. Left unaddressed, this can contribute to secondary issues like mold growth or material degradation.
Root Cause Context: High pressure rarely originates within your home. It’s typically imposed by the municipal supply system—especially if your house sits at the bottom of a hill (gravity increases pressure) or near a pumping station. Older neighborhoods retrofitted with modern high-pressure mains may lack required Pressure Reducing Valves (PRVs). Crucially, high pressure is not a “good problem.” It’s a preventable stressor on your system. Think of it like sustained high blood pressure in the human body: often asymptomatic until a critical event occurs. Ignoring it increases the risk of component failure. The solution isn’t accepting “strong flow”—it’s implementing regulation to protect your home’s integrity.
Zone 2: Too Low Pressure (Below 40 PSI)
Low pressure announces itself immediately. It transforms routine tasks into tests of patience: waiting minutes for a sink to fill, enduring a lukewarm trickle in the shower when a toilet flushes elsewhere, watching the dishwasher cycle stretch abnormally long. But low pressure is rarely a single-issue problem. It’s a symptom pointing to obstruction, restriction, or supply deficiency. Misdiagnosis is common—many assume municipal supply is weak when the real culprit lies within their walls.
Observable Symptoms of Low Pressure:
– Weak, inconsistent flow: Showers lack force; sink streams feel thin. Pressure drops noticeably when multiple fixtures run simultaneously (e.g., kitchen sink use weakens bathroom shower flow).
– Extended appliance cycles: Washing machines take noticeably longer to fill. Dishwashers may display error codes related to slow water intake.
– Sputtering or air in lines: Faucets spit and cough as air mixes with water, often indicating partial blockages or supply interruptions.
– Hot-water-only or cold-water-only issues: Pressure weakens solely on hot lines (pointing to water heater sediment) or cold lines (suggesting a filter or valve issue).
Root Cause Context: Low pressure demands methodical diagnosis. Is it isolated to one fixture? Likely a clogged aerator. Affecting all hot water? Sediment in the water heater. Whole-house and sudden? A partially closed main valve. Whole-house and gradual? Corroded galvanized pipes (common in pre-1980s homes) or a malfunctioning PRV. Municipal supply issues do occur—especially during droughts, peak usage hours, or infrastructure repairs—but internal restrictions are far more common. Imagine drinking a thick smoothie through a narrow, kinked straw: no matter how hard you try, flow remains restricted. Similarly, mineral buildup, corroded pipes, or malfunctioning valves restrict water volume. Addressing low pressure requires identifying and removing that “kink.” Crucially, persistently low pressure can impact safety systems. Fire sprinklers require minimum pressure to activate correctly. Backflow preventers on irrigation systems rely on adequate pressure to function; insufficient pressure risks compromised protection.
Zone 3: Just Right Pressure (40–80 PSI, Ideally 50–60 PSI)
This is the zone of harmony. Water flows with consistent, satisfying force without strain. Showers rinse efficiently. Sinks fill promptly. Appliances operate within designed parameters, supporting efficiency and longevity. Critically, pressure remains stable—minimal fluctuation when fixtures activate elsewhere. You hear no banging pipes, see no leaks at connections, and experience predictable performance room to room.
Why 50–60 PSI is Often the Sweet Spot:
– User comfort: Provides robust flow for showers and sinks without excessive splashing or noise.
– Appliance support: Dishwashers, washing machines, and ice makers operate efficiently, reducing pump strain and cycle times.
– System preservation: Minimizes stress on pipe joints, seals, and valves, supporting component longevity.
– Water efficiency: Delivers sufficient volume without wasteful over-flow. Modern low-flow fixtures (1.5–2.0 GPM) perform reliably within this range.
– Code alignment: Meets IRC and UPC standards while providing a buffer against minor municipal fluctuations.
Nuance Matters: “Ideal” is household-specific. A single-person apartment may function well at 45 PSI. A four-bedroom home with three bathrooms, an irrigation system, and a large family may benefit from 58–60 PSI to handle simultaneous demand. The true hallmark of “just right” isn’t a single number—it’s consistency. Pressure holding steady at 55 PSI all day is superior to pressure swinging between 40 and 70 PSI. Stability protects your investment. It’s the difference between an engine cruising smoothly versus one constantly straining. Achieving this zone requires understanding your unique demand profile and implementing appropriate regulation or boosting.
The Fundamental Principle: Water pressure management is not about maximizing flow but optimizing balance—between user experience, system durability, resource efficiency, and safety. The goal is stable, predictable pressure that meets your household’s demands without imposing undue stress on any component.
Step 1: Accurately Measuring Your Water Pressure
You cannot manage what you do not measure. Guessing pressure based on shower feel is unreliable. This step is essential. Skipping it risks misdiagnosis: installing a booster pump for perceived low pressure when the real issue is a clogged aerator, or overlooking high pressure because “the flow feels fine.” Measurement transforms vague frustration into actionable data. Follow this precise protocol.
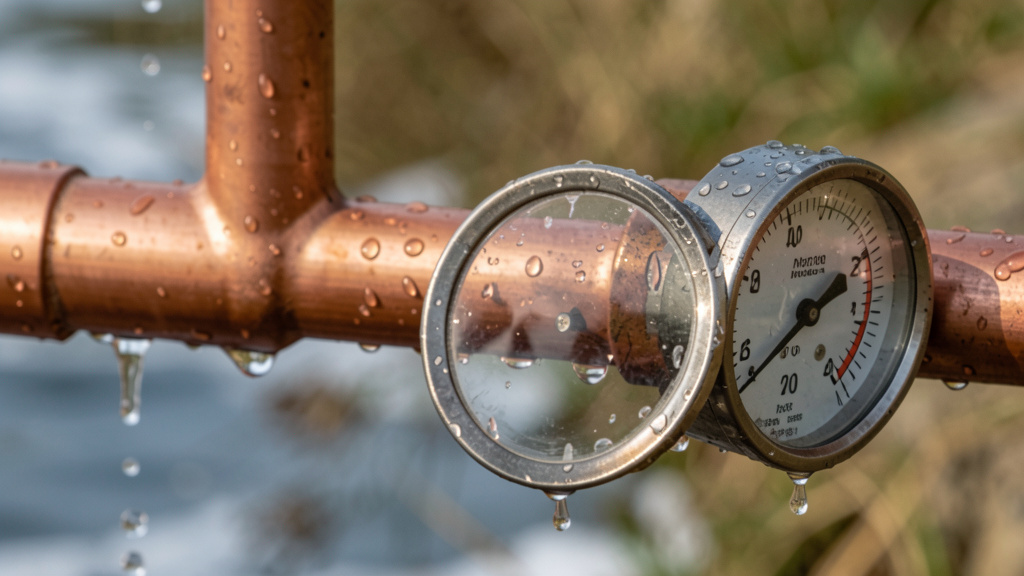
Selecting the Correct Tool: The Water Pressure Gauge
Invest in a dedicated water pressure gauge ($10–$25 at hardware stores or online). Avoid tire pressure gauges—they lack water-resistant construction, proper threading, and calibration for hydraulic measurement. Choose a gauge with:
– Dual-scale display: PSI (primary for North America) and BAR (metric reference). Helpful for understanding international appliance specs.
– Range capacity: Minimum 0–150 PSI scale. Gauges maxing at 100 PSI may not capture spikes accurately.
– Hose thread connection: Standard 3/4-inch National Pipe Thread (NPT) to fit outdoor spigots (hose bibbs) and laundry sink faucets. Verify compatibility—some older spigots use non-standard threads.
– Glycerin-filled dial (recommended): The liquid dampens needle vibration, providing a stable reading.
– Protective cage: Shields the glass face from impacts.
Pro Tip: Keep this gauge in your home maintenance toolkit permanently. Label it “Water Pressure – Do Not Use for Tires.” Its ongoing utility justifies the minimal cost.
Optimal Timing and Location for Measurement
Accuracy depends entirely on when and where you measure.
For Static Pressure (Most Critical Reading):
– When: Early morning (5:00–7:00 AM) on a weekday. Municipal demand is lowest, revealing the true incoming pressure before usage fluctuations. Avoid weekends when neighborhood irrigation systems may run.
– Where: The outdoor spigot closest to your main water shut-off valve or water meter. This location provides the purest reading of street pressure before it passes through internal valves, PRVs, or potential restrictions. If no outdoor spigot exists, use the cold water supply behind your washing machine or a utility sink faucet with threaded outlet.
– Condition: ABSOLUTELY NO WATER RUNNING ANYWHERE IN THE HOUSE. This includes:
– Toilets not refilling (add food coloring to tank; if color appears in bowl without flushing, you have a leak)
– Ice makers not cycling
– Dishwashers/washing machines off
– Irrigation systems disabled
– Dripping faucets repaired temporarily
Even a slow drip affects the reading. Static pressure measures the force at rest—the baseline your system experiences.
For Dynamic Pressure (Supplemental Context):
– When: Evening peak usage (6:00–8:00 PM).
– Where: Same spigot as static test.
– Condition: Run a shower and kitchen sink simultaneously. Note the stabilized pressure. This reveals how your system handles demand. A healthy system drops moderately (e.g., 55 PSI → 45 PSI) but remains stable. A severe drop (<30 PSI) or erratic needle indicates supply or restriction issues.
Step-by-Step Measurement Procedure
- Preparation: Confirm zero water usage. Attach gauge hand-tight to spigot. Do not overtighten—brass threads strip easily. Ensure rubber washer inside gauge connector is seated.
- Initial Reading: Open spigot valve fully and quickly. Watch the needle. A glycerin-filled gauge will settle smoothly; others may vibrate. Read straight-on to avoid parallax error.
- Stability Check: Observe needle for 60 seconds. Does it hold steady? A stable needle indicates consistent supply. A needle that drifts downward suggests a slow leak or failing PRV. A needle that pulses rhythmically may indicate a well pump issue or municipal regulator fluctuation.
- Record Data: Note: Date, Time, Static PSI, Dynamic PSI (if taken), Needle Behavior (Steady/Drifting/Pulsing). Example: “Oct 26, 7:15 AM, Static: 78 PSI, Steady needle.”
- Repeat Verification: Take two additional readings on separate mornings. Consistency confirms accuracy. Variance >5 PSI warrants investigation.
Interpreting Your Results: What the Numbers Mean
| Your Reading | Interpretation | Immediate Next Step |
|---|---|---|
| < 40 PSI | Clinically low pressure. Functional deficiencies likely. | Proceed to Step 2: Diagnose low pressure causes. Map affected fixtures. |
| 40–49 PSI | Borderline low. May suffice for small homes; problematic for multi-story or high-demand households. | Assess symptoms. If satisfied with flow, monitor annually. If issues exist, investigate restrictions. |
| 50–60 PSI | Ideal Range. Optimal balance for comfort, efficiency, longevity. | Celebrate! Implement Step 5 maintenance routine. No corrective action needed. |
| 61–79 PSI | Acceptable per code but suboptimal. Higher wear risk. | Evaluate symptoms. If water hammer or leaks occur, install/adjust PRV. If stable and symptom-free, monitor closely. |
| ≥ 80 PSI | Action Recommended. Requires evaluation to prevent accelerated wear. | Proceed to Step 3: High pressure solutions. Prioritize PRV assessment. |
| ≥ 100 PSI | Prompt Attention Advised. Elevated risk of component stress. | Contact plumber for assessment. Temporarily reduce main valve slightly (do not close fully) only if PRV installation is delayed. |
Common Measurement Pitfalls to Avoid
- Measuring with water running: Yields falsely low dynamic pressure. Static pressure is the diagnostic cornerstone.
- Using a corroded spigot: Internal rust restricts flow, giving false low reading. Clean threads or use alternative location.
- Ignoring gauge calibration: Before attaching, verify needle rests at zero. Tap gauge gently if stuck. Replace if inaccurate.
- Testing during municipal work: Construction nearby? Reschedule. Street repairs cause artificial spikes/drops.
- Misreading the scale: Confirm whether gauge uses PSI or BAR. 4 BAR = ~58 PSI. Dual-scale gauges prevent this error.
This measurement is your foundation. Write the number prominently in your home maintenance log. It is the single data point that determines every subsequent action. With it, you move from reactive frustration to proactive stewardship. Without it, decisions lack objective grounding.
Step 2: Diagnosing the Root Cause
Armed with your pressure reading, shift into detective mode. A number alone isn’t a diagnosis—it’s a clue. High pressure could mean no PRV, a failed PRV, or thermal expansion. Low pressure could stem from a clogged aerator, corroded pipes, or municipal issues. Jumping to solutions without diagnosis wastes time and resources. This structured diagnostic path isolates the true culprit. Proceed methodically. Document findings. Patience here prevents unnecessary expenses later.
Diagnosing High Pressure (Readings ≥ 80 PSI)
Primary Question: Is a Pressure Reducing Valve (PRV) installed, and is it functioning?
A PRV (bell-shaped brass device on the main line) is required by code in many jurisdictions when street pressure exceeds 80 PSI. Its absence or failure is a common high-pressure root cause.
Diagnostic Pathway:
1. Locate the PRV: Trace the main water line from entry point (basement, crawlspace, garage). Look for a dome-shaped valve (3–6 inches tall) with an adjustment screw on top, typically near the main shut-off valve or water meter.
– PRV NOT FOUND: Root cause = Unregulated municipal supply. Proceed to Step 3, Solution Path A (Install PRV).
– PRV FOUND: Continue diagnosis.
2. Inspect PRV Condition: Check for leaks, corrosion, or physical damage. Note adjustment screw position. Is locknut loose? Evidence of tampering?
3. Test PRV Functionality:
– Attach gauge to outdoor spigot.
– Have assistant open a cold water faucet (e.g., basement sink).
– Observe gauge: A functioning PRV maintains steady downstream pressure (e.g., holds at 60 PSI) despite flow.
– Pressure spikes significantly when faucet opens: PRV may be stuck open or malfunctioning.
– Pressure remains high static but drops excessively under flow: PRV may be partially restricted.
4. Check for Thermal Expansion Symptoms (Critical Distinction):
– Is high pressure only observed after water heater cycles?
– Does temperature/pressure (T&P) relief valve on water heater drip periodically?
– Does pressure gauge show normal static (e.g., 60 PSI) but spike to 90+ PSI after hot water use?
– If YES: Root cause = Thermal expansion in a closed system (PRV or check valve prevents expanded water from flowing back to main). Solution requires expansion tank (Step 3, Path C), not PRV adjustment.
5. Verify Municipal Pressure (Optional):
– Contact water utility. Request pressure reading at curb stop (street-side valve).
– If their reading is also high (e.g., 100+ PSI), confirms external source. However, a functioning PRV should still protect your home—so PRV absence/failure remains the actionable root cause.
Diagnostic Decision Tree for High Pressure:
Static Pressure ≥ 80 PSI?
│
├── PRV Installed? → NO → Root Cause: No regulation. Solution: Install PRV.
│
└── PRV Installed? → YES
     │
     ├── Pressure spikes ONLY after water heater runs? → YES → Root Cause: Thermal expansion. Solution: Install expansion tank.
     │
     └── Pressure consistently high (static & dynamic)? → YES → Root Cause: PRV malfunction/misadjusted. Solution: Adjust or replace PRV.
Diagnosing Low Pressure (Readings < 40 PSI)
Low pressure diagnosis hinges on scope: Is it isolated or systemic? Create a simple fixture map before proceeding.
Step 1: Map the Problem (5-Minute Audit)
Grab paper. Sketch your home’s layout. Test every faucet, shower, toilet. Note:
– Which fixtures have low pressure? (All? Only upstairs? Only kitchen?)
– Hot water only? Cold water only? Both?
– Does pressure drop further when multiple fixtures run? (e.g., shower weakens when toilet flushes)
– Is the issue constant or intermittent?
Interpret Your Map:
| Symptom Pattern | Likely Root Cause | Next Diagnostic Step |
|—————–|——————-|———————-|
| Single fixture only (e.g., kitchen sink) | Clogged aerator, partially closed shut-off valve | Remove/clean aerator; check valve under sink |
| All hot water fixtures | Sediment in water heater, clogged dip tube, closed heater valve | Flush water heater; inspect inlet/outlet valves |
| All cold water fixtures | Clogged main line filter, failing PRV stuck closed, municipal issue | Check main shut-off valve; contact utility |
| Whole-house, gradual decline over years | Corroded galvanized pipes (pre-1980s homes) | Inspect pipe material; check for discolored water |
| Whole-house, sudden onset | Main shut-off valve partially closed, recent plumbing work error | Verify main valve is fully open; review recent repairs |
| Pressure drops severely under demand | Undersized pipes, failing well pump, inadequate municipal supply during peak | Test dynamic pressure; contact neighbors/utility |
Step 2: Execute the 5-Minute Fixture Audit (Start Simple!)
Before assuming systemic issues, eliminate the most common culprits:
– Aerators/Showerheads: Unscrew aerator from affected faucet. Inspect screen for white crusty mineral deposits (hard water) or debris. Soak in white vinegar 30 minutes. Scrub gently with toothbrush. Rinse. Reinstall. Test flow. Repeat for showerheads. This addresses a majority of isolated “low pressure” complaints.
– Individual Shut-Off Valves: Under sinks, behind toilets, near water heater—ensure valves are fully open (turn counterclockwise until stop). Ball valves: lever parallel to pipe. Gate valves: handle turned fully counterclockwise.
– Main Shut-Off Valve: Locate main valve (near meter/entry point). Confirm fully open. A partially closed gate valve is a frequent culprit in older homes.
Step 3: Investigate Systemic Causes (If Fixture Audit Fails)
– Water Meter/Curb Stop Check: Contact water utility. Request inspection of meter screen and curb stop valve (street-side). Debris in meter or partially closed curb stop restricts whole-house flow. Utilities often perform this free.
– PRV Malfunction Check: If PRV exists, is pressure low both before and after it? (Requires two gauges or professional help). A PRV stuck closed restricts flow. Symptoms mimic low municipal pressure.
– Pipe Material Inspection: In basement/crawlspace, examine main supply line. Galvanized steel pipes (dull gray, threaded joints) corrode internally over time. Scratch surface—if shiny silver underneath, it’s galvanized. Rust-colored water when first turned on confirms internal corrosion.
– Neighbor Comparison: Ask nearby homes (same street, similar elevation) about their pressure. If all report low pressure, issue is municipal. Document readings to present to utility.
– Well System Owners: Check pressure tank air charge (Schrader valve). Should be 2 PSI below pump cut-in pressure (e.g., 38 PSI for 40/60 switch). Water spraying from valve = ruptured bladder. Listen for rapid pump cycling (“short cycling”) = waterlogged tank.
Critical Diagnostic Principle: Always progress from simplest/least invasive (aerator clean) to most complex (repiping). Document each test result. If pressure normalizes after cleaning one aerator, stop—you’ve found the cause. Avoid “solution hopping” (replacing PRV before checking valves). Methodical diagnosis saves resources and frustration.
Step 3: Solutions for High Water Pressure
Confirming pressure ≥ 80 PSI warrants evaluation. Unaddressed, it increases the risk of accelerated wear: leaking fixtures, stressed hoses, and potential component failures. The solution path depends entirely on your diagnosis from Step 2. This section details each remedy with precise steps, safety protocols, material considerations, and professional boundary markers. Prioritize solutions in this order: PRV installation/replacement → Thermal expansion mitigation → Temporary measures.
Solution Path A: Installing a New Pressure Reducing Valve (PRV)
When to Choose This Path: No PRV exists and municipal pressure is confirmed high (≥ 80 PSI). This is the definitive, permanent solution. PRVs are critical protective devices required by code in many jurisdictions where street pressure exceeds 80 PSI. They support long-term system health by preventing unnecessary stress.
Why This Works: A PRV is a spring-loaded diaphragm valve that automatically reduces incoming high pressure to a safe, preset level (e.g., 55 PSI). It requires no electricity, operates silently, and typically lasts 10–15 years with minimal maintenance. Think of it as a hydraulic governor—essential for system stability.
Tools & Materials Checklist:
– PRV (3/4-inch standard residential size; verify your pipe size). Choose models with:
– Integral strainer (catches debris to protect diaphragm)
– Bypass port (for future maintenance)
– Adjustable range (25–75 PSI typical)
– Reputable brands include Watts, Zurn, and Apollo, among others. Avoid no-name imports.
– Pipe cutter or hacksaw
– Adjustable wrenches (2), pipe wrench
– Teflon tape (pink for gas/water) or non-hardening pipe dope
– Emery cloth or sandpaper
– Shut-off valve (if not present downstream)
– Pipe support brackets
– Bucket, towels, safety glasses, gloves
– Optional but recommended: Dielectric union (if connecting copper to galvanized pipe)
Pre-Installation Safety Protocol:
1. Shut off main water supply: At house main valve. If inaccessible, contact utility to shut curb stop.
2. Relieve system pressure: Open lowest faucet in house (e.g., basement sink) + highest faucet (upstairs sink). Water will drain until pressure releases. Keep open during work.
3. Verify water is OFF: Attempt to run faucet. No flow = safe to proceed. Double-check.
4. Turn off water heater: Electric: circuit breaker. Gas: control knob to “Pilot.” Prevents thermal expansion complications during work.
5. Clear workspace: Ensure adequate lighting and room to maneuver tools.
Installation Step-by-Step:
1. Select Location: Install horizontally on main cold water line after main shut-off valve and water meter (if present), before any branch lines. Ensure 12+ inches of straight pipe upstream/downstream. Arrow on PRV body MUST point in direction of water flow (into house).
2. Cut Pipe: Use pipe cutter for clean, square cut. Remove section equal to PRV length + fittings. Deburr pipe ends inside/out with emery cloth.
3. Dry-Fit Assembly: Temporarily assemble PRV with adapters/unions. Confirm alignment, flow direction arrow, and clearance. Mark pipe for final cut if needed.
4. Apply Sealant: Wrap Teflon tape clockwise 3–5 times on all male threads. For threaded joints, apply pipe dope sparingly to female threads per manufacturer instructions.
5. Install PRV: Hand-tighten components first. Use wrenches to tighten securely—do not overtighten (brass cracks easily). Torque spec: snug plus 1/4 turn.
6. Install Bypass Valve (Highly Recommended): Add tee fittings before/after PRV with a ball valve connecting them. Allows isolating PRV for future service without shutting main water. Adds modest cost but significant future convenience.
7. Support Piping: Secure PRV and adjacent pipes with metal brackets screwed to framing. Prevents stress on connections from vibration or pipe movement.
8. Restore Water Slowly: Close drain faucets. Open main shut-off valve gradually (1/4 turn every 10 seconds). Listen for leaks. Check all joints with paper towel—moisture reveals even tiny leaks. Tighten slightly if needed.
9. Set Pressure: Attach gauge to outdoor spigot. Locate PRV adjustment screw. Turn counterclockwise to reduce pressure. Make 1/8-turn adjustments. Wait 30 seconds between turns. Target 55 PSI. Tighten locknut to secure setting.
10. Final Verification: Run water at multiple fixtures. Check for leaks. Monitor gauge for 5 minutes—pressure should remain stable at 55 PSI. Flush system by running all faucets 2 minutes to clear debris.
Critical Installation Notes:
– Flow Direction is Essential: Installing PRV backwards causes immediate malfunction. Triple-check arrow direction.
– Orientation Matters: Adjustment screw must face upward for access and proper diaphragm function.
– Thermal Expansion Consideration: If your system has a check valve (common with backflow preventers) or PRV creates a “closed system,” install an expansion tank on water heater cold line before restoring water (see Path C). Skipping this may lead to pressure spikes during heating cycles.
– Code Compliance: Many jurisdictions require permits/inspections for main line modifications. Check local regulations. A licensed plumber handles this seamlessly.
When to Hire a Professional:
– Uncertainty about pipe material/type (lead, Orangeburg, etc.)
– No accessible main shut-off valve inside house
– Local code requires licensed installer
– PRV location requires cutting into finished walls
– Discomfort with soldering (if using copper sweat connections)
– Presence of lead pipes or asbestos insulation (do not disturb)
Cost Context: DIY PRV cost: $75–$150 (valve + parts). Professional installation: $300–$800. This investment supports long-term system integrity and may prevent costly repairs. View it as proactive home maintenance.
Solution Path B: Adjusting or Replacing an Existing PRV
Adjustment Protocol (For Slightly High Pressure):
Only attempt if PRV is accessible, corrosion-free, and adjustment screw moves freely.
1. Attach pressure gauge to outdoor spigot.
2. Loosen locknut on adjustment screw with wrench.
3. Turn screw counterclockwise 1/8 turn. Wait 30 seconds.
4. Check gauge. Repeat until 55 PSI achieved.
5. Tighten locknut securely.
6. Test flow at multiple fixtures.
Caution: If screw is frozen, stripped, or pressure doesn’t change after 1/2 turn, PRV may be malfunctioning—proceed to replacement. Forcing adjustment causes damage.
Replacement Protocol (For Malfunctioning PRV):
Follow Solution Path A installation steps, substituting “remove old PRV” for “cut pipe.” Additional steps:
– Photograph old PRV orientation before removal.
– Clean pipe threads thoroughly after removal.
– Match new PRV size/type exactly to old unit (take old unit to store).
– Consider upgrading to model with integral strainer/bypass.
– After installation, flush system thoroughly—debris from old PRV may contaminate lines.
Solution Path C: Addressing Thermal Expansion (Expansion Tank Installation)
When This Applies: Pressure spikes only after water heater cycles (e.g., static 60 PSI → spikes to 95 PSI post-heating), T&P valve drips periodically, PRV or check valve creates a “closed system.” This is distinct from consistently high static pressure. Installing a PRV alone won’t resolve this—it requires an expansion tank.
Why It Happens: Water expands ~2% when heated. In open systems, expanded water flows back to main line. In closed systems (PRV/check valve blocks backflow), expansion has nowhere to go—pressure spikes occur. An expansion tank absorbs this expansion.
Expansion Tank Selection:
– Size: 2-gallon tank for 40–50 gallon water heaters; 5-gallon for 60+ gallon heaters.
– Pre-charge: Must match your home’s static water pressure (e.g., 55 PSI tank for 55 PSI system). Verify with tire gauge before installation.
– Type: Diaphragm-style (not bladder) for residential use. Reputable brands include Amtrol and Watts, among others.
Installation Steps:
1. Turn off main water and water heater power/gas. Open hot water faucet to relieve pressure.
2. Install tee fitting on cold water inlet line to water heater (within 3 feet of heater).
3. Mount tank vertically (air side up) to tee using short nipple. Secure with strap to nearby framing—tank becomes heavy when full.
4. Critical: Pre-charge tank air side to match static water pressure before connecting to water line. Use bicycle pump on Schrader valve. Undercharged = ineffective; overcharged = won’t accept water.
5. Slowly restore water. Check for leaks.
6. Verify operation: After water heater completes full heating cycle, check pressure gauge. Spike should be minimized. Press Schrader valve—air should hiss (water spray = ruptured diaphragm; replace tank).
Maintenance: Test annually. Tank should feel warm on water side, cool on air side. If water sprays from Schrader valve, replace immediately. Tanks typically last 5–10 years.
Budget and Emergency Considerations
- Temporary Mitigation (Not Recommended Long-Term): Slightly closing main shut-off valve reduces flow but does NOT regulate pressure. Risks inconsistent flow and does not protect against spikes. Use only as absolute last resort until PRV installed.
- Municipal Pressure Inquiry: If street pressure is high (>100 PSI) and utility is unresponsive, file formal inquiry with local building department. Cite IRC Section P2912.1 (requires PRV if street pressure >80 PSI in many jurisdictions). Document your readings.
- Renter’s Note: Report high pressure to landlord immediately in writing. Provide gauge reading. Landlords are typically responsible for providing safe, functional plumbing. High pressure may relate to habitability standards in your jurisdiction.
Addressing high pressure is proactive stewardship. The investment in a PRV or expansion tank supports the longevity and safety of your home’s plumbing system. Proceed with confidence using this precise roadmap.
Step 4: Solutions for Low Water Pressure
Low pressure solutions are highly targeted—what fixes a clogged aerator won’t resolve corroded pipes. Match the remedy precisely to your diagnostic findings from Step 2. This section progresses logically from simplest/cheapest fixes to complex systemic solutions. Always start at the top of the relevant path. Success often lies in the first step.
Solution Path A: Fixing Isolated Fixture Issues (Clogged Aerators & Showerheads)
Applies When: Low pressure affects only one fixture (e.g., kitchen sink weak, others strong). This addresses the most common cause of isolated low pressure complaints. Mineral deposits from hard water accumulate on fine mesh screens, restricting flow. Prevention is easier than cure—clean annually.
Deep-Cleaning Protocol:
1. Removal: Wrap pliers jaws with cloth/tape to protect finish. Turn aerator counterclockwise. Most unscrew by hand. For stubborn units, use adjustable wrench on flats. Showerheads: Unscrew connector nut at shower arm.
2. Disassembly: Lay parts on towel in order. Typical aerator: Outer shell → Flow restrictor (plastic disk with tiny holes) → Screen filter → Washer. Showerheads may have internal screen near connection.
3. Descaling: Submerge all parts in white vinegar (or CLR for severe buildup). Soak 30+ minutes. For heavy deposits, simmer parts in vinegar 10 minutes (do not boil plastic parts).
4. Scrubbing: Use soft toothbrush to gently clean screen mesh and flow restrictor holes. Never use pins/needles—enlarging holes violates water efficiency standards and causes splashing.
5. Rinse & Reassemble: Flush thoroughly under running water. Reassemble in reverse order. Hand-tighten only.
6. Test: Run water. Flow should improve noticeably. If not, repeat soak or replace aerator.
Replacement Guidance:
– Aerators: Cost $2–$15. Choose flow rate: Bathroom sinks 1.0–1.5 GPM; Kitchen sinks 1.8–2.2 GPM. Look for “pressure-compensating” models—they maintain consistent flow across pressure ranges.
– Showerheads: Cost $15–$50. Select “high-efficiency” (≤2.0 GPM) with “pressure-boosting” technology (air infusion, laminar flow). Reputable options include models from High Sierra and Oxygenics, among others. Avoid “massage” settings—they reduce effective flow.
– Pro Tip: Keep spare aerators on hand. Replacement takes minutes versus cleaning time.
Prevention Strategy:
– Install aerators with removable screens for easy future cleaning.
– In hard water areas (>7 grains hardness), consider a whole-house water softener. Reduces mineral buildup throughout plumbing.
– Schedule aerator/showerhead cleaning every 6 months as routine maintenance.
Solution Path B: Addressing Whole-House Low Pressure
Sub-Solution B1: Valve Verification (5-Minute Fix)
- Main Shut-Off Valve: Confirm fully open. Gate valves: Turn counterclockwise until stop (do not force). Ball valves: Lever parallel to pipe.
- PRV Bypass Valve (if installed): Ensure bypass is closed. An open bypass renders PRV ineffective.
- Water Heater Valves: Verify inlet/outlet valves fully open.
Impact: A partially closed main valve can reduce pressure significantly. This single check resolves many “sudden onset” low pressure cases.
Sub-Solution B2: Water Heater Flushing (For Hot-Water-Only Low Pressure)
Sediment buildup restricts flow from tank. Annual flushing prevents this.
Flushing Procedure:
1. Turn off power (electric: breaker; gas: “Pilot” setting). Turn off cold water supply valve to heater.
2. Connect garden hose to drain valve. Run to floor drain/outside.
3. Open hot water faucet upstairs (allows air into system).
4. Open drain valve. Water/sediment flows out. Caution: Initial water may be hot.
5. When tank empties, briefly open cold water supply to stir remaining sediment. Drain again. Repeat until water runs clear (5–15 minutes).
6. Close drain valve. Remove hose. Turn cold water supply back on. Wait for tank to refill (hot faucet runs steadily).
7. Restore power/gas.
Result: Restores full hot water flow. Supports heater efficiency and longevity.
Sub-Solution B3: PRV Replacement (For PRV Stuck Closed)
If diagnosis confirms PRV is restricting flow (whole-house low pressure, PRV present), replacement is required. Follow Step 3, Solution Path B replacement protocol. Set new PRV to 55 PSI. Do not attempt to “force open” a stuck PRV—it may fail.
Sub-Solution B4: Corroded Pipe Remediation (Galvanized Steel Systems)
Applies When: Gradual pressure decline over years + rust-colored water + pre-1980s home + galvanized pipes confirmed. Internal corrosion narrows pipe diameter.
Solution: Repiping
– Materials: PEX-A (Uponor) is ideal for many: flexible, freeze-resistant, fewer connections. Copper is durable but requires soldering skills. CPVC is budget option but less flexible.
– Scope Strategy:
– Whole-house: Ideal but disruptive/costly ($4,000–$15,000+). Requires wall/floor access. Best during major renovation.
– Critical zones first: Repipe kitchen/bath hot water lines initially. Prioritize areas with worst corrosion.
– Professional Strongly Recommended: Repiping requires permits, pressure testing, and code compliance. Licensed plumbers have specialized tools (PEX crimpers, manifolds) and expertise. Get multiple quotes. Verify license/insurance.
– Temporary Mitigation (Not a Fix): Install pressure booster pump (see B5) to compensate for restriction. Does not stop corrosion progression. Monitor closely for leaks.
– Critical Warning: Do not attempt chemical pipe descaling in severely corroded pipes—it can dislodge rust chunks, causing blockages. Repiping is the only permanent solution.
Sub-Solution B5: Pressure Booster Pump Installation
Applies When: Confirmed low municipal supply (utility verifies) OR well system cannot meet demand OR multi-story home with inadequate upper-floor pressure.
How It Works: Pump activates when pressure drops below set point (e.g., 40 PSI), boosting to target pressure (e.g., 60 PSI). Includes pressure tank (reduces pump cycling) and pressure switch.
Critical Sizing Factors:
– Incoming pressure (measured)
– Required boost (target PSI – incoming PSI)
– Peak demand flow rate (GPM): Calculate by adding flow of fixtures likely used simultaneously (e.g., 2 showers @ 2.0 GPM + kitchen sink @ 1.8 GPM = 5.8 GPM minimum)
– Undersized pump: Fails to boost adequately. Oversized pump: May cause water hammer, wastes energy. Consult pump supplier with your data.
Installation Reality Check:
– Electrical Work Required: Dedicated circuit, GFCI protection. Must comply with NEC.
– Plumbing Modifications: Requires cutting main line, installing check valve, pressure tank.
– Permits & Inspection: Almost always required.
– Professional Installation Strongly Recommended: Incorrect installation risks water hammer, pipe damage, or electrical hazards. Cost: $800–$2,500 installed.
– Well System Note: For wells, first try adjusting pressure switch settings (increase cut-in/cut-out pressures). If pump cycles rapidly or can’t maintain pressure, consult well specialist—may indicate failing pump or low well yield.
Budget-Conscious Alternatives & Workarounds
- Perception Boost (No Cost): Clean all aerators/showerheads. Install high-efficiency fixtures with “pressure-compensating” tech. Creates stronger sensation of flow without increasing actual GPM.
- Demand Management: Stagger high-water-use activities (don’t run dishwasher while showering). Install low-flow toilets (1.28 GPF) to reduce demand spikes.
- Community Advocacy: If neighborhood-wide low pressure, organize neighbors. Present documented pressure logs to utility. Request infrastructure assessment. Collective action often triggers municipal upgrades.
- Renters: Report low pressure to landlord in writing. Cite local housing codes regarding minimum pressure requirements. Landlord must investigate/repair. Document all communication.
Solving low pressure delivers immediate quality-of-life improvements. A reliable shower, efficient appliances, and consistent flow restore comfort and confidence. By matching the solution precisely to your diagnosis, you avoid wasted effort and achieve lasting results. Celebrate each victory—cleaning one aerator is a successful repair.
Step 5: Maintaining Ideal Pressure
Achieving ideal pressure is just the beginning. Proactive maintenance preserves your investment, prevents future issues, and provides early warning of developing problems. Integrate these simple practices into your annual home care routine. Think of it as an annual check-up for your plumbing system—quick, non-invasive, and invaluable.
The Annual Water Pressure Check-Up (15 Minutes)
Schedule this each spring (or on a memorable date).
- Static Pressure Test: Early morning, no water running. Attach gauge to primary test spigot. Record PSI. Note needle behavior (steady/drifting).
- Dynamic Pressure Test (Optional): Run shower + kitchen sink. Note stabilized PSI. Should drop moderately but remain >35 PSI.
- PRV Visual Inspection: Check for leaks, corrosion, or damage. Verify locknut tight on adjustment screw.
- Expansion Tank Test (If Installed): Press Schrader valve. Air should hiss. Water spray = replace tank immediately.
- Log Results: Maintain simple log:
Date | Static PSI | Dynamic PSI | Observations
4/15/2024 | 56 PSI | 48 PSI | Steady needle
4/15/2025 | 58 PSI | 50 PSI | Slight upward trend
Trends matter more than single readings. Gradual pressure increase suggests PRV wear; gradual decrease suggests developing restrictions.
Fixture & Appliance Maintenance Cycle
- Quarterly (3 Minutes per Fixture): Remove and rinse aerators/showerheads under tap. Prevents minor buildup from becoming major restriction.
- Biannually: Inspect washing machine/dishwasher inlet hoses for bulges, cracks, or leaks. Replace rubber hoses with stainless steel braided hoses ($15/pair)—they resist bursting.
- Annually:
- Flush water heater (see Step 4, B2).
- Clean appliance inlet screens: Turn off water to washer/dishwasher. Disconnect hoses. Clean small screens inside hose connectors with toothpick/vinegar. Prevents slow-fill errors.
- Test T&P relief valve on water heater: Lift lever briefly. Should release water then reseal tightly. Replace if leaking or stiff.
- Every 5 Years: Replace washing machine hoses regardless of appearance. Industry standard for leak prevention.
Seasonal Considerations
- Winter (Cold Climates):
- Insulate exposed pipes in basement, crawlspace, garage. Use foam pipe sleeves ($0.50/ft).
- Disconnect garden hoses. Frost-proof spigots can still freeze if hose left attached.
- Know location of main shut-off valve. Practice turning it off. Critical if pipe bursts.
- Spring:
- Before activating irrigation system, check backflow preventer pressure requirements. High pressure damages sprinkler heads; low pressure causes poor coverage.
- Inspect outdoor spigots for leaks after winter.
- Vacation Protocol:
- For absences >1 week: Shut off main water supply. Relieves constant pressure on system.
- Upon return: Open faucets starting lowest point (basement) to highest (upstairs). Slowly turn main valve on. Flush system 2 minutes. Check for leaks.
When to Reassess Your System
Trigger a full diagnostic review if:
– Adding significant water demand (new bathroom, kitchen remodel, irrigation system)
– Installing whole-house filter/softener (can introduce slight pressure drop; verify sizing)
– Noticing new symptoms: increased pipe noise, new leaks, flow changes
– Household size changes significantly (more residents = higher peak demand)
– After any major plumbing repair or replacement
Maintenance transforms pressure management from crisis response to confident stewardship. These small, consistent actions compound into years of reliable performance, water savings, and peace of mind. Your annual check-up takes less time than mowing the lawn—but protects a far more valuable asset.
Special Scenarios: Wells, Municipal Variability, and Multi-Story Homes
Core principles apply universally, but unique home setups require tailored approaches. This section addresses three common scenarios where standard protocols need adaptation. Apply the Goldilocks Framework first—then layer in these scenario-specific insights.
Scenario 1: Private Well Systems
Well owners manage their entire pressure system. Low pressure is a common concern, but pressure instability and pump issues require specific understanding.
Critical Components & Functions:
– Pressure Tank: Stores pressurized water to minimize pump cycling. Contains air bladder. Waterlogged tank (bladder failed) causes rapid “short cycling”—pump turns on/off constantly for small water uses.
– Pressure Switch: Activates pump at “cut-in” pressure (e.g., 40 PSI), deactivates at “cut-out” (e.g., 60 PSI). Adjusting these settings changes operating range.
– Pump: Must match well yield (GPM) and home demand. Undersized pump = pressure drops during use. Failing pump = slow recovery or no pressure.
– Check Valve: Prevents water from flowing back down well pipe. Failure causes loss of prime or pressure drop.
Diagnosing Common Well Pressure Issues:
| Symptom | Likely Cause | Diagnostic Step |
|———|————–|—————–|
| Pressure drops during use, pump runs continuously | Low well yield, undersized pump, waterlogged tank | Run water. If pressure drops to cut-in and pump runs >2 mins without recovering, suspect yield/pump. Check tank air charge. |
| Pump cycles on/off rapidly (every 10-30 sec) | Waterlogged pressure tank (no air cushion) | Turn off power. Drain tank completely. Check air charge at Schrader valve—it should be 2 PSI below cut-in pressure (e.g., 38 PSI for 40/60 switch). No air/water spray = replace tank. |
| Pressure fluctuates wildly (40 → 65 → 45 PSI) | Failing pressure switch, air leak in tank | Observe gauge while running water. Erratic needle suggests switch malfunction. |
| No pressure, pump silent | Power issue, pressure switch failure, pump failure | Check circuit breaker. Tap pressure switch lightly (sometimes frees stuck contacts). If pump hums but no water, loss of prime or well issue. |
Solutions Tailored for Wells:
– Adjusting Pressure Switch: Only if comfortable with electrical work. Turn off power. Remove switch cover. Two nuts adjust cut-in/cut-out. Turn clockwise to increase pressure. Maintain 20 PSI differential (e.g., 40/60, 50/70). Do not exceed tank max rating (usually 70 PSI). Test after adjustment. If unsure, hire well specialist.
– Replacing Waterlogged Tank: Match gallon size to pump HP (e.g., 4.5 gal for 1/2 HP pump). Pre-charge new tank to 2 PSI below desired cut-in before installation.
– Constant Pressure System Upgrade: Replace standard switch/tank with variable speed drive (VSD) pump system. Maintains consistent pressure (e.g., 55 PSI) regardless of demand. Reduces pump wear, quieter operation. Investment: $1,800–$3,500. Ideal for large homes or pressure-sensitive appliances.
– Low Yield Mitigation: If well can’t keep up with demand: Install larger storage tank (100+ gal) with float switch; add secondary recovery pump; consult well driller about options. Requires professional assessment.
Critical Safety Protocol for Wells:
– ALWAYS turn off electrical power at breaker before touching pressure switch, tank, or pump connections.
– Well pumps use high-voltage circuits. If uncomfortable with electrical components, hire a certified well contractor.
– Test well water annually for bacteria/nitrates—pressure issues can sometimes correlate with water quality events.
Scenario 2: Municipal Supply with Variable Pressure
Even connected to city water, pressure isn’t always constant. Peak usage (mornings/evenings), firefighting, main breaks, or infrastructure work cause fluctuations. You can’t control the street—but you can buffer your home.
Stabilization Strategies:
– PRV as Stabilizer: A properly set PRV doesn’t just reduce high pressure—it smooths fluctuations. If street pressure swings between 50–90 PSI, a PRV set to 55 PSI delivers consistent 55 PSI to your home. This is a key benefit often overlooked. Ensure PRV is functioning correctly (Step 2 diagnosis).
– Small Buffer Tank: Install a 2–5 gallon pressure tank after the PRV on the main line. During brief demand spikes or municipal dips, the tank supplies supplemental water, preventing momentary drops. Particularly valuable for homes at end of municipal line or with known instability.
– Utility Communication Protocol:
1. Document fluctuations with pressure log (date, time, PSI).
2. Contact neighbors—confirm if issue is widespread.
3. Call water utility with data: “My pressure drops to 35 PSI between 6–8 PM daily. Neighbors on [Street] report same.”
4. Request inspection of district pressure regulator. Utilities have incentive to maintain stable pressure.
5. Escalate to public works director if unresolved. Persistent low pressure may relate to service agreements.
Scenario 3: Multi-Story Homes
Gravity reduces pressure approximately 0.433 PSI per foot of elevation gain. A faucet on the second floor (10 ft above main line) experiences ~4.3 PSI less pressure than a basement faucet. In homes with marginal incoming pressure (45 PSI), upper floors may suffer.
Diagnosis First:
– Measure pressure on lowest floor (basement) and highest floor (master bath).
– Normal difference: 8–15 PSI between floors.
– Problem indicator: Lowest floor pressure < 45 PSI or highest floor pressure < 30 PSI during use.
Solutions by Severity:
– Mild Imbalance (Lowest floor ≥ 50 PSI):
– Install high-efficiency, pressure-compensating showerheads/aerators on upper floors.
– Ensure supply lines to upper floors are adequately sized (3/4-inch risers, not 1/2-inch).
– Moderate Imbalance (Lowest floor 40–49 PSI):
– Install whole-house pressure booster pump (see Step 4, B5). Elevates pressure for entire home.
– Verify PRV isn’t set too low—adjust to 58 PSI if system allows.
– Severe Imbalance (Lowest floor < 40 PSI or multi-story >2):
– Zoned Pressure System: Advanced solution. Install booster pump dedicated to upper floors, with PRV on lower floors to prevent excessive pressure downstairs. Requires professional design/installation.
– During Renovation: Specify larger diameter pipes for upper-floor supply lines. Install manifold system with home-run PEX lines to minimize pressure loss.
Design Tip for Future Projects: When planning additions or major remodels, consult a plumber early about pressure requirements for upper levels. Proper pipe sizing and strategic pump placement prevent issues before walls close.
These scenarios prove the framework’s flexibility. Whether drawing from a well, connected to city mains, or spanning multiple stories, the process remains: measure → diagnose → solve → maintain. Adapt the tools to your context, and you’ll achieve balanced pressure throughout your living space.
Safety First: When to Call a Professional
Competence includes knowing your limits. Certain situations require licensed expertise—not as a luxury, but as a non-negotiable safety consideration. Attempting complex repairs without proper training, tools, or authorization risks serious consequences: flooding, structural damage, electrocution, or gas leaks. This section defines clear boundaries. When these indicators appear, stop work and contact a qualified professional immediately. This isn’t failure—it’s responsible homeownership.
Red Lines: Call a Professional Immediately
- Major Leak or Suspected Burst Pipe: Rushing water inside walls, significant pooling, or sudden unexplained water bill spike. Action: Shut off main water supply. Call plumber and water damage restoration company if flooding occurred.
- Water Heater Malfunctions Beyond Flushing: Tank leaking, loud rumbling/knocking noises, T&P valve discharging water continuously, or rotten egg smell (indicates bacterial growth). Action: Shut off water and power/gas. Call plumber. Water heaters operate under high pressure/temperature—professional assessment is essential.
- Electrical Components Involved: Installing pressure booster pumps, working on well pump systems, replacing pressure switches, or any task requiring electrical wiring. Action: Hire licensed plumber and electrician if needed. Water + electricity = serious hazard.
- Gas Line Proximity: Any plumbing work near gas lines (common in basements with gas water heaters/furnaces). Action: Stop work. Contact plumber. Accidentally nicking a gas line causes explosion/fire risk.
- Sewer Line Symptoms: Low water pressure combined with slow drains, gurgling sounds, sewage odors, or backups. Action: Call plumber with sewer camera capability. Do not use chemical drain cleaners—they can damage pipes.
- Suspected Hazardous Materials: Homes built before 1986 may contain lead pipes. Pre-1980s insulation may contain asbestos. Action: If pipes are dull gray (lead) or wrapped in white fibrous material (asbestos), STOP. Contact certified abatement professional. Do not cut, sand, or disturb.
- Code Compliance Requirements: Most jurisdictions require permits/inspections for:
- Main water line modifications
- PRV installation/replacement
- Water heater replacement
- Booster pump installation
- Repiping projects
Action: Hire licensed plumber. They handle permitting and ensure code compliance. DIY work violating code can complicate insurance or home sales. - Persistent Issues After DIY Attempts: Followed diagnostic steps, implemented solutions, but problem remains or worsens. Action: Call plumber. Continuing to guess wastes resources and risks exacerbating the issue. Professionals have advanced tools (video scopes, pressure data loggers) and experience with elusive problems.
Choosing a Qualified Professional: A Practical Checklist
- Verify Credentials: Confirm state/local plumbing license is current. Ask for license number; verify online with licensing board. Ensure general liability insurance and workers’ compensation coverage. Request certificate of insurance.
- Specialization Matters: For well systems, hire a certified well contractor. For complex repiping, seek plumbers specializing in your pipe type (PEX, copper).
- Get Detailed Quotes: For non-emergencies, obtain written estimates from multiple plumbers. Quotes should include:
- Scope of work (step-by-step)
- Materials specified (brand/model)
- Labor cost and timeline
- Warranty details (workmanship + parts)
- Permit responsibilities
Beware quotes significantly below others—they may cut corners. - Check References: Ask for recent clients with similar projects. Call them. Ask: “Were they on time? Clean? Explain issues clearly? Stand behind their work?”
- Emergency Preparedness: Identify a trusted plumber before emergencies strike. Save their number. Ask about after-hours rates and response time. A pre-vetted professional provides calm during crises.
- Warranty Clarity: Reputable plumbers warranty workmanship (typically 1 year) and may offer extended parts warranties. Get warranty terms in writing. Avoid companies refusing written warranties.
The True Value of Professional Expertise
A skilled plumber delivers more than a quick fix:
– Holistic Diagnosis: “While replacing your PRV, I noticed corrosion starting on this adjacent joint. Let’s address it now to prevent a leak next winter.”
– Code-Compliant Solutions: Ensures work meets local regulations, protecting your safety and home value.
– Long-Term Cost Savings: Correct diagnosis prevents repeated repairs. Quality materials and installation last longer.
– Peace of Mind: Knowing critical systems are handled by experts reduces stress.
Viewing professional help as an investment reframes the decision. A service call can prevent significant damage. Your safety and your home’s integrity are paramount. When in doubt, call a professional. It is the most responsible choice you can make.
Your Questions, Answered
These FAQs address real-world concerns gathered from homeowner resources, plumbing service patterns, and municipal water departments. Answers blend technical accuracy with practical advice.
Q: How often should I check my home’s water pressure?
A: Perform a full static pressure check annually during spring maintenance. Additionally, check anytime you notice flow changes (weaker shower, new pipe noises) or after plumbing work. Homes with known PRV issues or pressure history should check every 6 months. Consistency in logging reveals trends before problems escalate.
Q: My gauge reads 70 PSI. Is that too high?
A: While 70 PSI falls within the IRC/UPC allowable maximum (80 PSI), it resides at the higher end of acceptable. Consistently operating at 70+ PSI may accelerate wear on seals, valves, and appliance components. If you experience water hammer, premature leaks, or higher water usage, installing or adjusting a PRV to 55–60 PSI is recommended for long-term system health. If pressure is stable and symptom-free, monitor closely—but recognize the elevated stress profile.
Q: Can I adjust my PRV myself?
A: Minor adjustments to an accessible, corrosion-free PRV are feasible for handy homeowners. Use a pressure gauge to monitor changes. Turn adjustment screw counterclockwise in 1/8-turn increments to reduce pressure. Wait 30 seconds between adjustments. Secure locknut after achieving target (55 PSI). Stop immediately if the screw is frozen, stripped, or pressure doesn’t change—this indicates PRV malfunction requiring replacement. If the PRV is over 10 years old, replacement is often more reliable than adjustment. When uncertain, hire a plumber.
Q: Why does pressure drop significantly when I flush the toilet?
A: A brief, minor dip is normal due to sudden demand. However, a severe drop (shower becomes a trickle) lasting >15 seconds indicates inadequate supply capacity. Common causes: undersized pipes (common in older homes), a PRV restricting flow, low municipal pressure during peak hours, or (in well systems) an undersized pressure tank or pump struggling to keep up. Diagnose using the fixture mapping technique in Step 2. Solutions range from cleaning aerators (if isolated) to installing a booster pump (if systemic).
Q: Is low water pressure a health or safety hazard?
A: While low pressure itself isn’t a direct contaminant, it creates indirect risks:
– Compromised backflow prevention: Irrigation systems and certain appliances require minimum pressure to prevent contaminated water from siphoning into your drinking supply.
– Inadequate fire sprinkler operation: Most residential sprinklers require minimum pressure to activate properly.
– Hygiene challenges: Weak shower flow may hinder effective rinsing.
Address persistent low pressure promptly to ensure all safety systems function as designed.
Q: Will a water softener reduce my water pressure?
A: A properly sized softener causes negligible pressure drop (1–2 PSI). However, an undersized unit for your home’s flow rate, or a resin bed clogged with iron/sediment, can restrict flow significantly. Choose a softener rated for your household’s peak demand (measured in grains capacity and flow rate GPM). Maintain it per manufacturer instructions—regenerate regularly, clean brine tank annually. If pressure drops after installation, have the installer verify sizing and check for clogs.
Q: What’s the difference between water pressure (PSI) and water flow (GPM)?
A: This critical distinction clarifies many misconceptions:
– Pressure (PSI): The force pushing water through pipes. Measured with a pressure gauge. Determines how “hard” water comes out.
– Flow (GPM): The volume of water moving past a point per minute. Measured by timing how long to fill a 1-gallon container. Determines how “much” water comes out.
High pressure does not guarantee high flow—if pipes are clogged or undersized, pressure may read high at the source but flow at the fixture is low. Conversely, large-diameter pipes with moderate pressure can deliver high flow. Both metrics matter for diagnosis. Your pressure gauge measures PSI; a stopwatch and bucket measure GPM.
Q: Can high water pressure increase my water bill?
A: Yes. Higher pressure forces more water through fixtures per minute. Example: A showerhead flowing at 2.0 GPM at 60 PSI may flow higher at 90 PSI. That extra volume accumulates. Studies indicate households reducing pressure from 100 PSI to 60 PSI can achieve water savings in the range of 10–15%, lowering both water and wastewater bills. Installing a PRV supports conservation.
Q: My neighbor has great pressure, but mine is low. Why?
A: Many hyper-local factors create differences:
– Elevation: Homes lower on a slope receive higher pressure from gravity.
– Pipe condition: Your home may have corroded galvanized pipes while your neighbor’s were recently repiped.
– PRV settings: Your neighbor’s PRV may be set higher, or they lack one if street pressure is moderate for their location.
– Meter/curb stop: Debris in your meter screen or a partially closed curb stop valve restricts flow.
– Internal restrictions: Clogged aerators or valves specific to your home.
Diagnose your own system systematically using Step 2. Direct comparison is rarely useful—focus on your home’s specific metrics and symptoms.
Q: Is lower pressure normal in winter?
A: In some regions, yes. Municipalities may reduce system pressure during freezing months to minimize main line break risks. Additionally, frozen ground can slightly constrict shallow supply lines. For well systems, frozen ground may reduce aquifer yield. If the drop is significant:
– Check for frozen pipes in your home (feel for cold spots on pipes; thaw with hairdryer never open flame).
– Insulate exposed pipes.
– Contact your utility to inquire about seasonal pressure adjustments.
Persistent low pressure warrants investigation—don’t assume it’s “just winter.”
Q: Can I install a permanent pressure gauge for monitoring?
A: Yes—and it’s recommended for homes with pressure history. Install a glycerin-filled gauge with protective cage on an outdoor spigot or main line using a tee fitting. Choose a gauge rated for continuous duty (0–100 PSI range). This allows instant visual checks without attaching a separate gauge. Ensure installation location won’t be damaged by weather or activity. A permanent gauge is a small investment for ongoing peace of mind.
Q: What should I do about loud banging pipes (water hammer)?
A: Water hammer indicates pressure dynamics or sudden valve closures. First, check static pressure—if ≥ 80 PSI, address high pressure with a PRV (Step 3). If pressure is good:
– Install water hammer arrestors near offending fixtures (typically washing machine, dishwasher, toilet fill valves). These small devices absorb shock waves.
– Ensure pipes are securely strapped to framing with cushioned clamps to minimize movement.
– Replace quick-closing toilet fill valves with slow-closing models.
Persistent water hammer requires professional evaluation—it can stress pipes over time. Do not ignore it.
These answers provide a foundation, but every home has unique characteristics. When questions arise, consult this guide’s diagnostic framework or seek advice from a qualified plumbing professional. Knowledge empowers—but wisdom knows when to call for support.
Conclusion and Next Step
Water pressure management sits at the intersection of daily comfort, system longevity, and resource stewardship. Throughout this guide, we’ve moved deliberately from foundational understanding to actionable mastery. You now possess a complete framework: the Goldilocks Zones for contextualizing pressure, precise measurement protocols to replace guesswork, a diagnostic pathway to isolate root causes, targeted solutions matched to specific scenarios, and a maintenance rhythm to sustain ideal conditions. This isn’t merely about fixing a weak shower or noisy pipes—it’s about cultivating a proactive relationship with your home’s infrastructure. Each step you take reinforces resilience, conserves resources, and protects your investment.
Recap: The Five Pillars of Pressure Mastery
- Measure Objectively: Your pressure gauge is your most valuable tool. Static pressure reading is the non-negotiable starting point for all decisions.
- Diagnose Systematically: Map symptoms, eliminate simple causes first, and trace the path to the true root cause. Avoid solution-hopping.
- Solve Precisely: Match the remedy to the diagnosis—clean an aerator for isolated low flow, install a PRV for high pressure, flush the water heater for hot-water-only issues.
- Maintain Proactively: Integrate the annual pressure check-up and fixture cleaning into your home care routine. Small actions prevent major failures.
- Respect Boundaries: Know when to call a professional. Safety, code compliance, and complex systems demand licensed expertise. This is wisdom, not weakness.
The 24-Hour Rule: Your Immediate Action Step
Knowledge without action yields no results. Within the next 24 hours, complete this single, concrete step:
Locate your most accessible outdoor spigot or laundry sink faucet. Attach a water pressure gauge (purchase one today if needed). Tomorrow morning between 5:00–7:00 AM, with NO water running anywhere in your house, measure and record your static water pressure. Write the number prominently in your home maintenance log or on your refrigerator.
That number—whether 42 PSI, 78 PSI, or 55 PSI—is your truth. It holds the key to your next move. If outside the ideal range, you now have the roadmap to address it confidently. If perfect, you’ve gained documented peace of mind and a baseline for future monitoring. This act transforms you from a passive experiencer of plumbing issues into an informed steward of your home’s systems. There is immense power in that shift.
The Big Picture: Pressure as a Vital Sign
View water pressure not as an isolated metric, but as a vital sign of your home’s overall plumbing health. Just as a physician monitors blood pressure to assess cardiovascular risk, your annual pressure check reveals early warnings: a creeping increase signals PRV wear; a gradual decrease hints at developing restrictions; sudden fluctuations suggest external changes. By mastering this aspect, you contribute to a larger philosophy of attentive homeownership—where observation leads to understanding, understanding informs action, and consistent small actions compound into decades of reliable performance. This mindset extends beyond plumbing: it cultivates patience, precision, and respect for the systems that sustain daily life. You conserve water, support system longevity, extend appliance lifespans, and create a more comfortable, efficient home environment. Share this knowledge with neighbors, friends, or family members. Water pressure challenges are universal; empowered homeowners build stronger, more resilient communities. Return to this guide whenever questions arise—it is designed to be a lasting reference. Here’s to the quiet confidence of a home where water flows exactly as it should: reliably, efficiently, and just right.
Explore Our Complete Home Systems Mastery Series:
Understanding Your Home’s Plumbing Blueprint: Pipes, Valves, and Fixtures Decoded | The Ultimate Guide to Water Heater Maintenance and Longevity | Preventing and Fixing Common Household Leaks: A Room-by-Room Strategy | Smart Water Monitoring: Devices and Daily Habits for Conservation | The Seasonal Home Maintenance Checklist: Spring, Summer, Fall, Winter